Getting things rolling with Submarine on your Shopify Plus store.
1. Theme quick-start
Submarine has a comprehensive API that allows theme developers to integrate it seamlessly into any Shopify theme. Some use cases include:
- supporting regular and campaign purchases on the product page;
- exposing detailed campaign options on cart pages; and
- building out beautiful portals for customers to manage their purchases.
However, if you just want to get up and running quickly, with the minimal effort, Submarine provides a simple theme extension so that customers can opt in to delayed payment for presale and crowdfund campaigns.
Dawn theme
The Submarine theme extension has been tested with recent versions of the Dawn theme.
1.1. Configuring the Submarine theme extension
- Navigate to your published theme and click the “Customise” button.
- Using the drop-down box at the top of the screen, pick the product page that you want to add the theme extension to.
- In the “Product information” section, click “Add block” and select the Submarine “Selling plan selector” — it’s at the bottom, in the “Apps” collection.
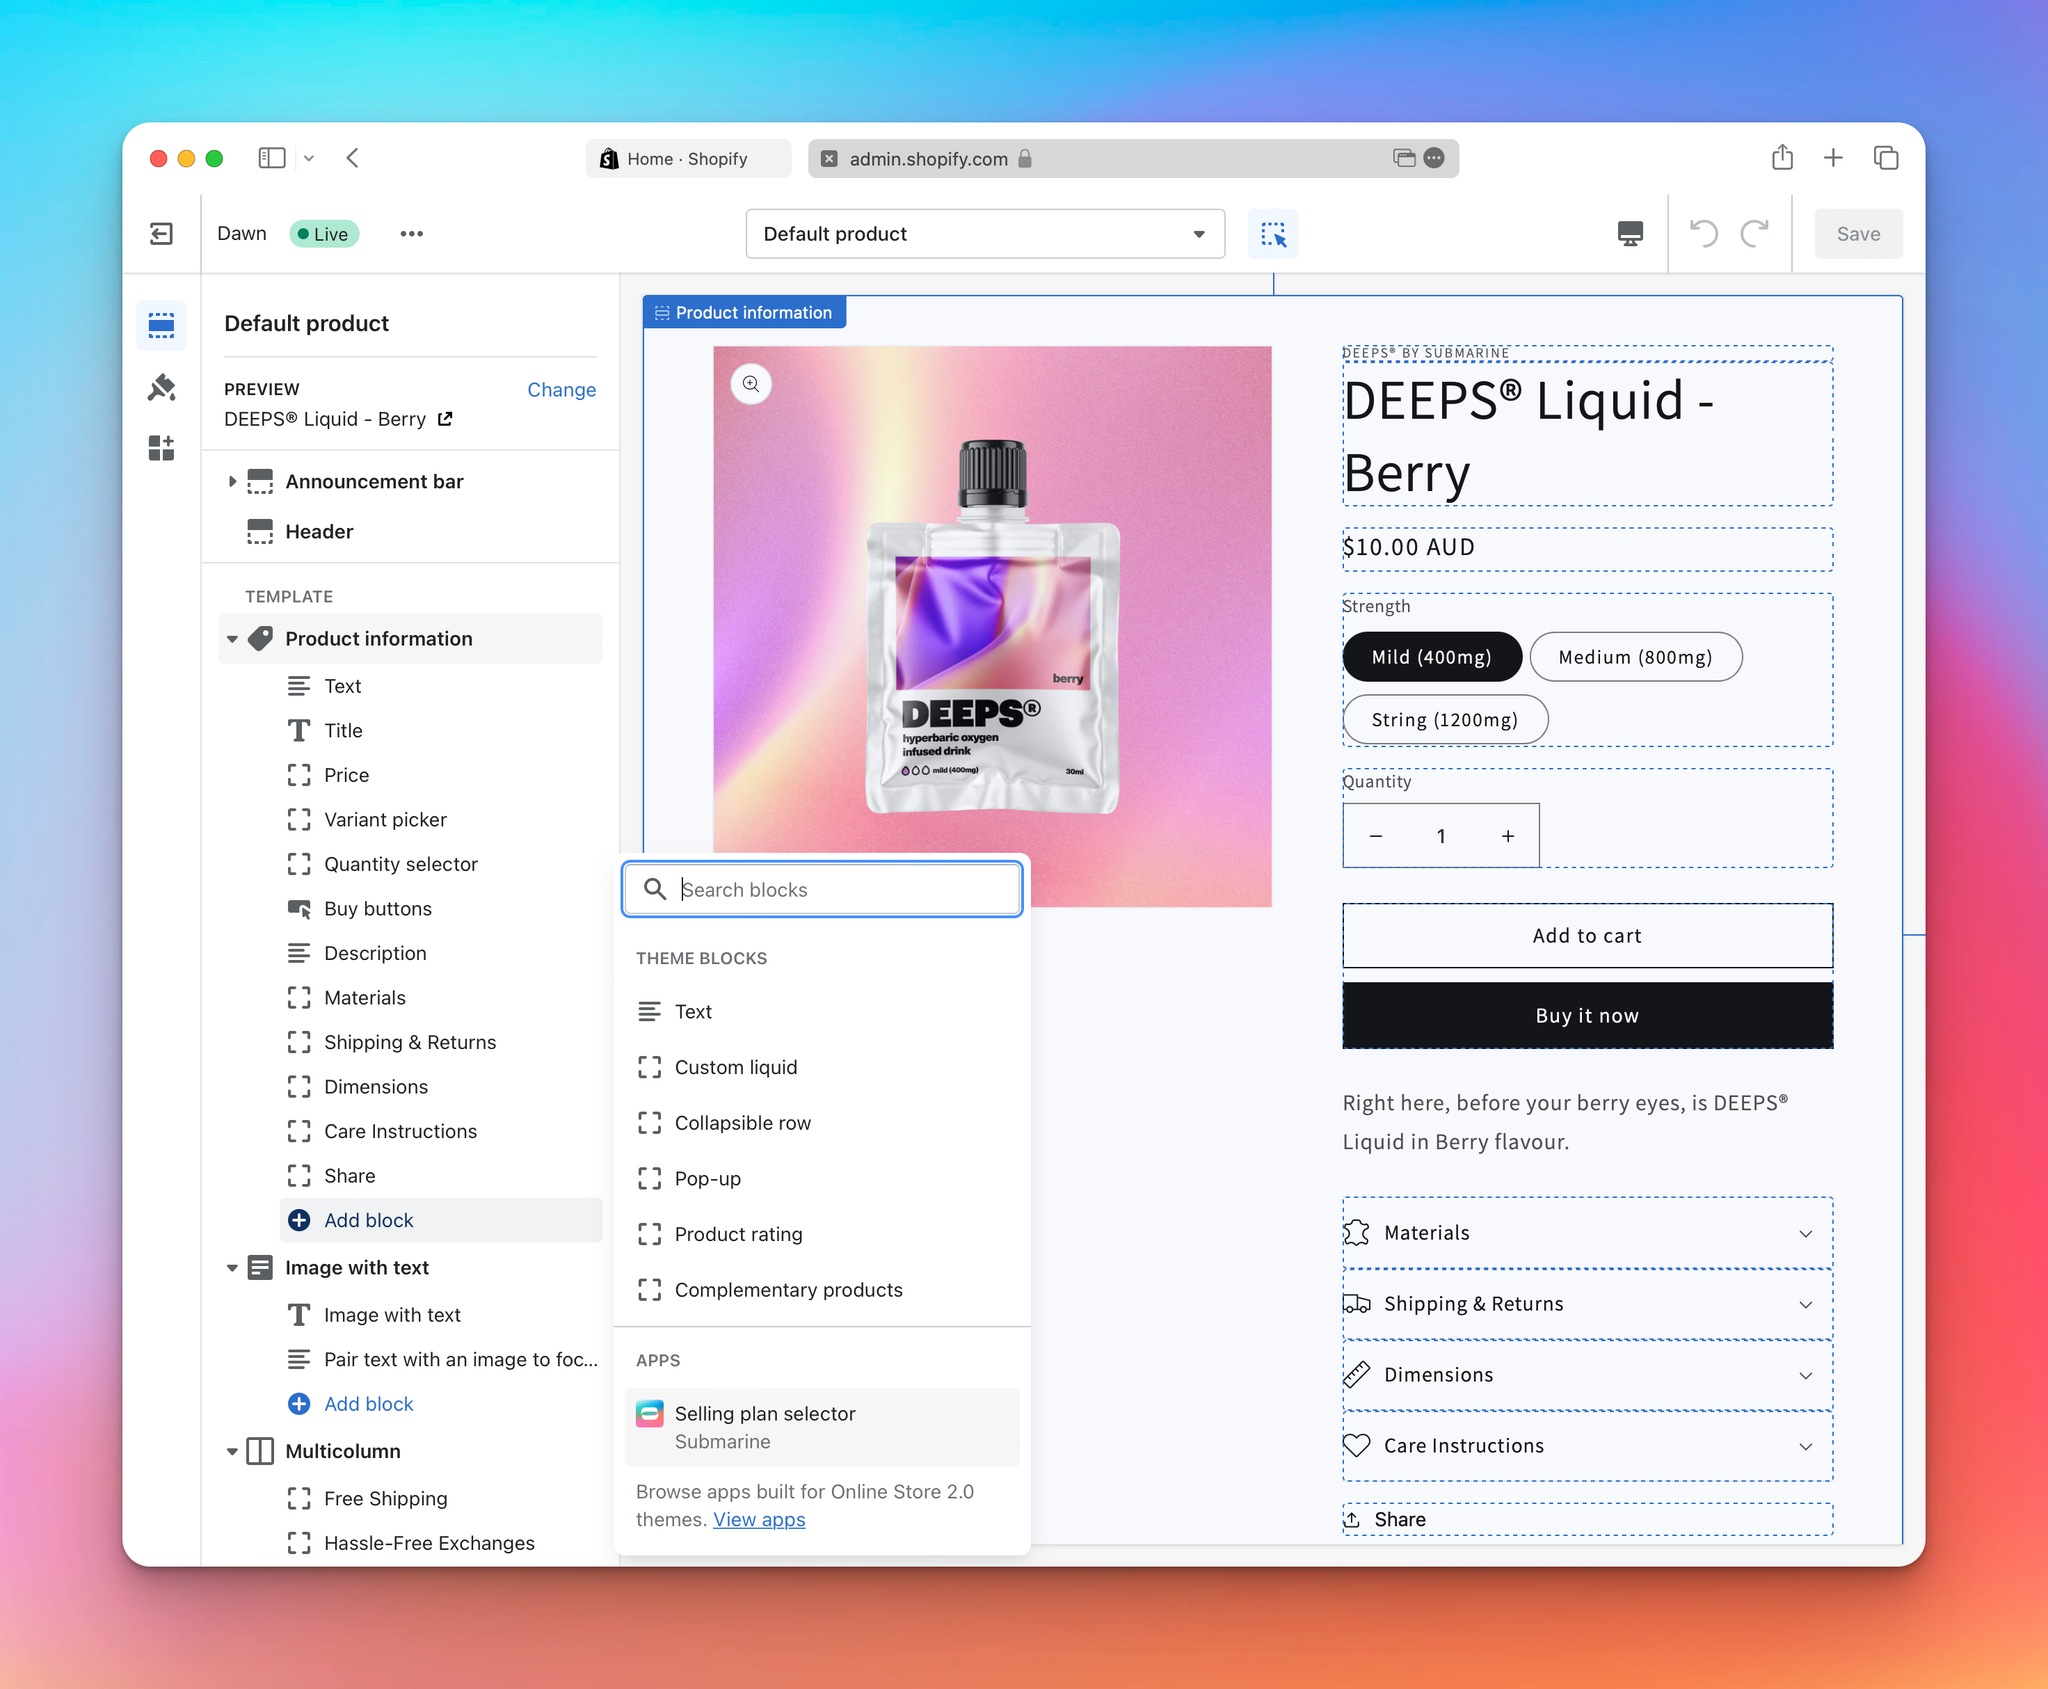
- Since this extension also provides a variant selector, it makes sense to remove the default one that comes with Dawn.
- Move the selector to somewhere that makes sense for your customer flow (under the price is decent start).
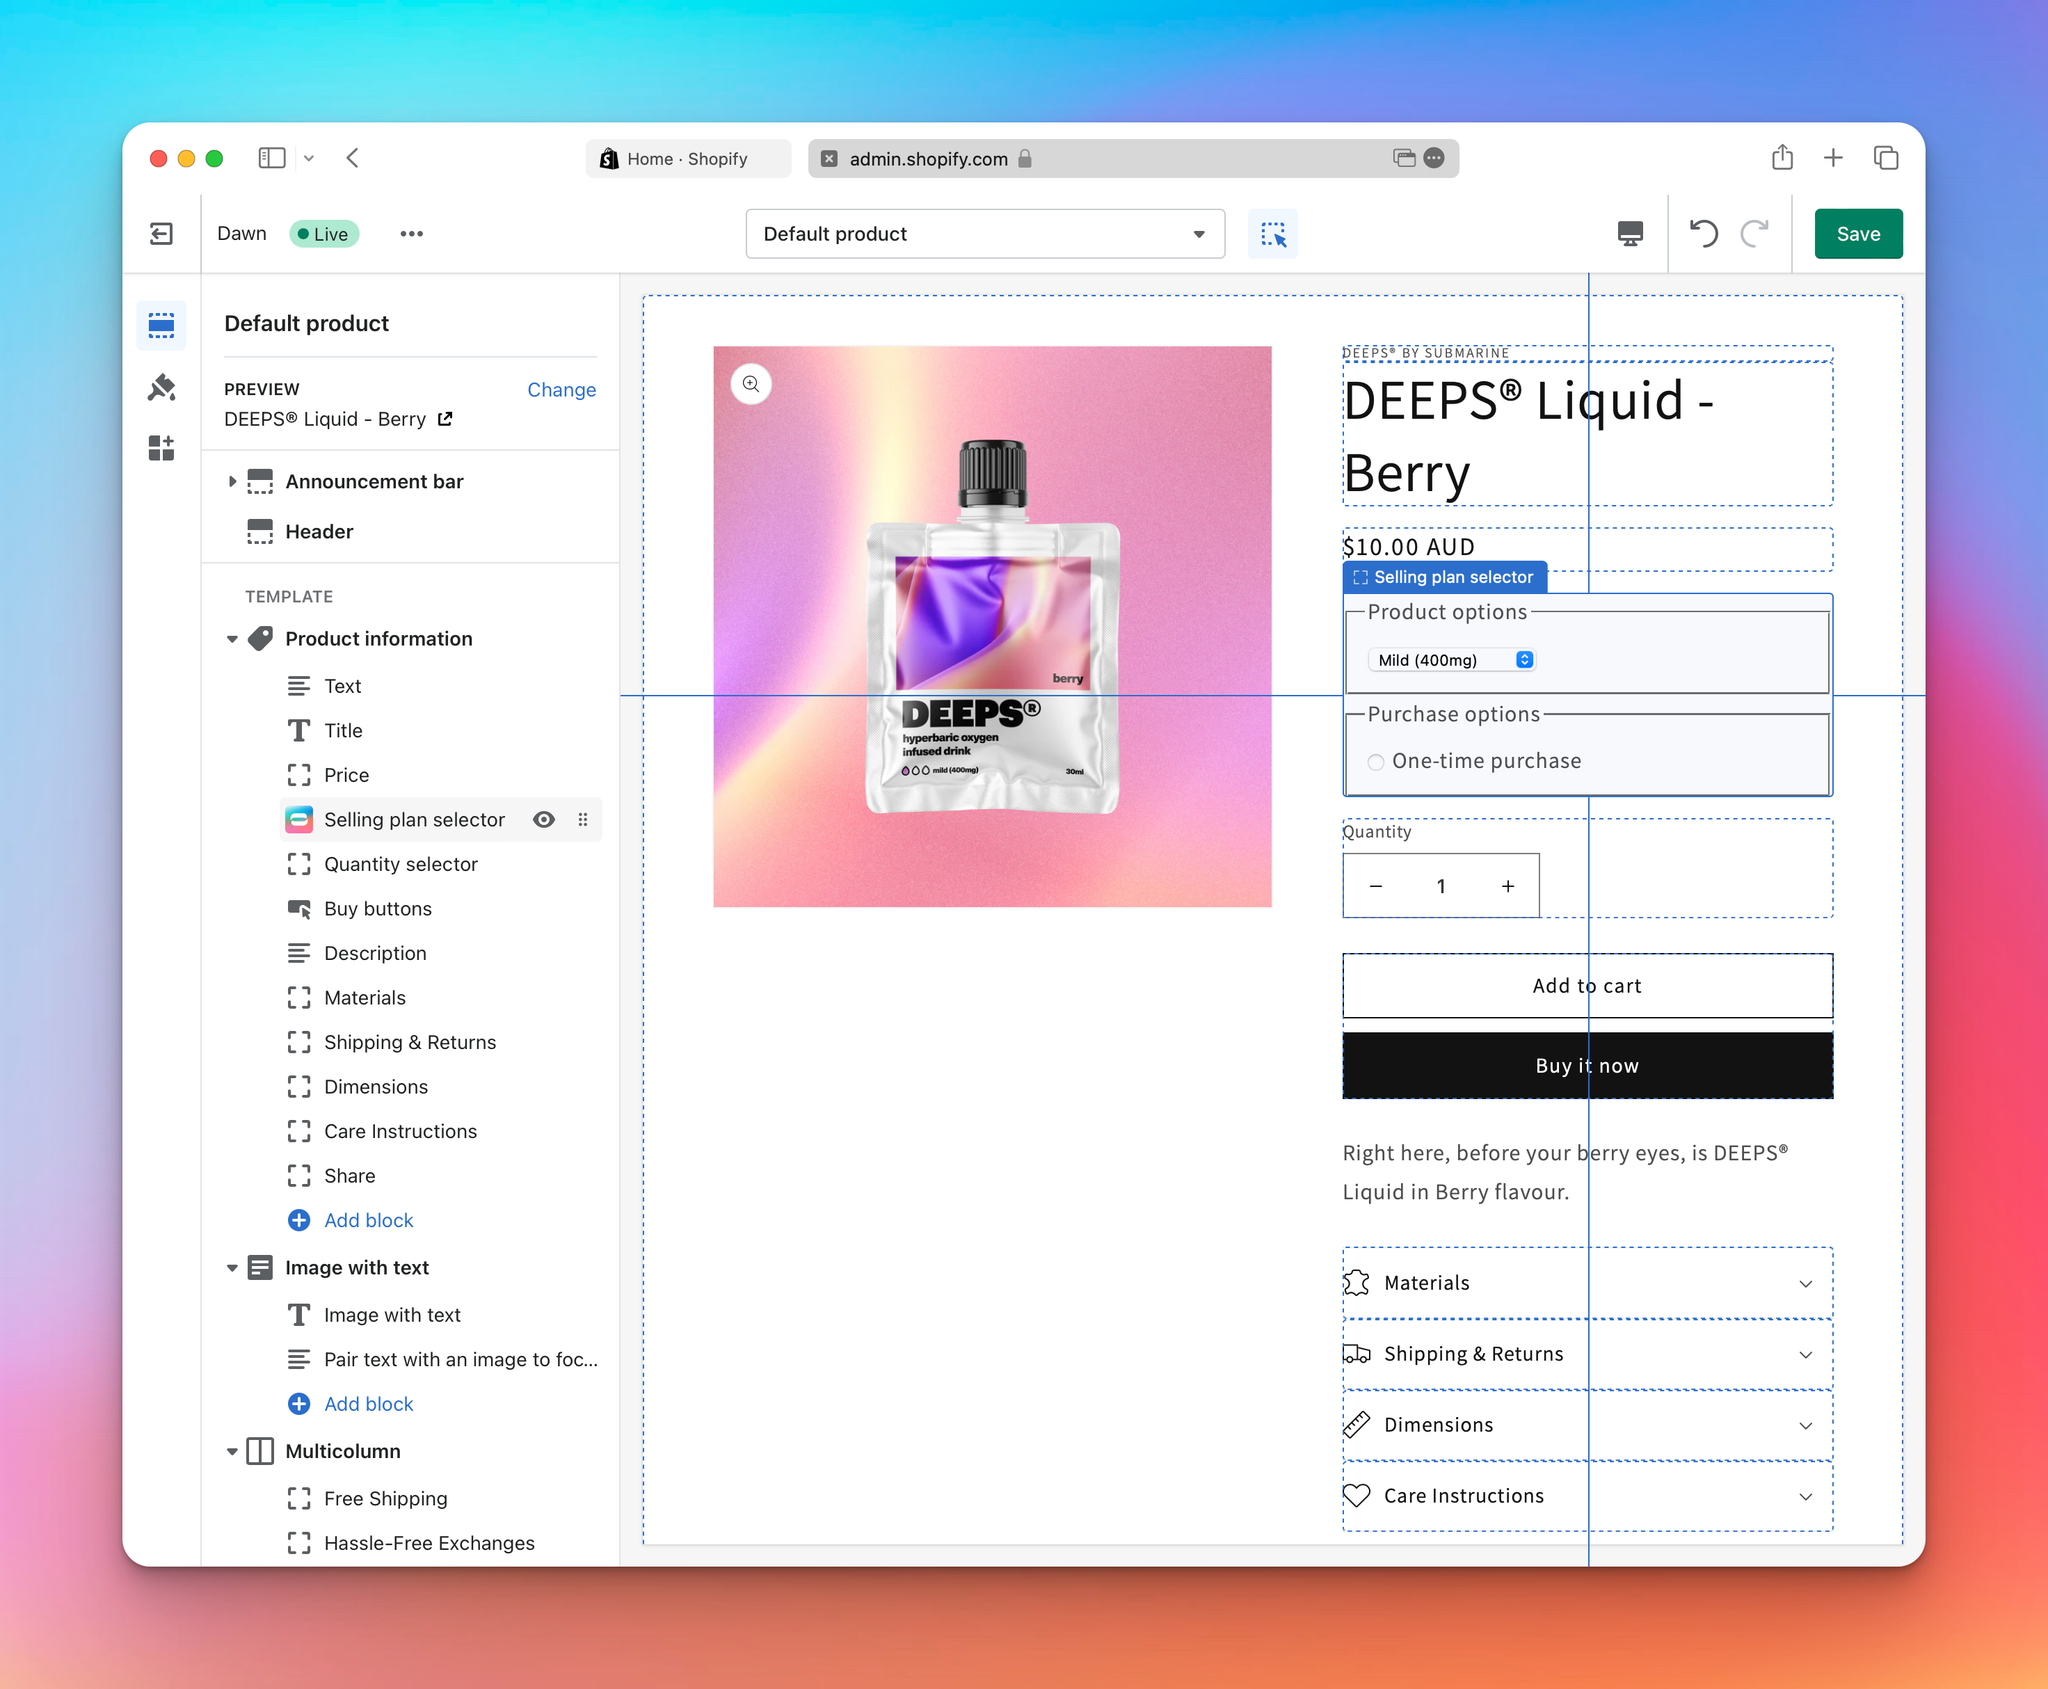
- Click “Save”.
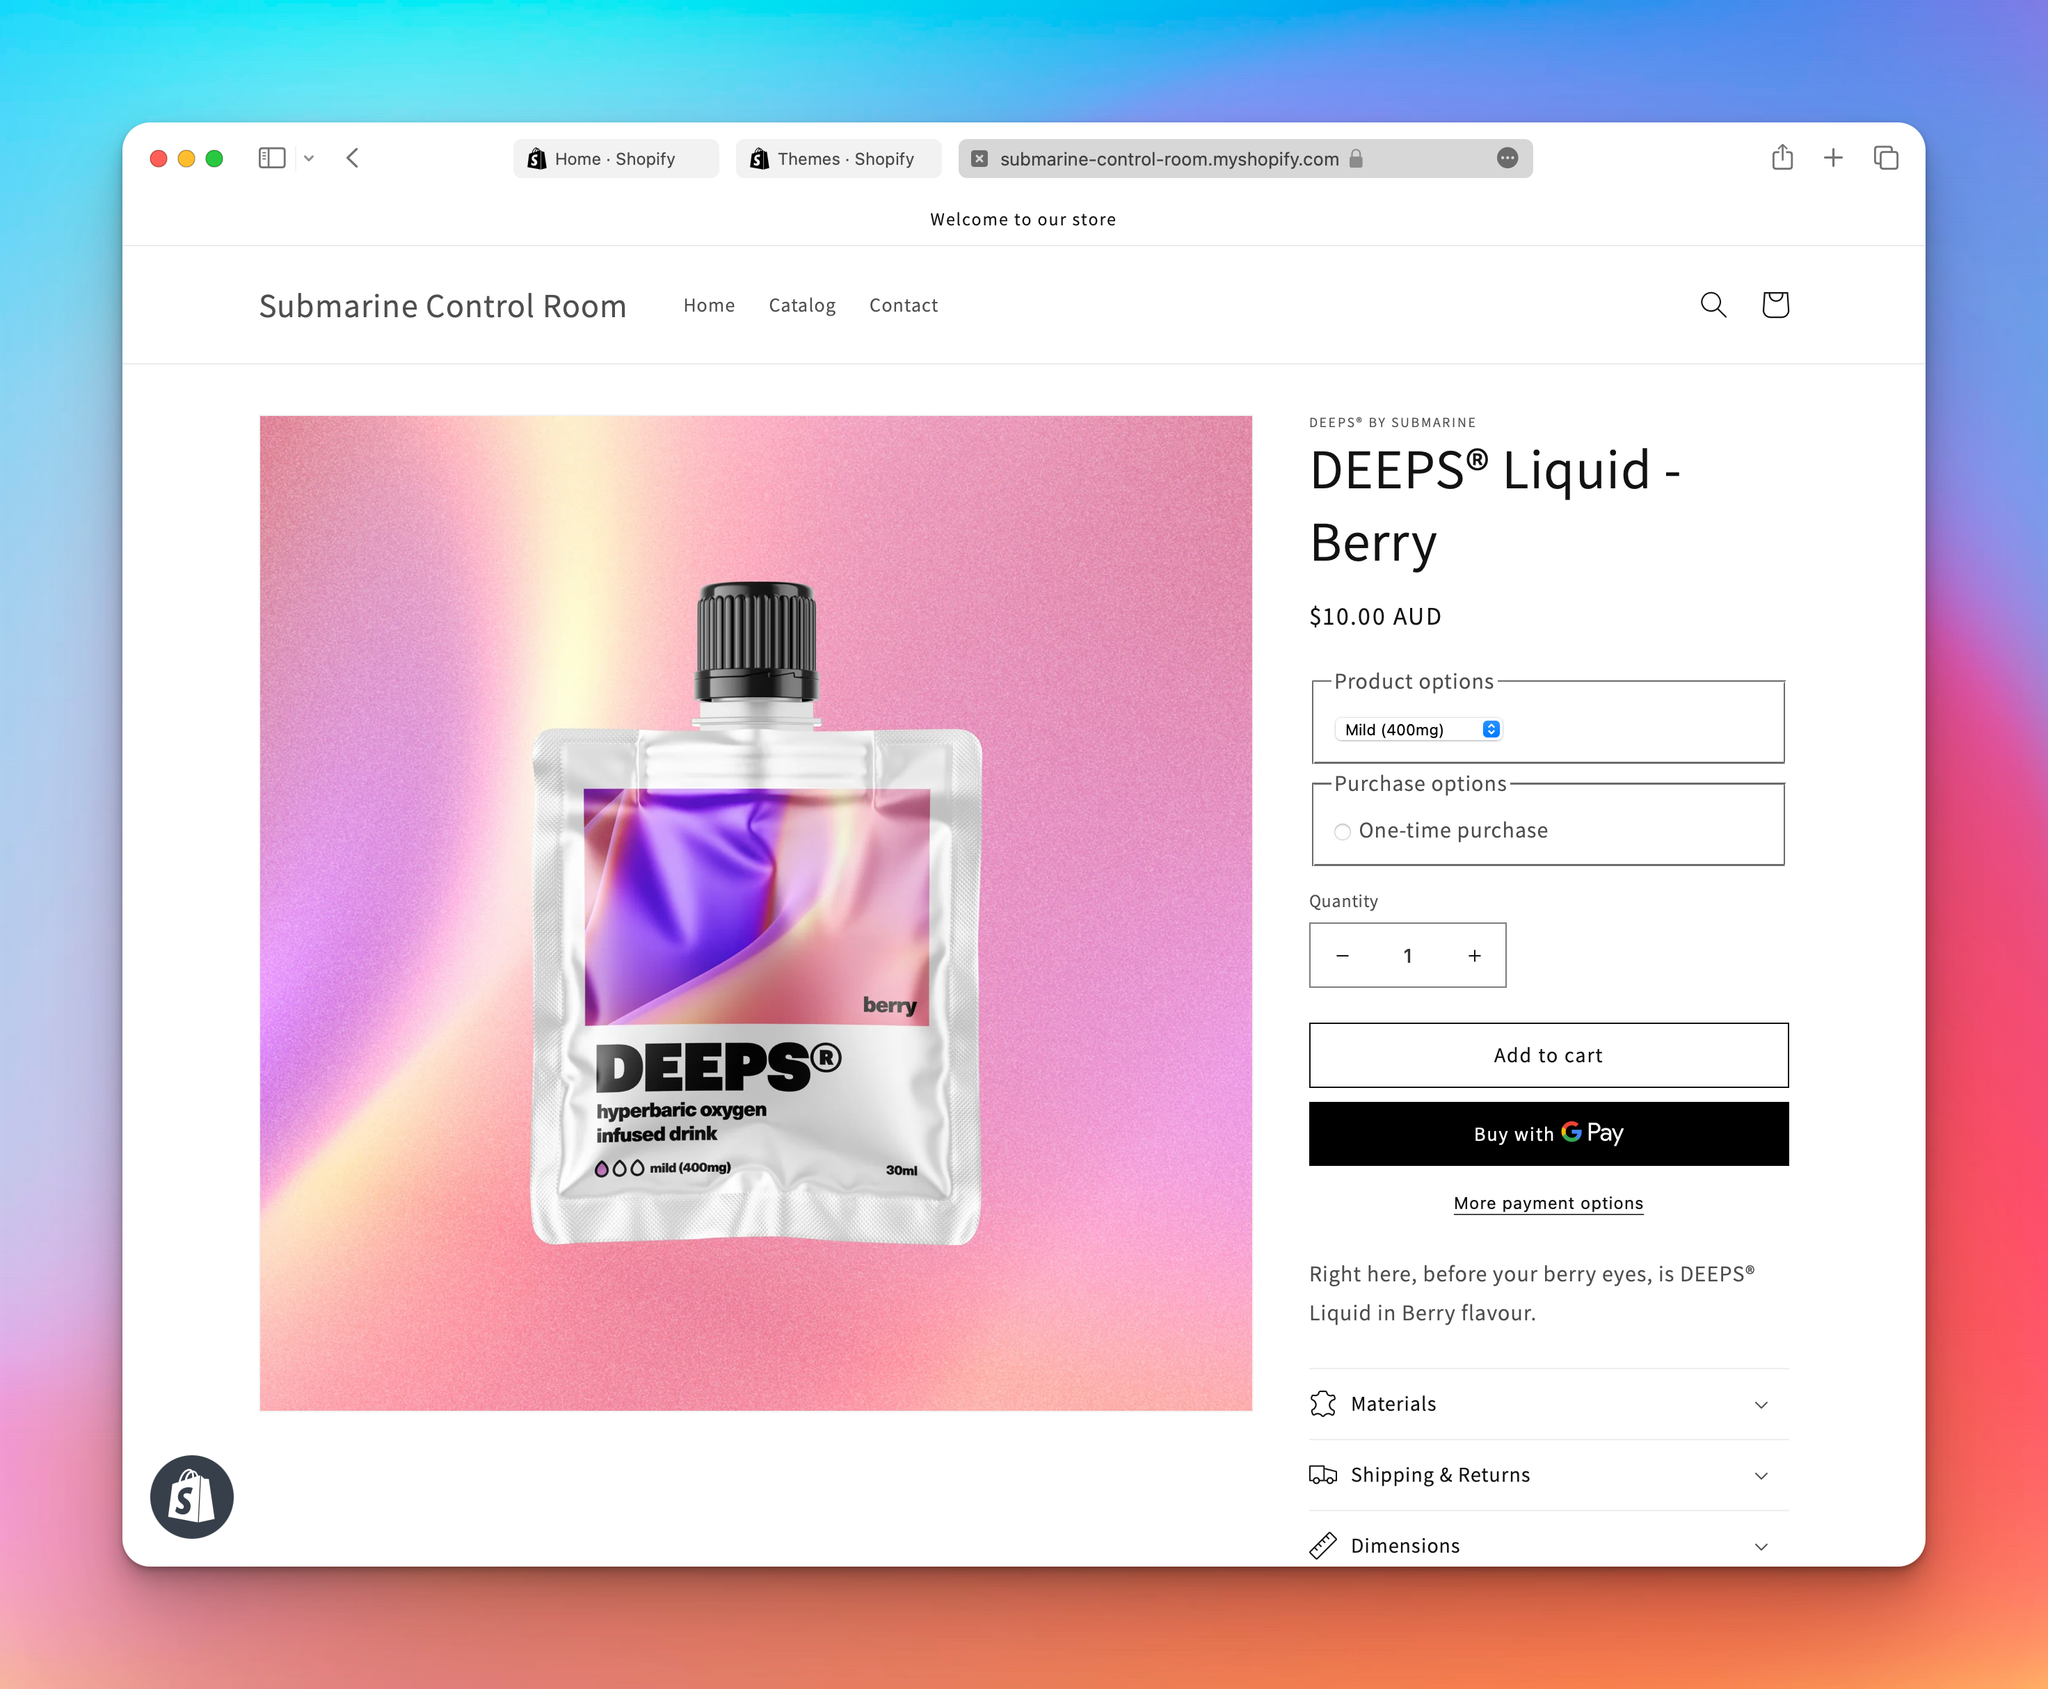
- Confirm that the changes are working in your store, by previewing the theme. Note that, if this is a fresh Submarine install, then the only purchase option available will be “One-time purchase”.
2. Creating your first crowdfunding campaign
Goal
Create a crowdfunding campaign in the Submarine UI.
With the theme ready, you are now in a position to create your first crowdfunding campaign.
- Navigate to the Submarine homepage and click the green “Add crowdfund” button in the middle section of the page.
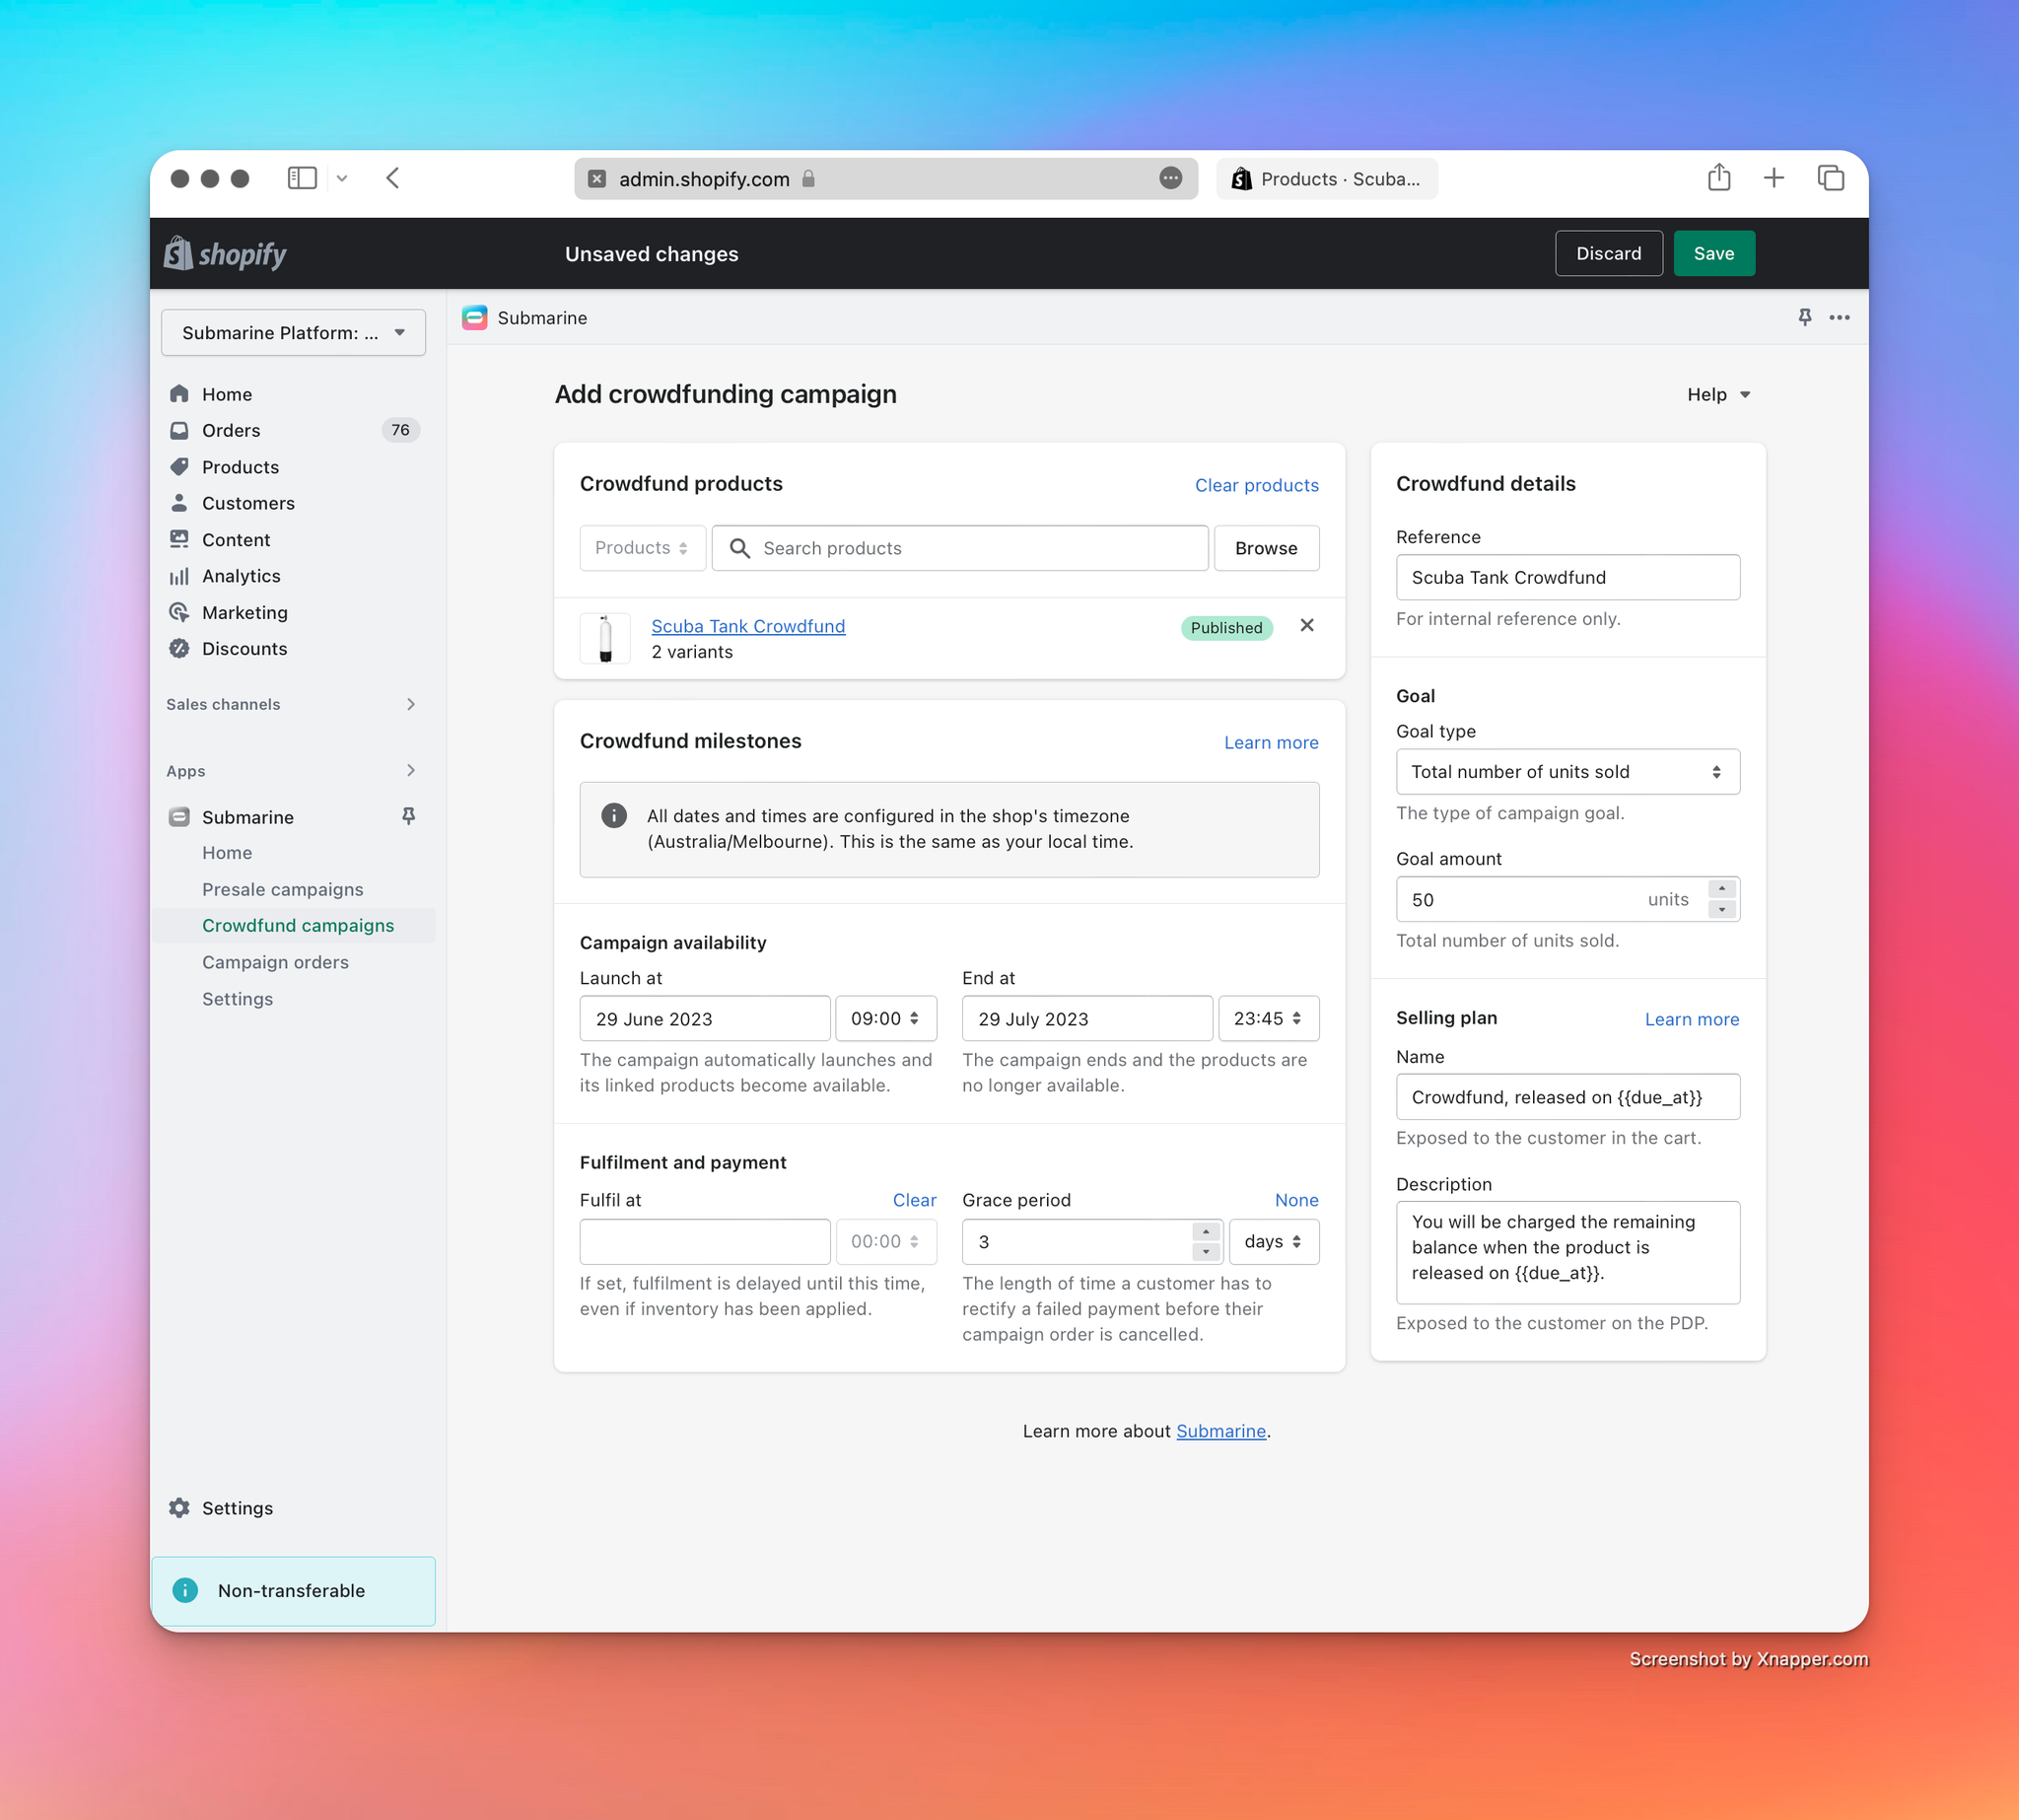
- You’ll be presented with a screen similar to this one:
- Crowdfunding campaigns can be defined on one or more products or one or more variants, but not a mix of both. If you choose the wrong target when you create the campaign, the only option you have available is to delete it and start again.
- Crowdfunding campaigns defined on products are exposed to every single variant of that product, throughout the lifetime of the campaign. This means that if you create a product campaign and then add a new variant to that product, customers will be able to purchase the new variant as a crowdfund.
- Crowdfunding campaigns defined on variants are only ever exposed on the selected variants.
- Crowdfunding campaigns have four important milestones in their lifecycle, all of which can be configured on creation.
- The date that the campaign will be launched. Before then, customers will not be able to purchase the crowdfund.
- The date that the campaign ends. After then, customers will be unable to purchase the crowdfund.
- The date that the campaign will be fulfilled. This field is optional. If left blank, fulfilment will commence as soon as inventory is applied. If it’s defined, fulfilment will be delayed until the provided date, even if inventory has been made available.
- The grace period provided to customers, so that they can rectify their payment details should any payment fail. If this is set to “None”, then customers have one chance to pay for their crowdfund before Submarine cancels their campaign order.
- Note that all times for these milestones are defined in the shop’s timezone.
- Crowdfunding campaigns should be given a reference. This is only ever used internally, and aids identification for you, the merchant, while navigating the Submarine UI. This field will automatically be populated with the name of the first selected product/variant, but can be overwritten.
- Each crowdfunding campaign needs a goal type and goal number. This can either be set by Total units sold or or Total value of units sold. It should be noted that these totals is the total across all product items within the campaign. If you’d prefer to set a value goal rather than quantity goal, you can opt for this during the campaign setup.
- As mentioned elsewhere, Submarine integrates very closely with Shopify’s purchase options, and relies heavily on their concept of selling plans (to the extent that each Submarine campaign creates and maintains a Shopify selling plan under the hood). The name and description of the selling plan is automatically exposed to the customer in the theme, and this screen allows the merchant to configure what values these fields should take.
- The default values follow Shopify’s recommended best practice, but they can obviously be overridden with anything.
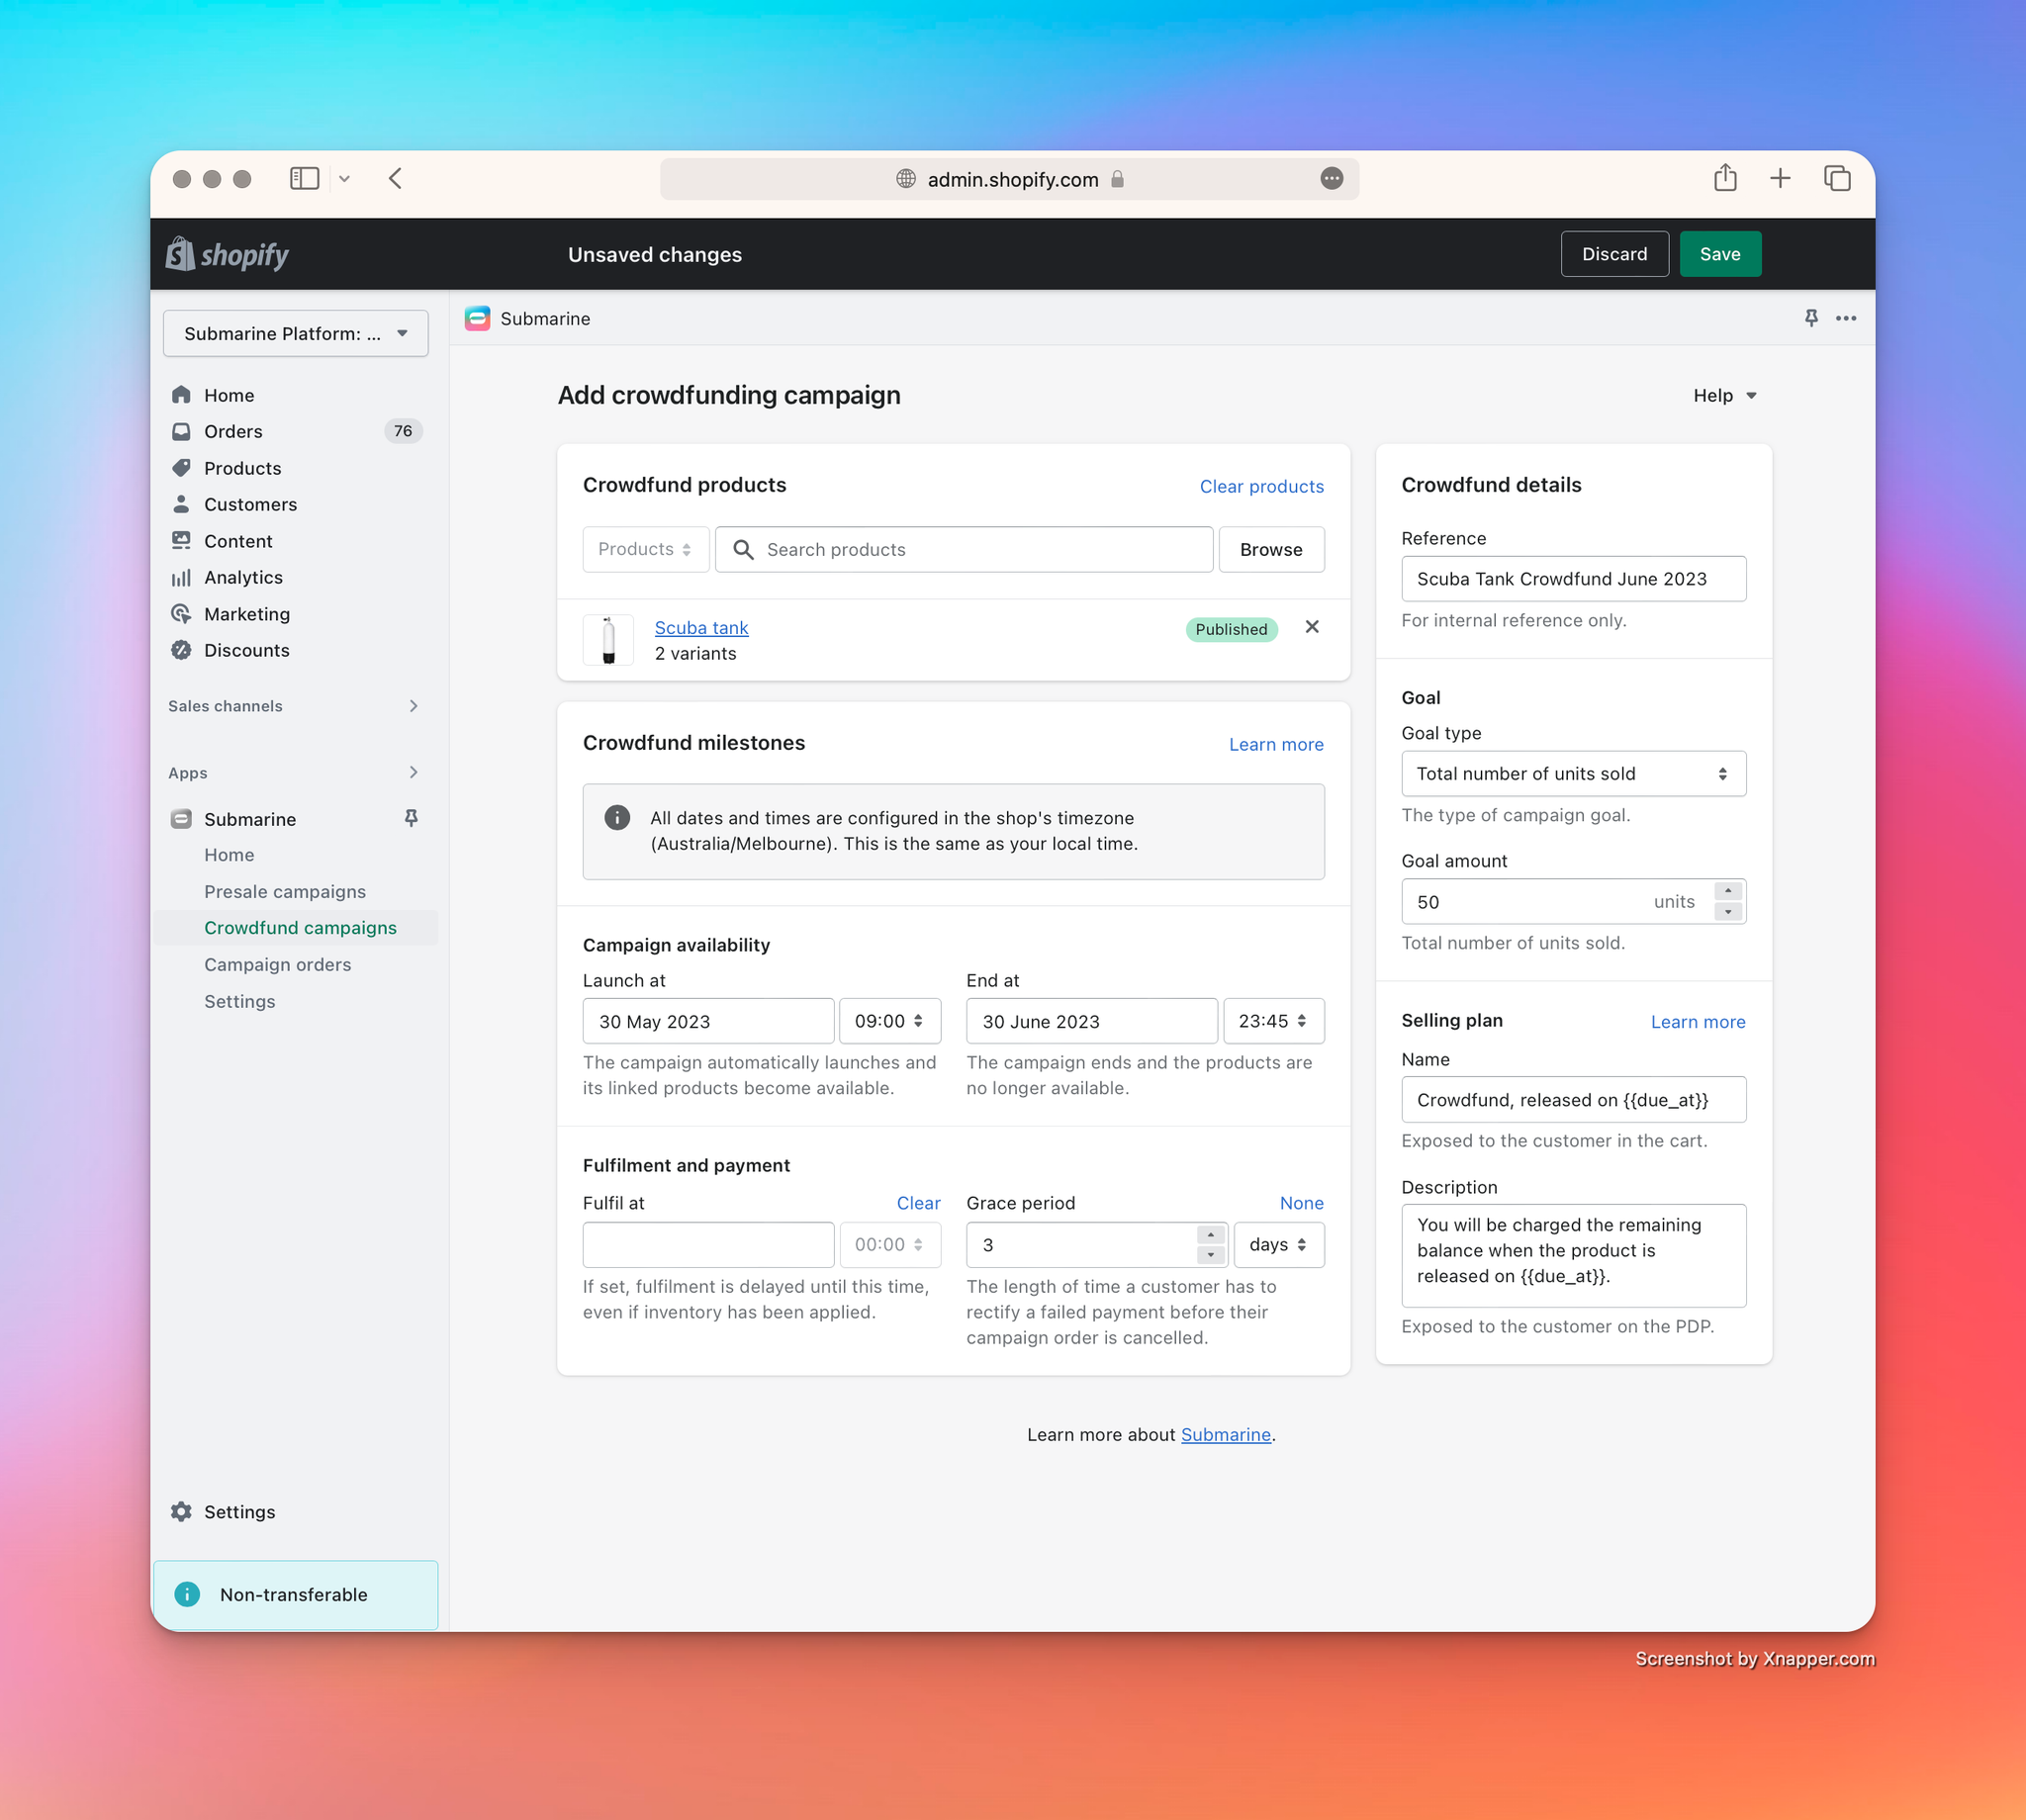
- Both fields support placeholder text — these placeholders are surrounded by double curly braces (e.g.
{{due_at}}), and will be replaced with the appropriate underlying data when the selling plan is created (or updated) on Shopify. - The supported placeholders are
launch_at,end_at,fulfil_atanddue_at. The first three align exactly with the milestone fields discussed above. Thedue_atplaceholder is a combination ofend_atandfulfil_at, and will take whatever value is set. - When all is said and done, you should have a form similar to this:
- Clicking “Save” creates the campaign in Submarine and shows you the campaign details.
- As well as the changes in the Submarine UI, there are also a few noticeable updates in the Shopify UI.
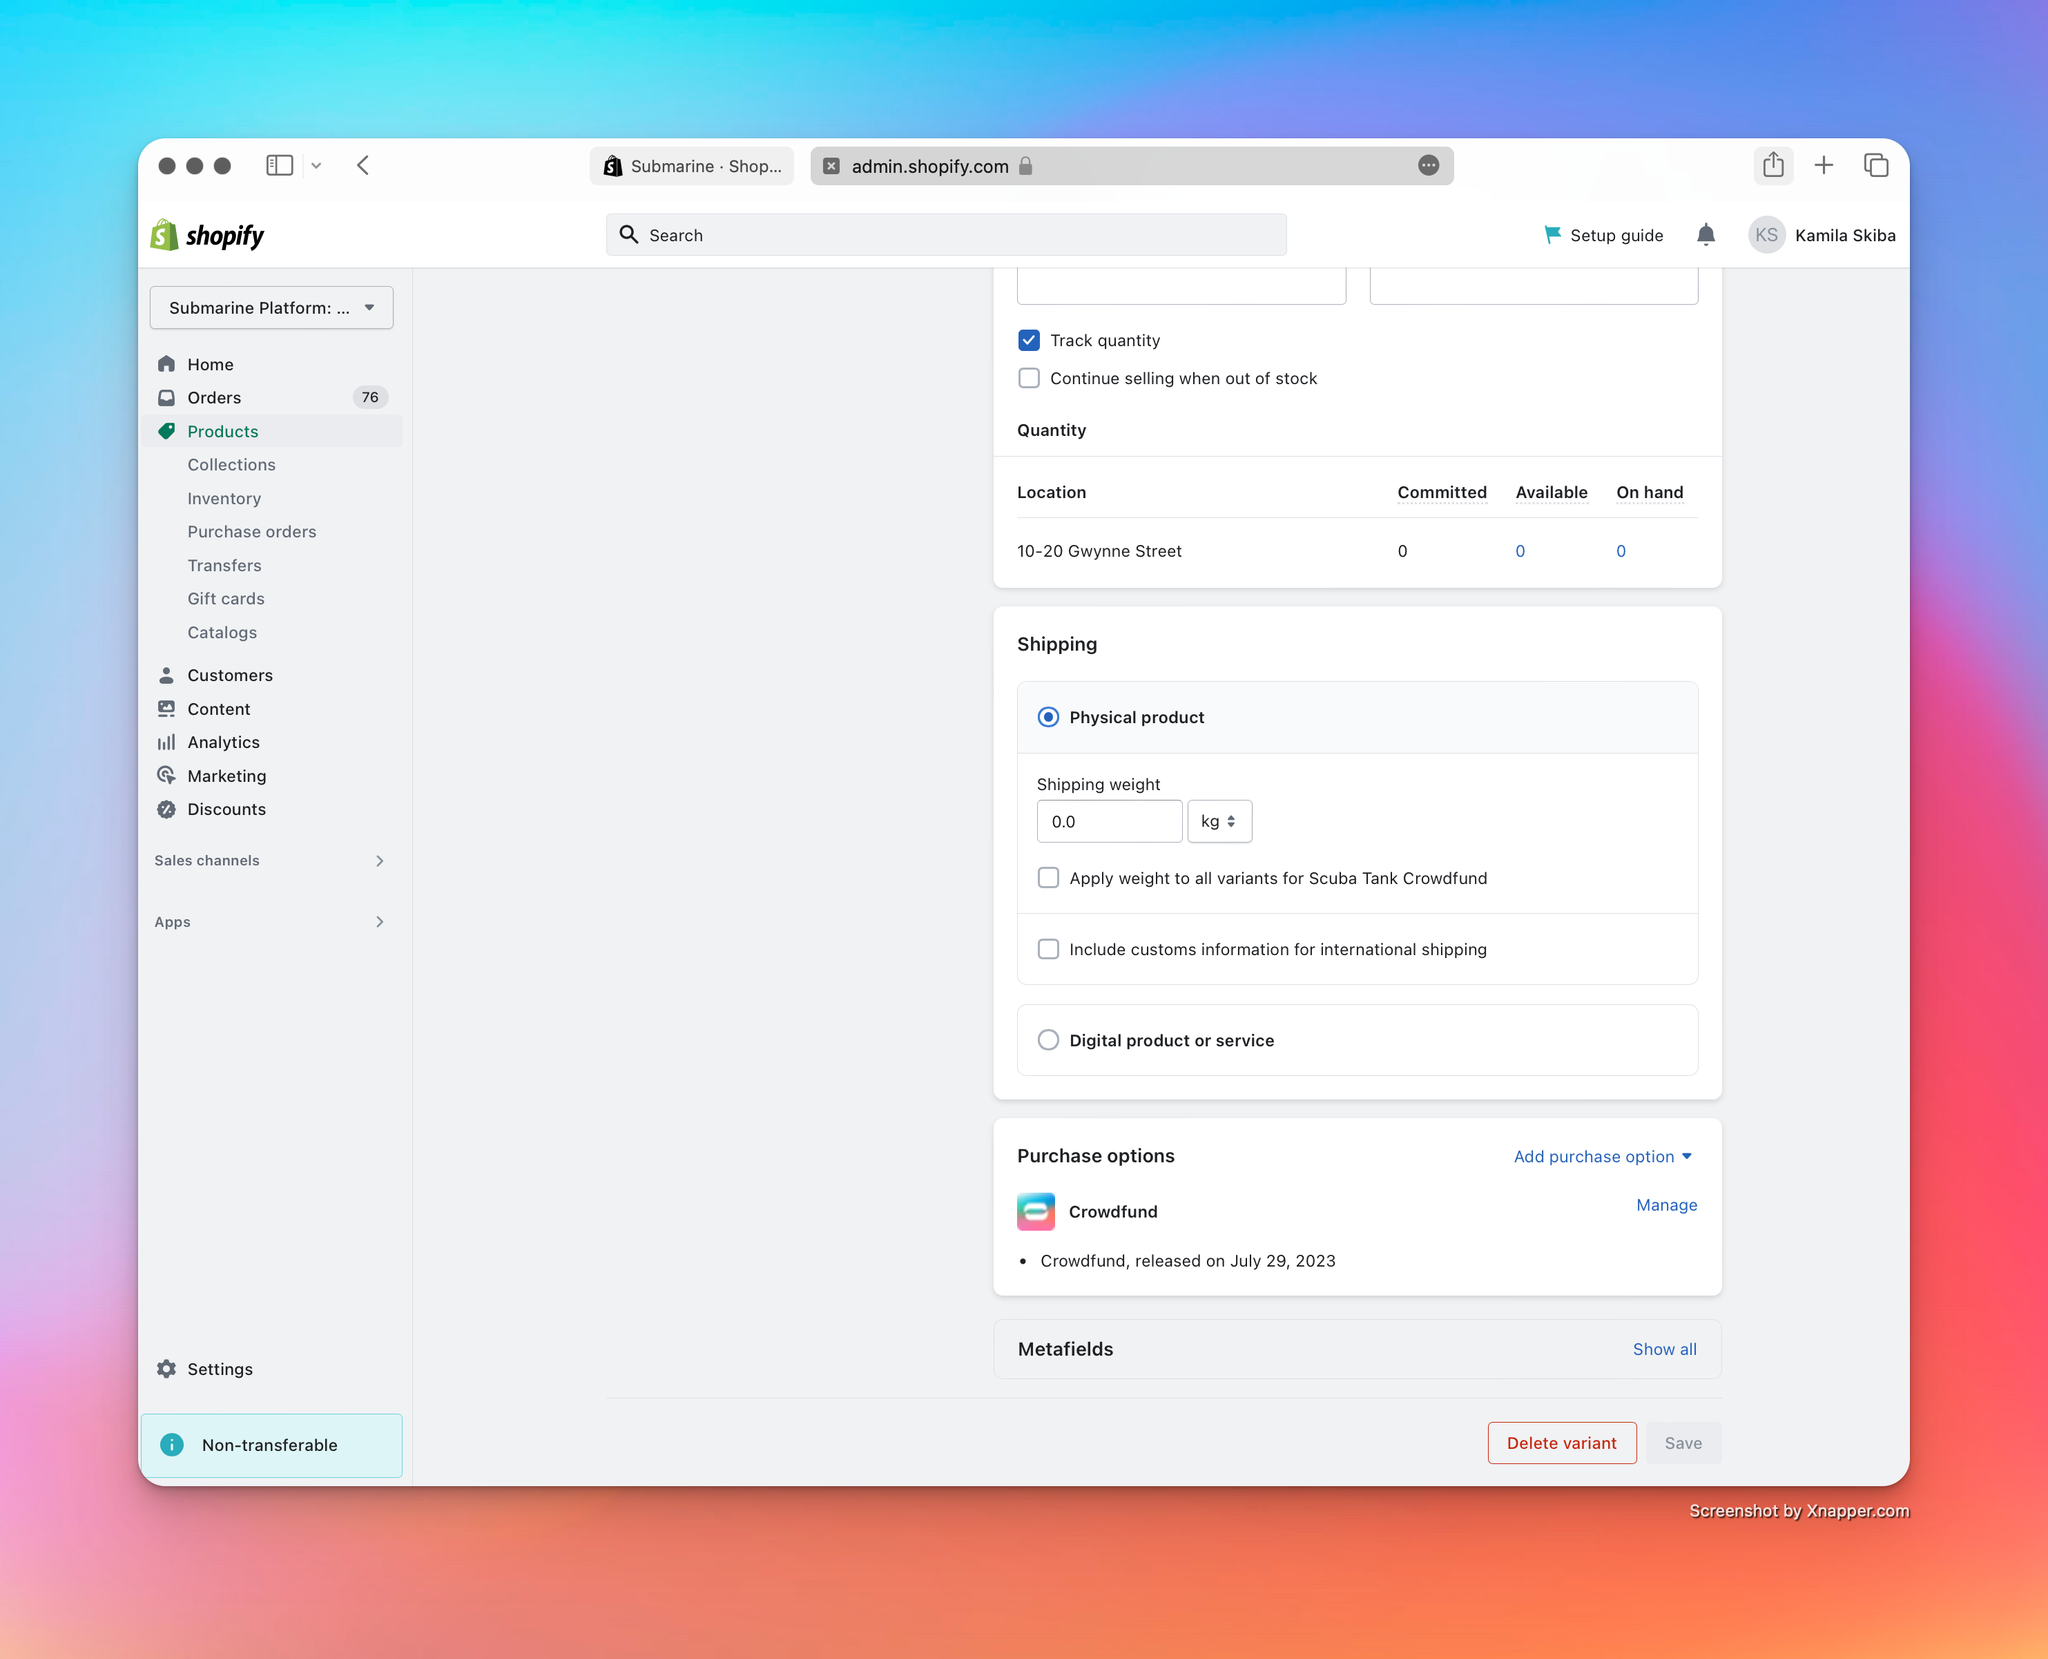
- The Shopify product page exposes the newly created purchase option. From here, you can manage the crowdfunding campaign without navigating to the Submarine UI.
- The variant page exposes the same purchase option (with the same management features).
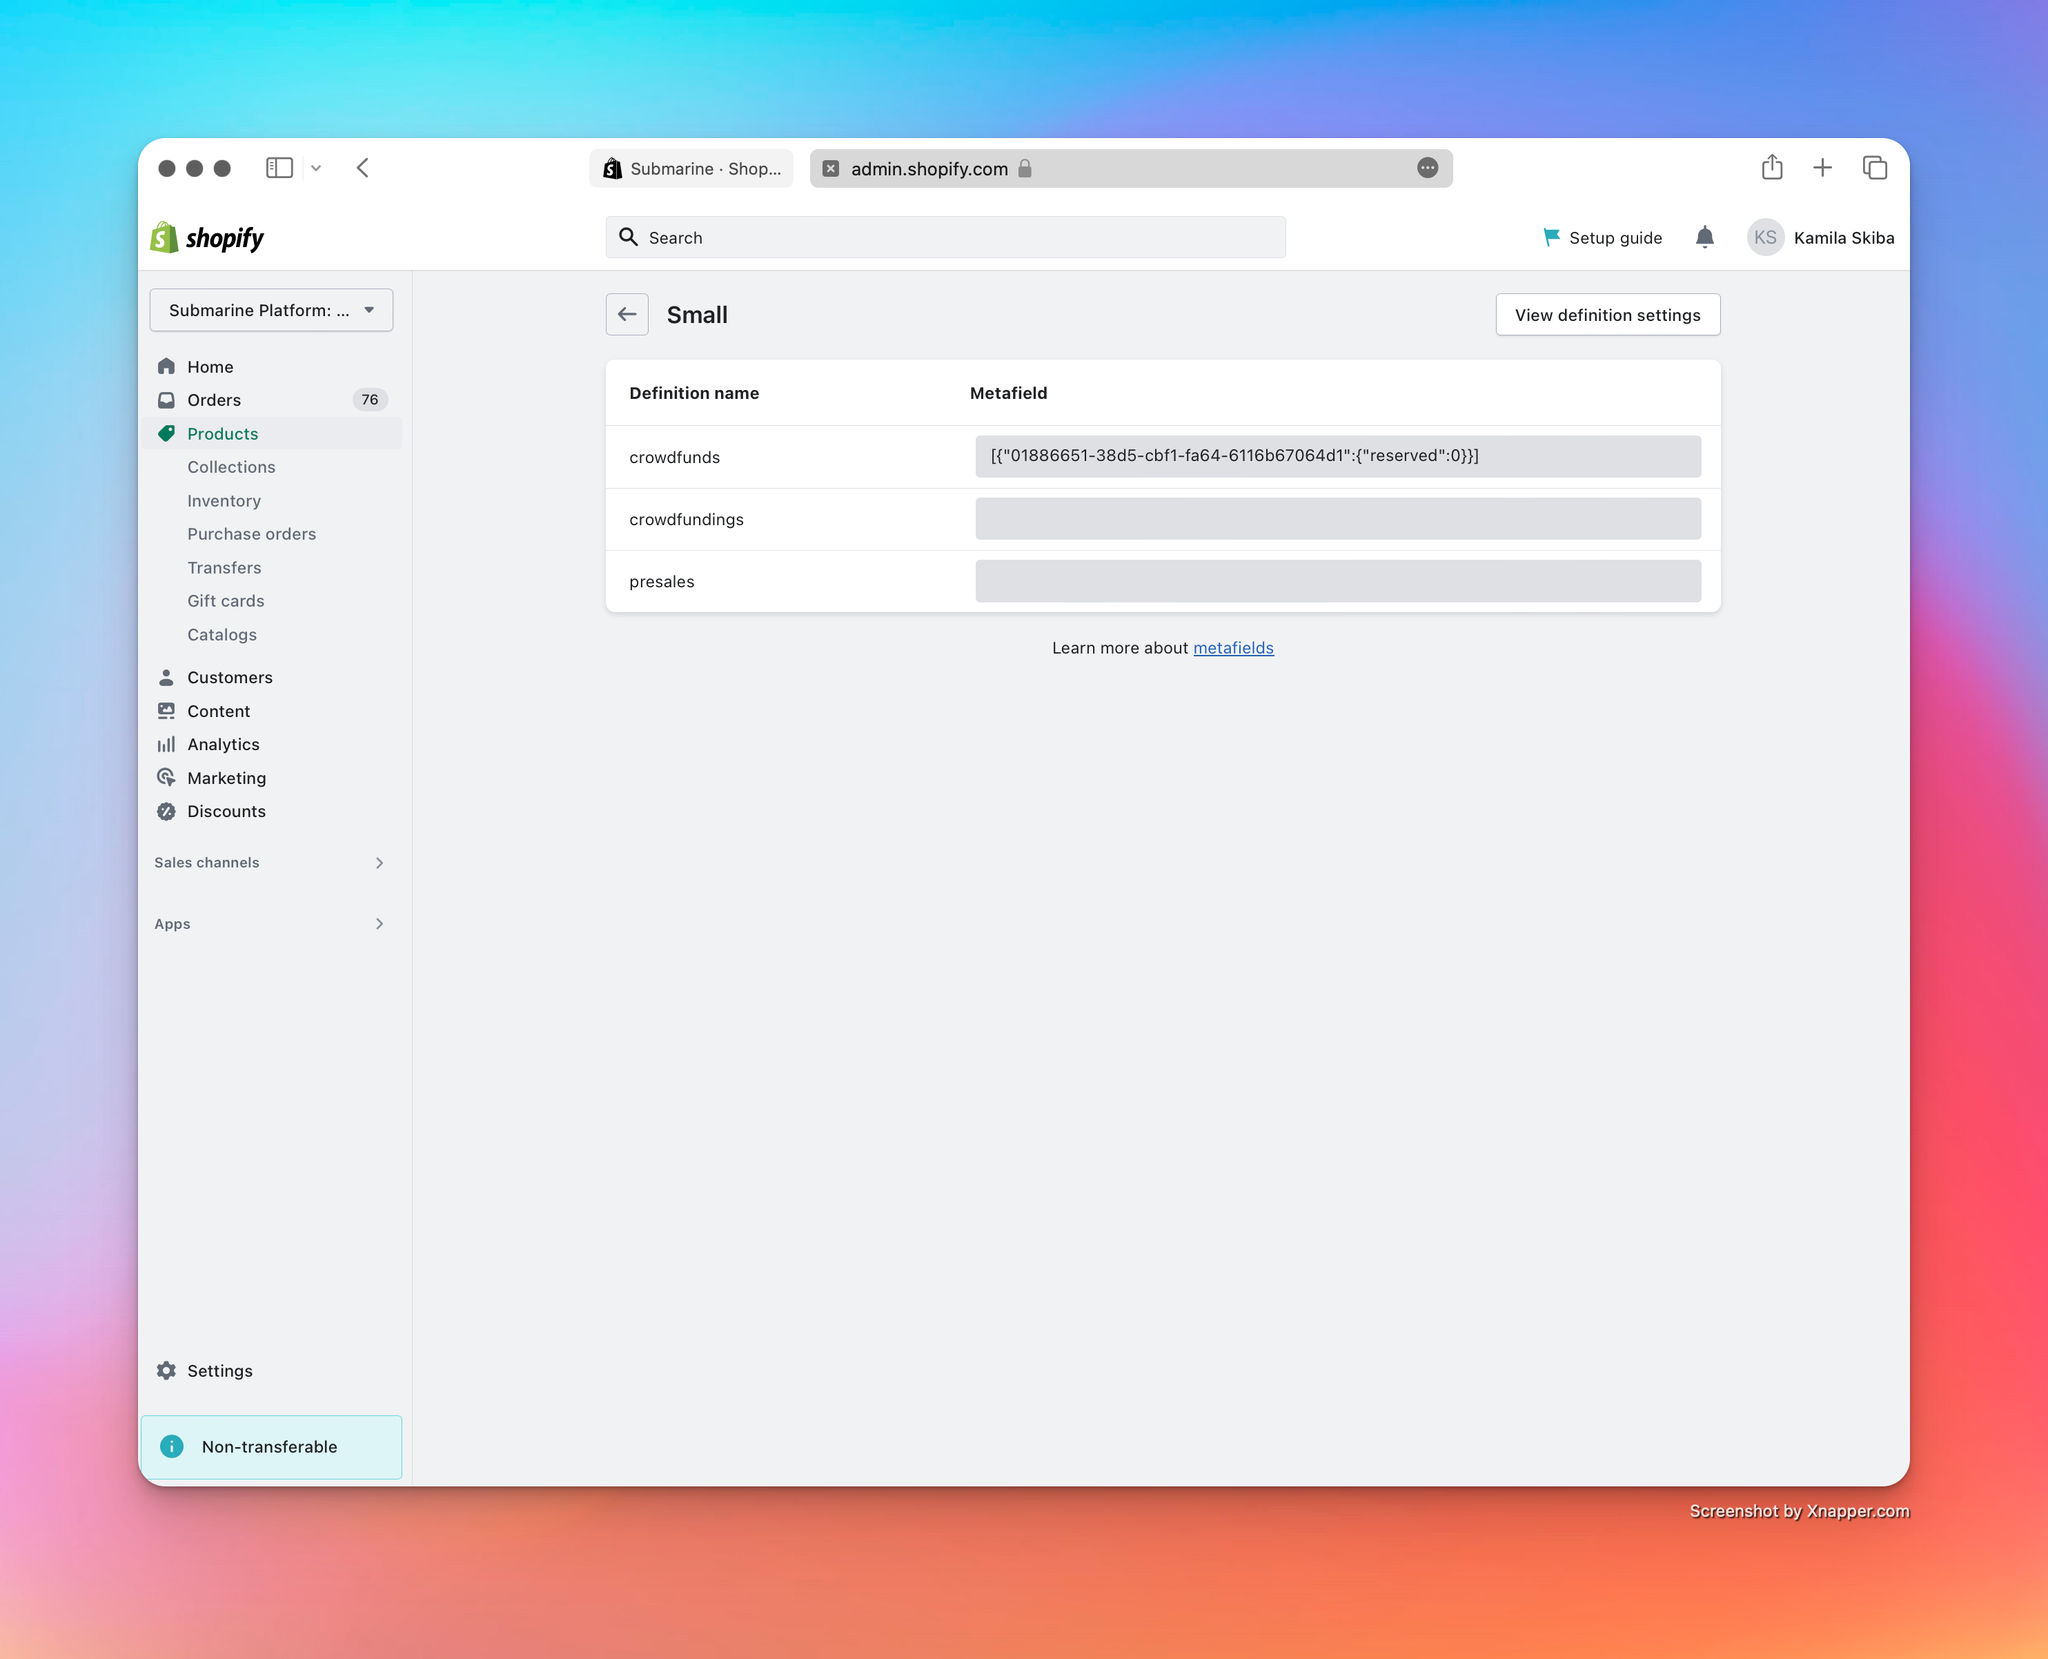
- Submarine created some metafields on the product and the variants. These are maintained throughout the lifetime of the campaign, and support sophisticated theme customisations.
We have a detailed breakdown of how Submarine works in Presale key concepts, so for now we’ll just go over the basics.
Note that the selling-plan name, configured in the Submarine UI when the campaign was created, has been properly parsed.

More details about Submarine’s integration with Shopify’s Admin UI can be found at .
More details on these metafields can be found in the  Front end integration documentation.
3. Launching your crowdfunding campaign
Goal
Manually launch a crowdfunding campaign, so that customers can purchase it.
Submarine will automatically launch the campaign according to the configuration that you provided when the crowdfund was created. If you’re impatient though, you can force an immediate launch.
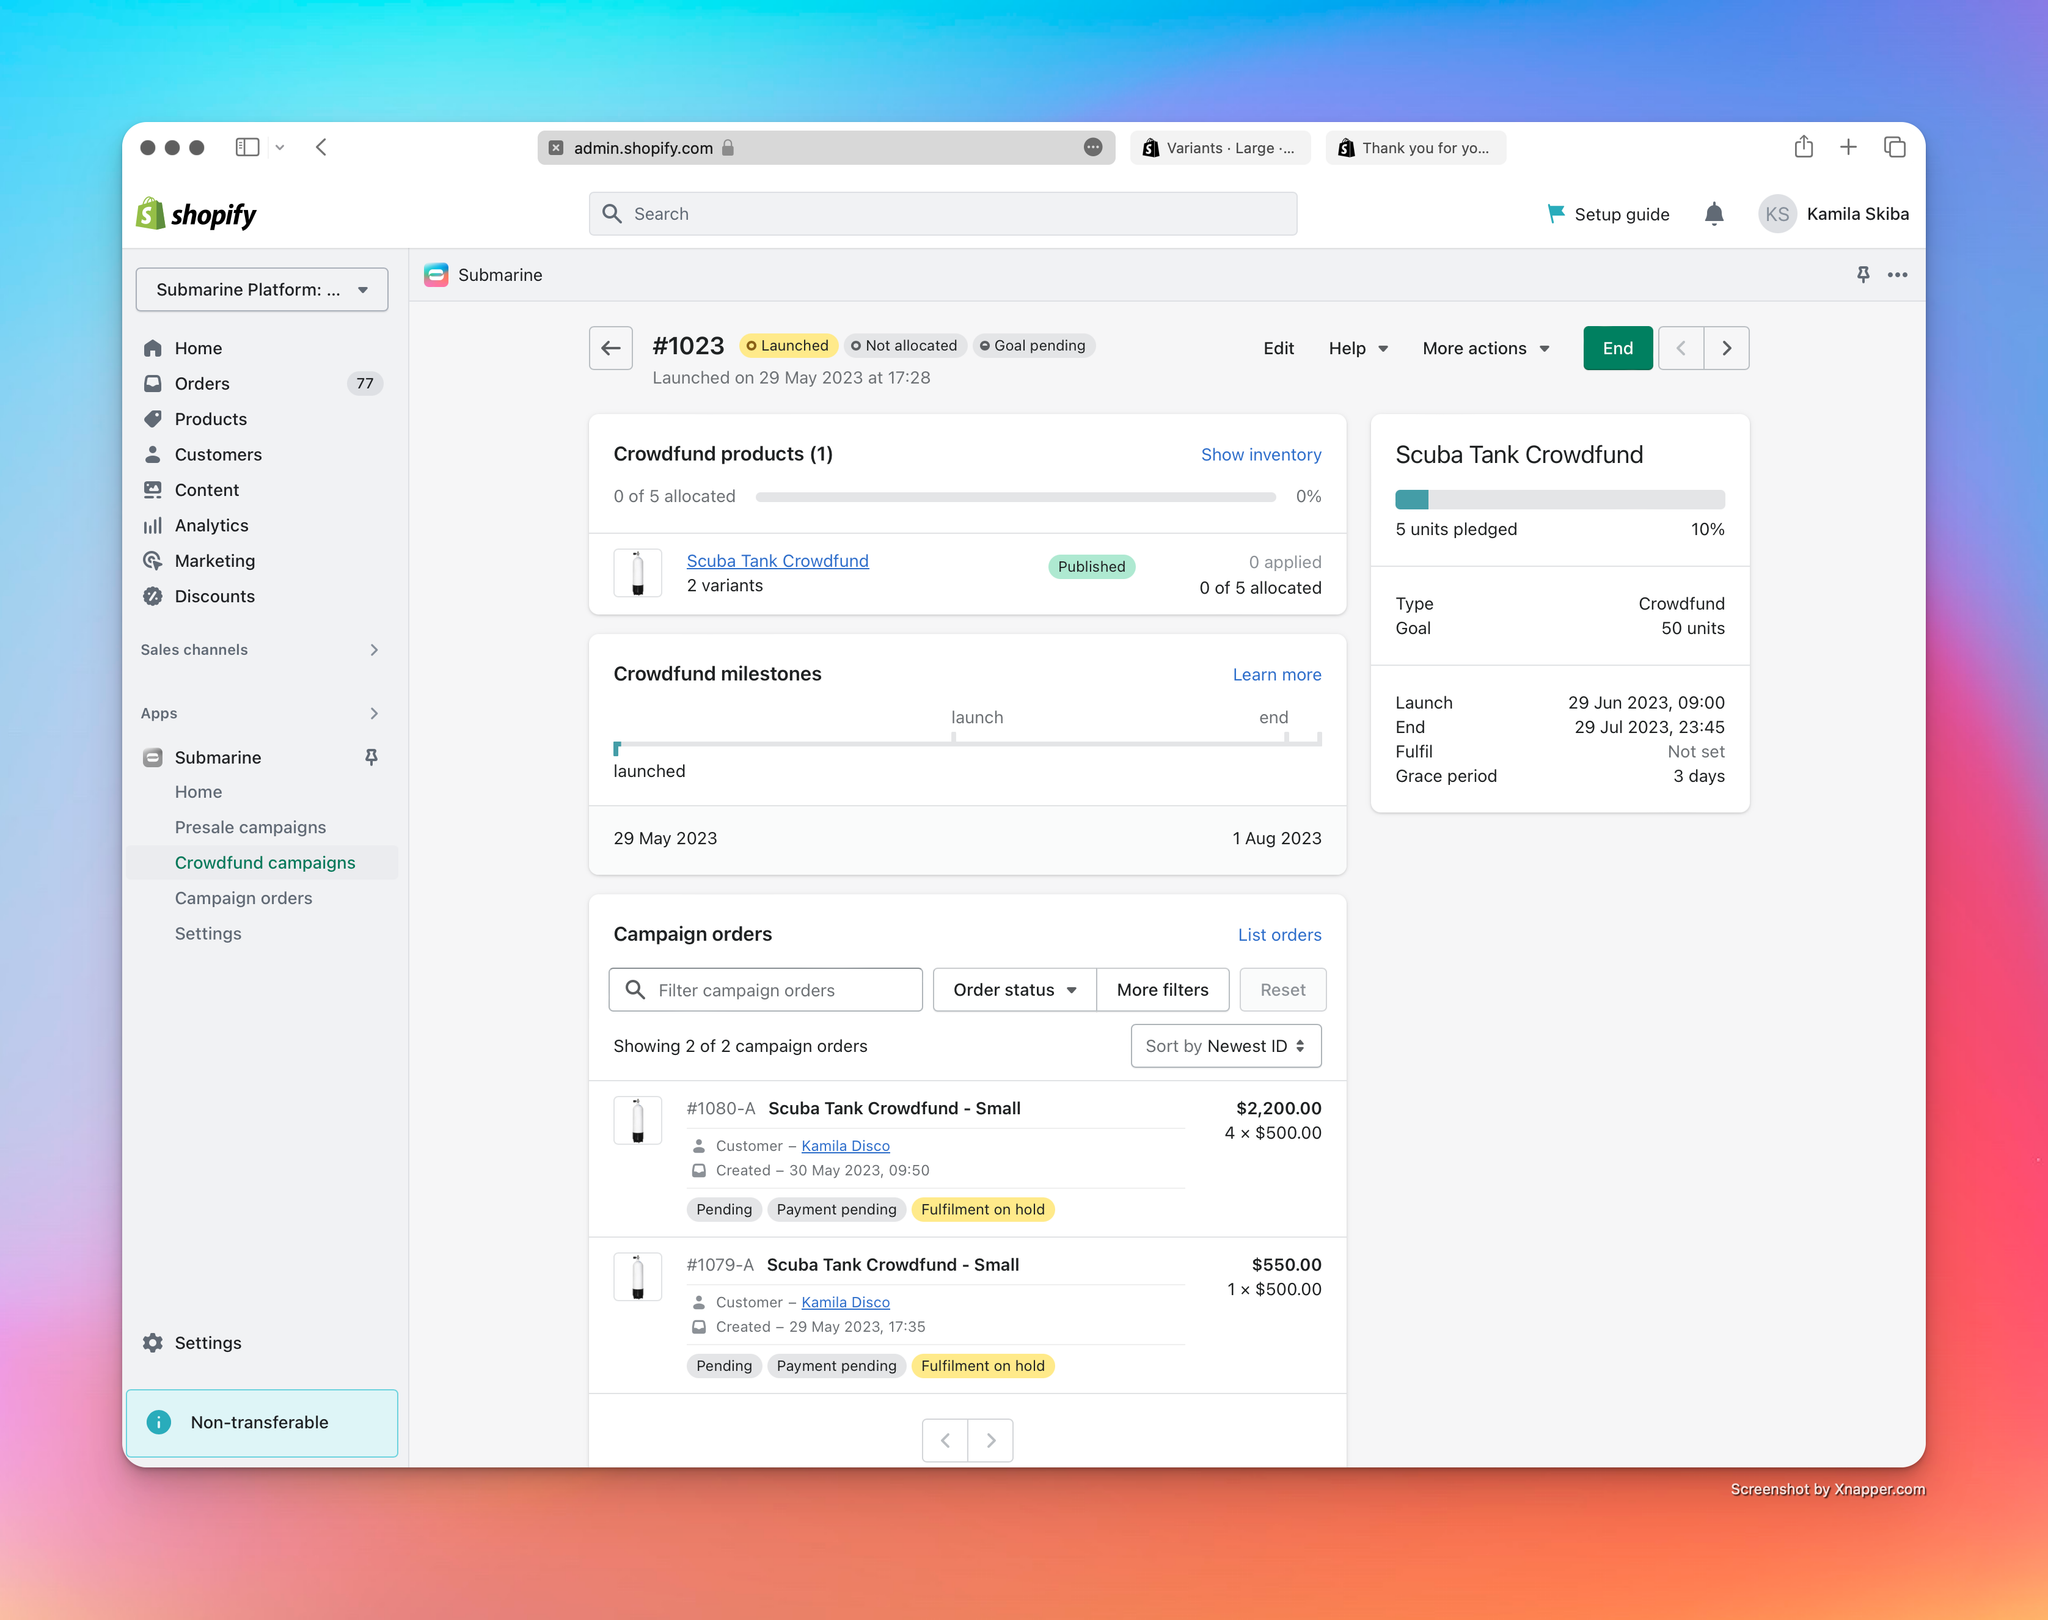
- First off, let’s navigate to the detail view of the campaign in the Submarine UI. Go to the Submarine homepage and click on the one-and-only crowdfund shown in the list.
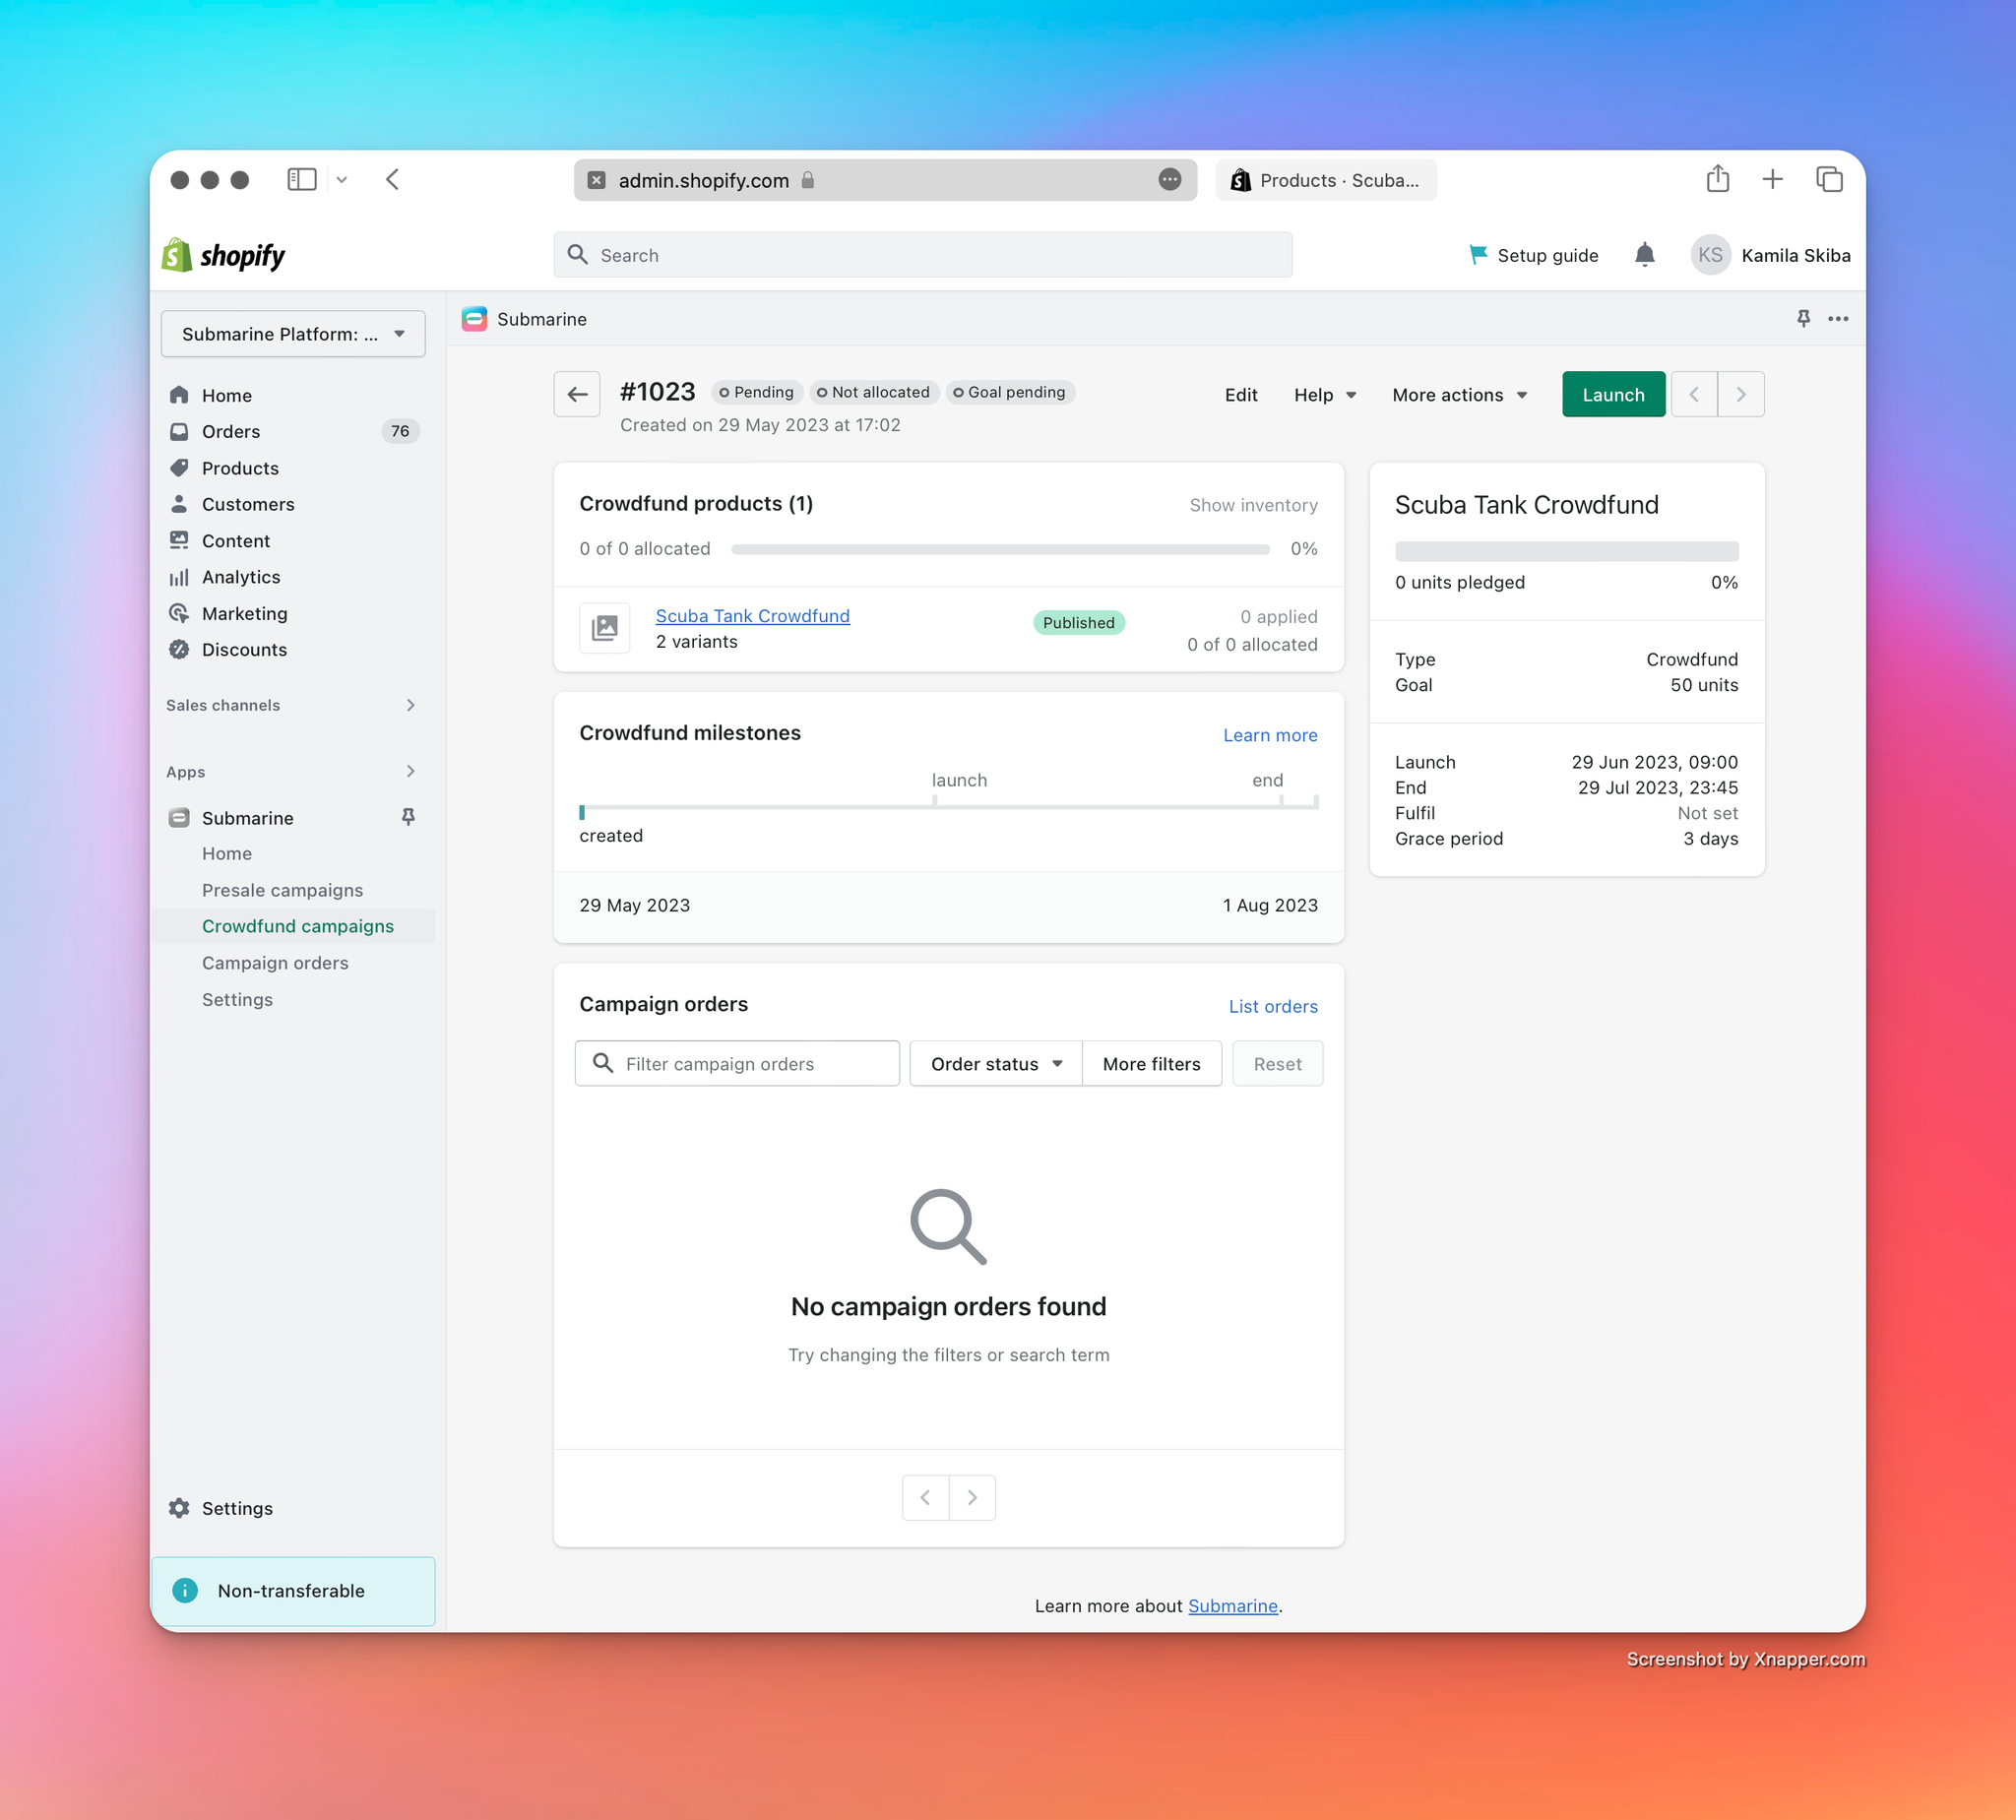
- You’ll be presented with a page that looks similar to this:

There’s a fair bit going on here, most of which we’ll touch on below, but for the time being we can see that the campaign has been given an ID of #1023, is in a pending state and inventory has not yet been allocated.
- Note that, since there have been no purchases made against the campaign, we’re able to cancel and delete it.
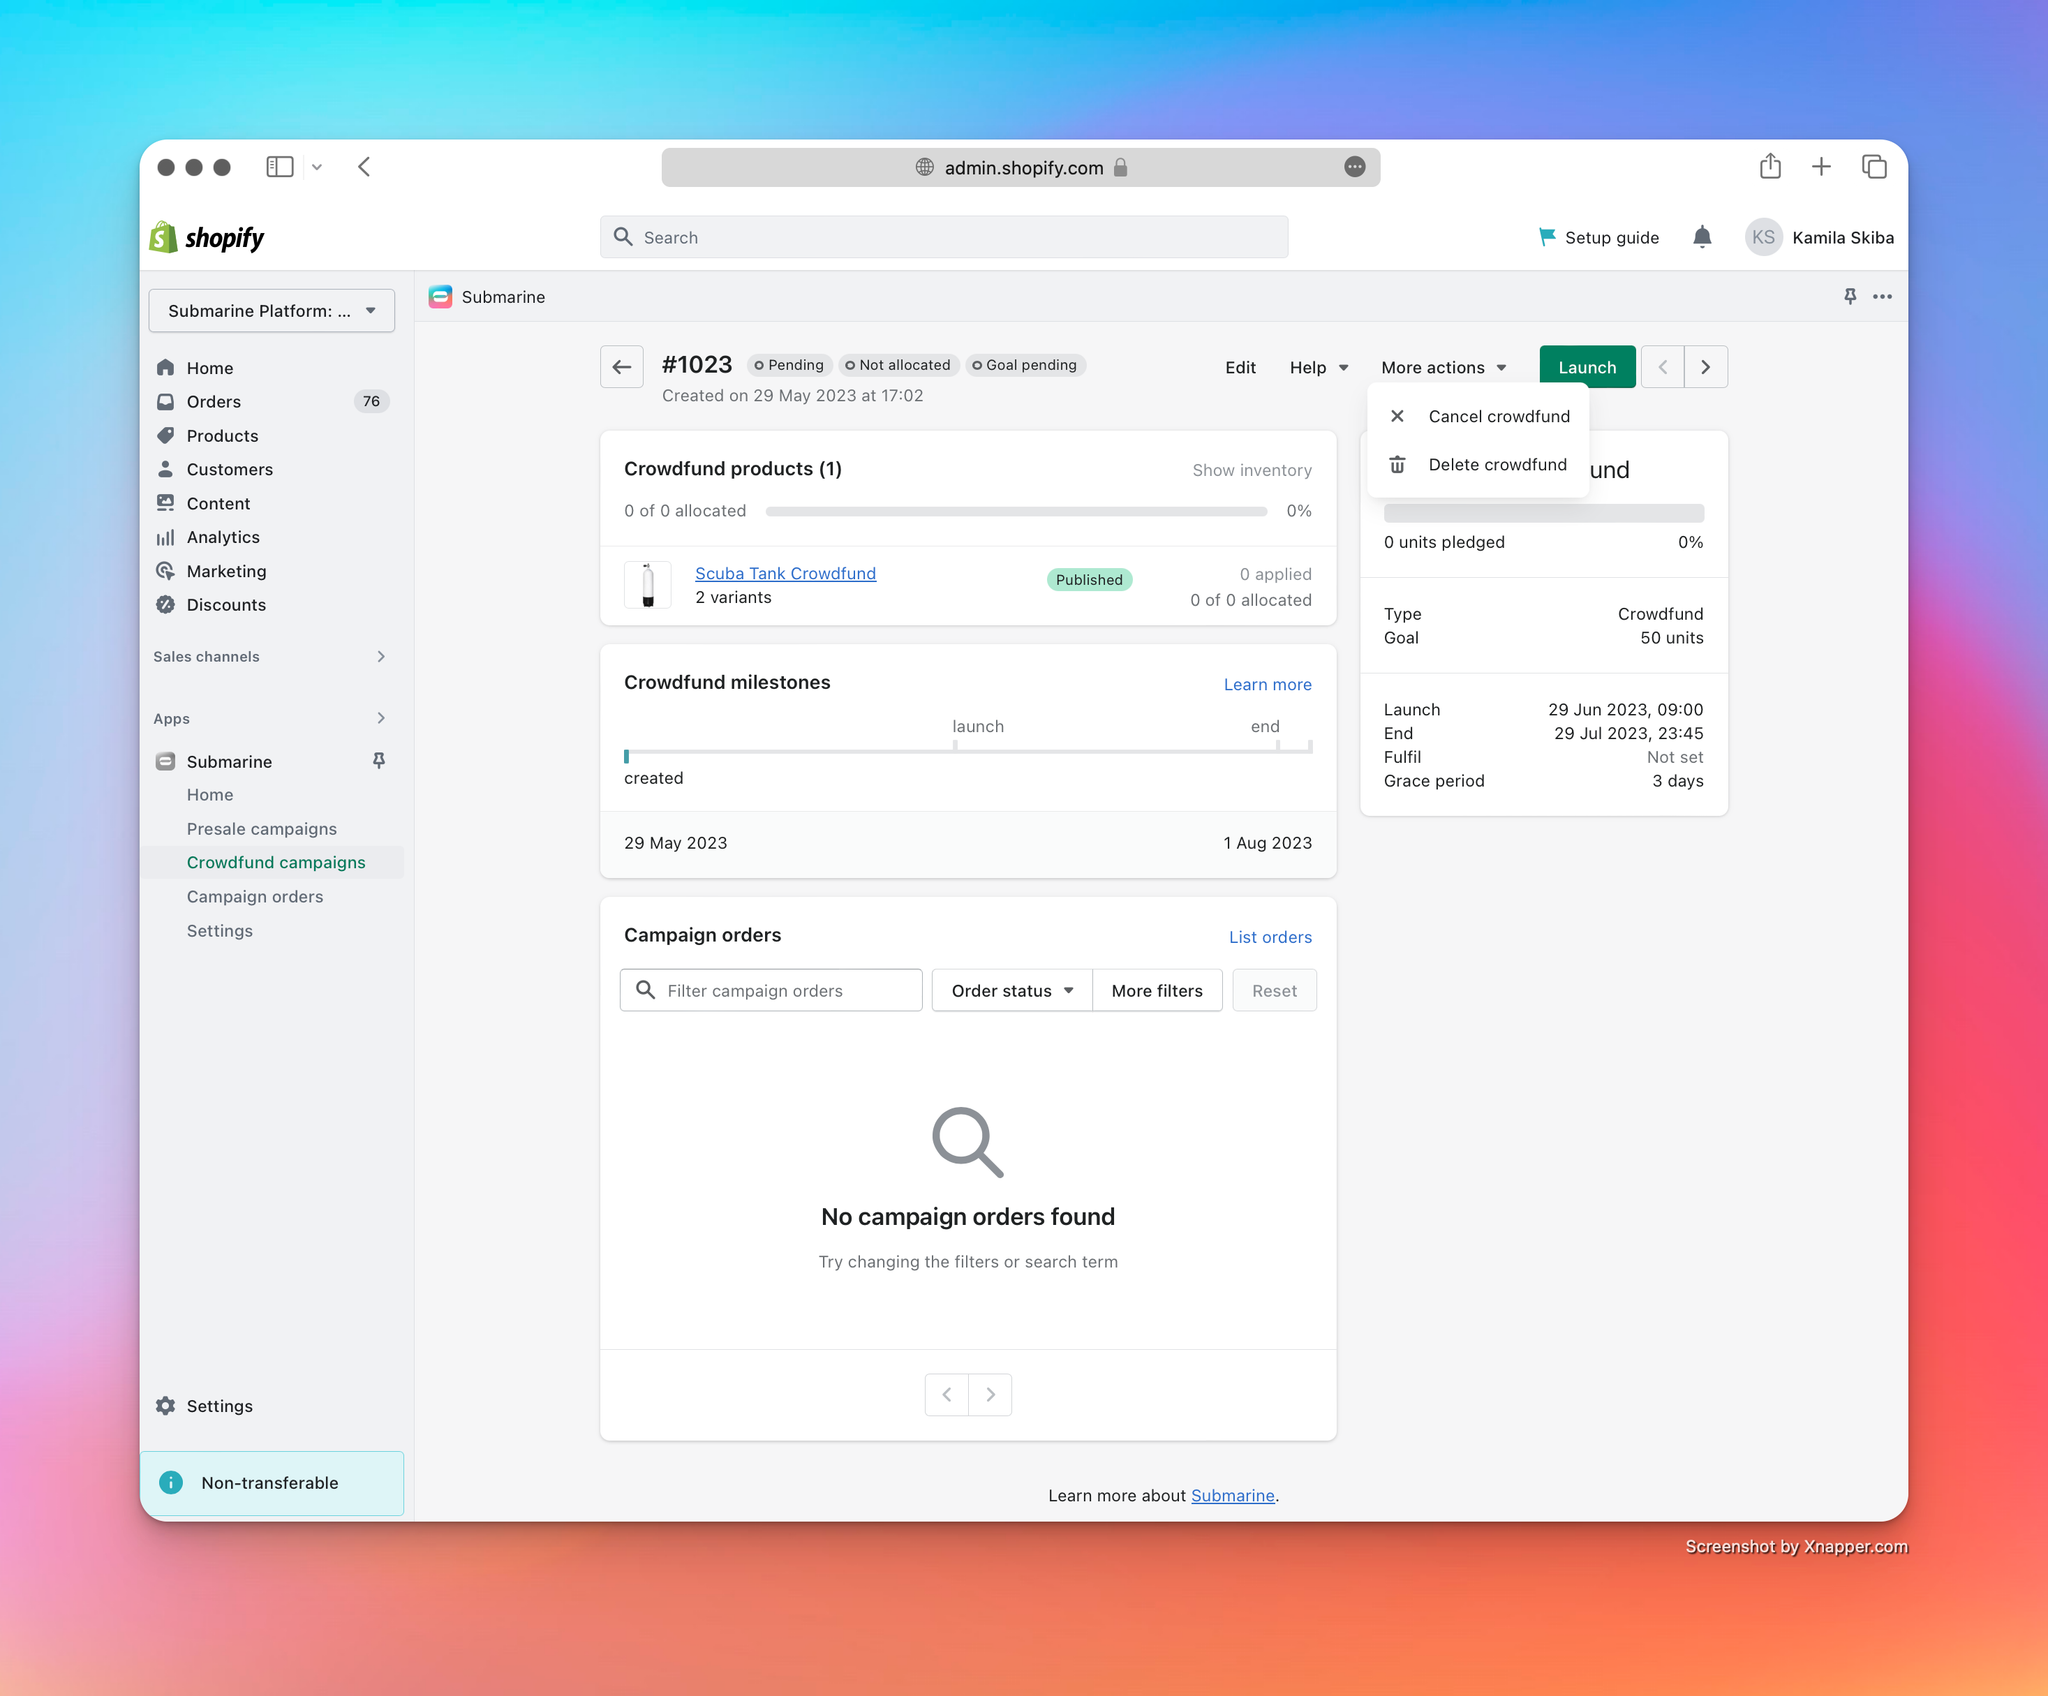
- However, we don’t want to do that right now. Instead, we want to force the launch of the campaign, so that our impatient customers can start backing it. We do that by clicking the green “Launch” button in the top-right corner.
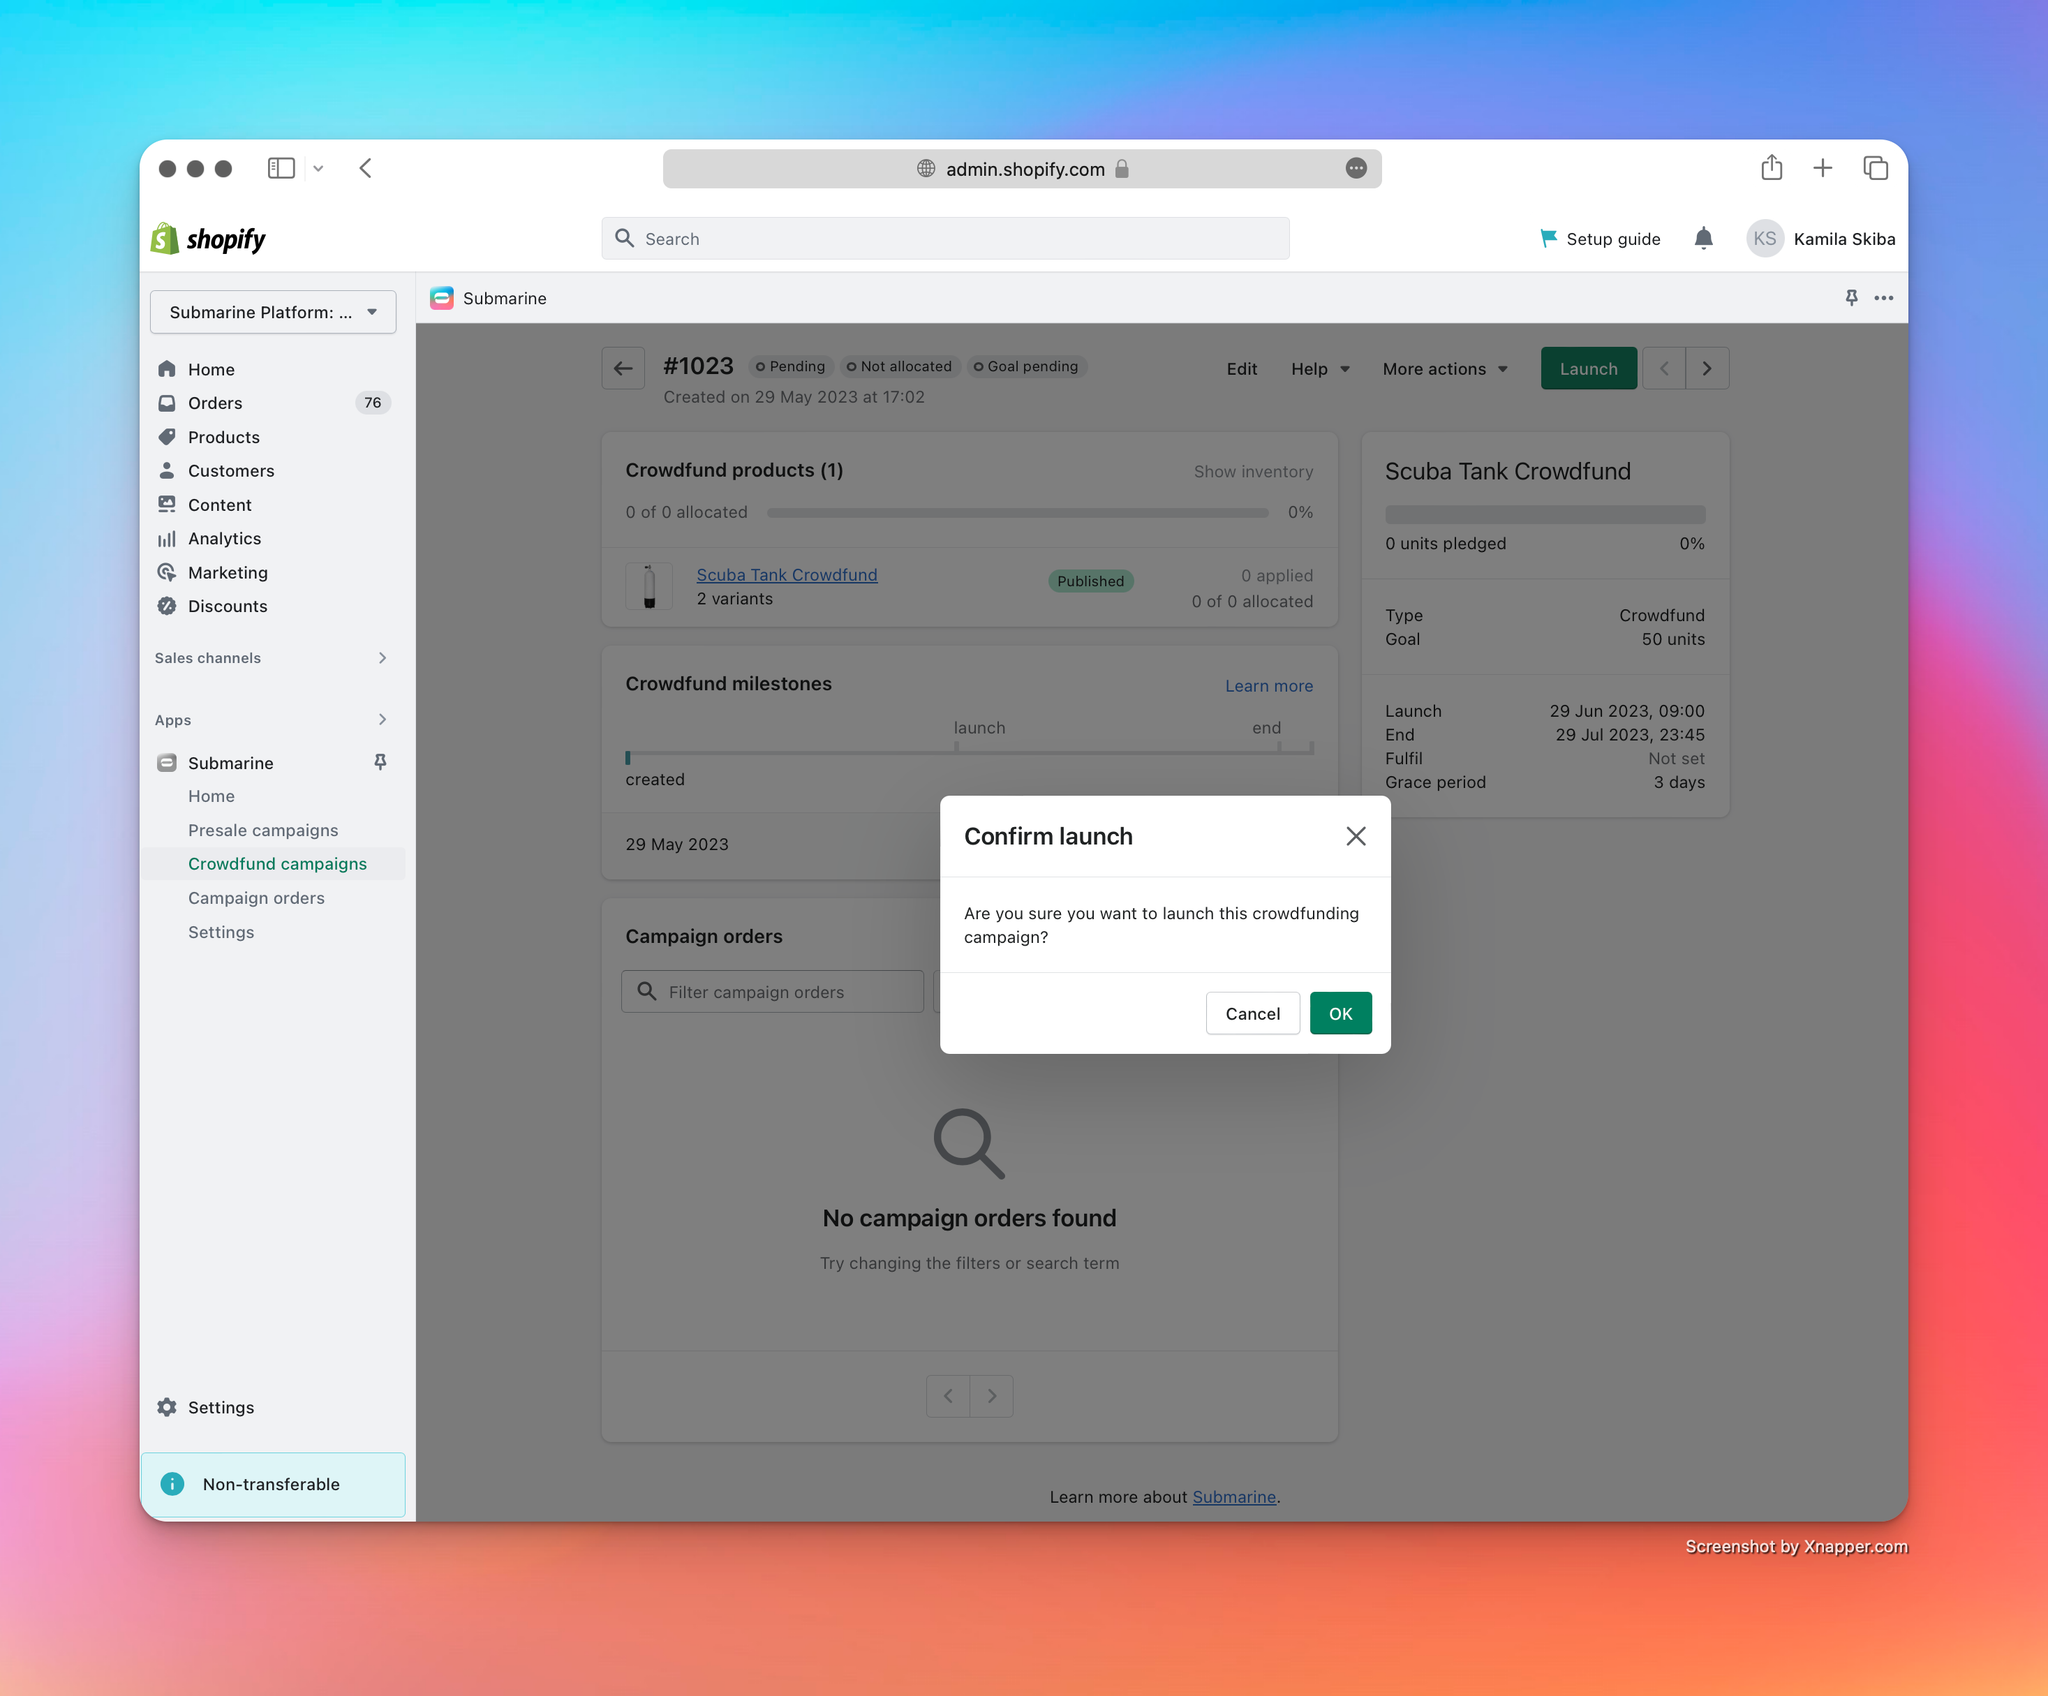
- There are two immediate effects as a result of this action.
- First, the new status of the crowdfund is reflected in the Submarine UI.
- More importantly though, the selling plan is now exposed to customers in the theme, which means that they can purchase our new crowdfunding campaign.
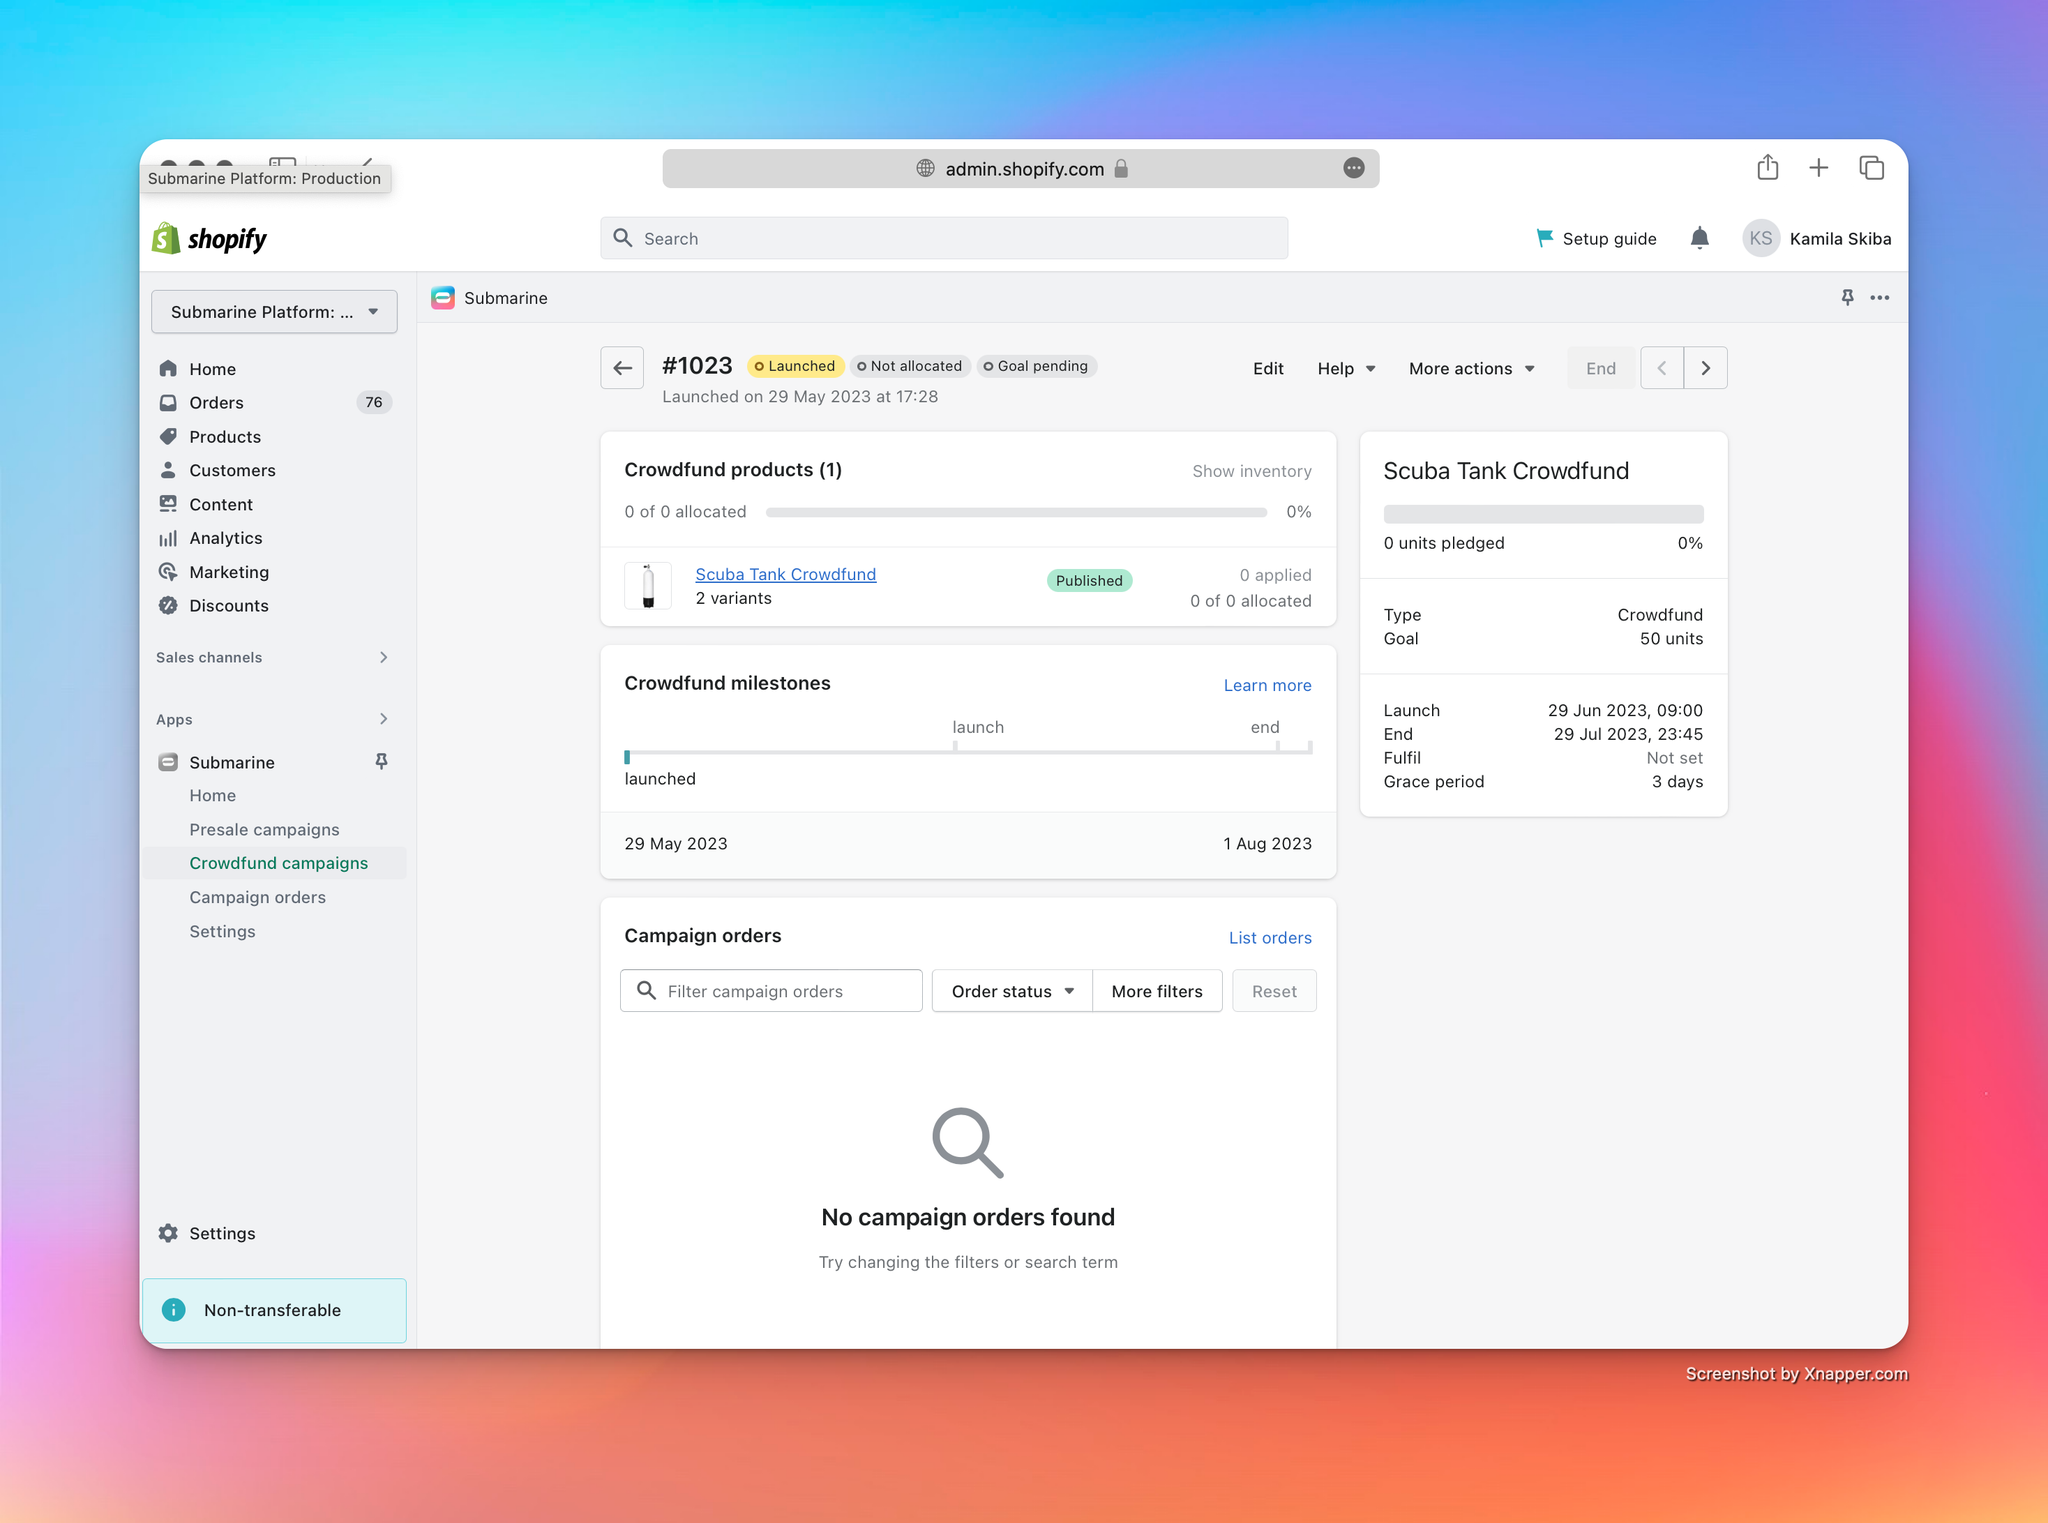
Note also that the “Launch” button has disappeared and has been replaced with a (disabled) “End” button. The button in this location will always indicate what is the next step in the campaign’s lifecycle, and will usually provide the option to manually override it. Here, we are unable to end the campaign because we haven’t received any orders for it.
Note that both the name and description of the selling plan (as configured when we created the crowdfunding campaign) is displayed in the selling plan selector.
4. Purchasing your crowdfunding campaign
Goal
Purchase a crowdfunding campaign via the Shopify checkout, as if you were a customer.
As a merchant, it makes sense to familiarise yourself with the subtle differences that a customer experiences at checkout when purchasing a crowdfunding campaign.
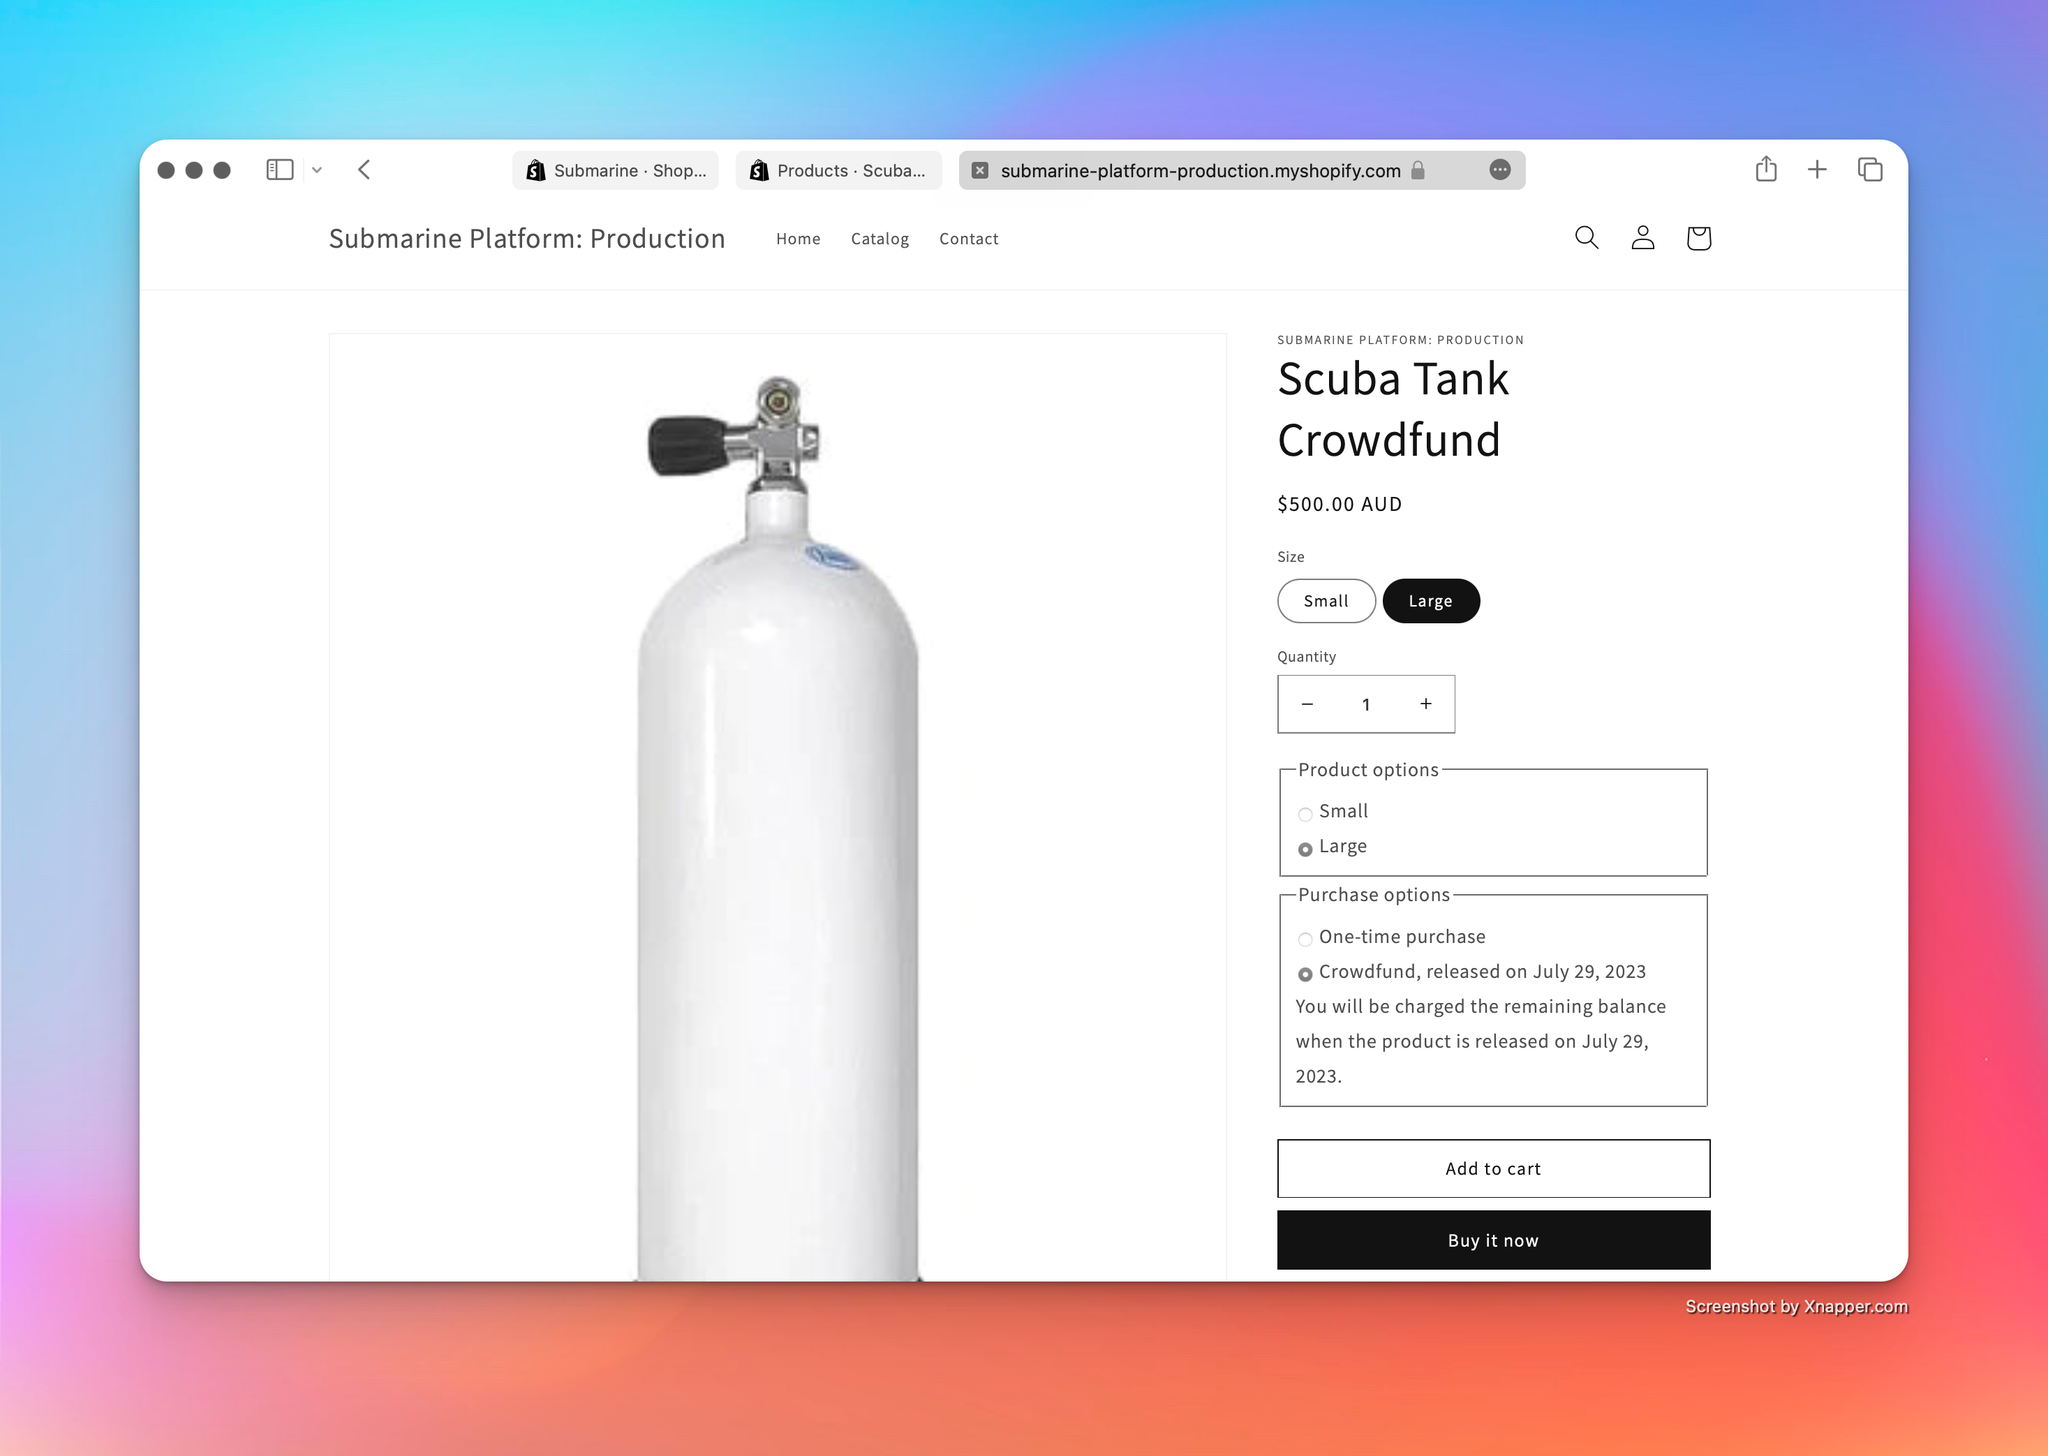
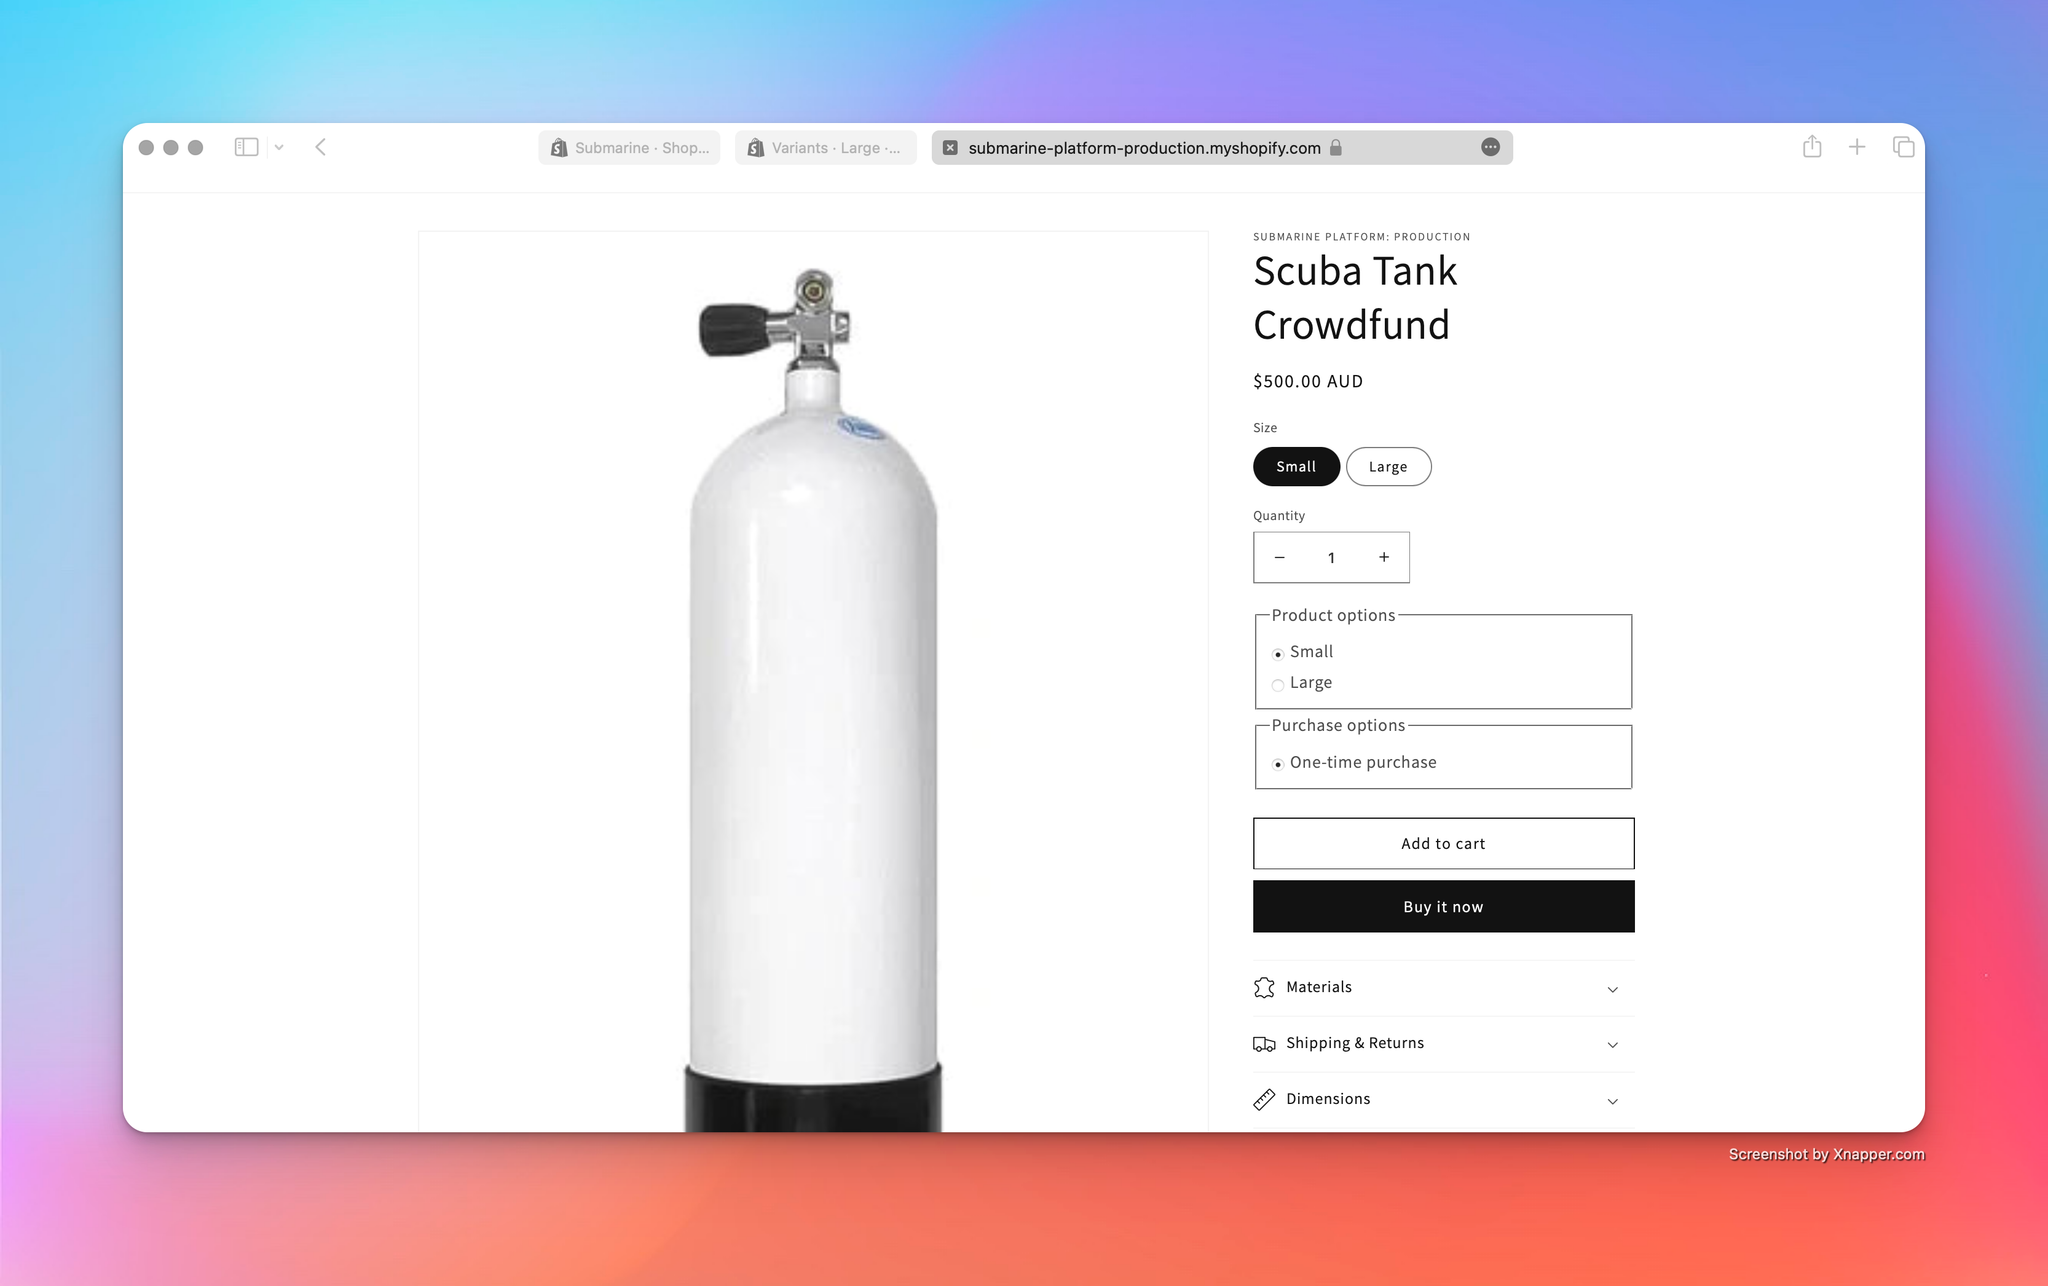
- From the product page, in the selling-plan selector, make sure you select the “Crowdfund” radio button. If you’ve only created one campaign for this variant, then the drop-down box should only have one option, and should be displaying the selling-plan name that you configured when you created the crowdfund.
- Add the item to your cart and review your cart contents. Submarine fully supports mixed carts, but we’ll be keeping it simple here and will stick to just one crowdfund item.
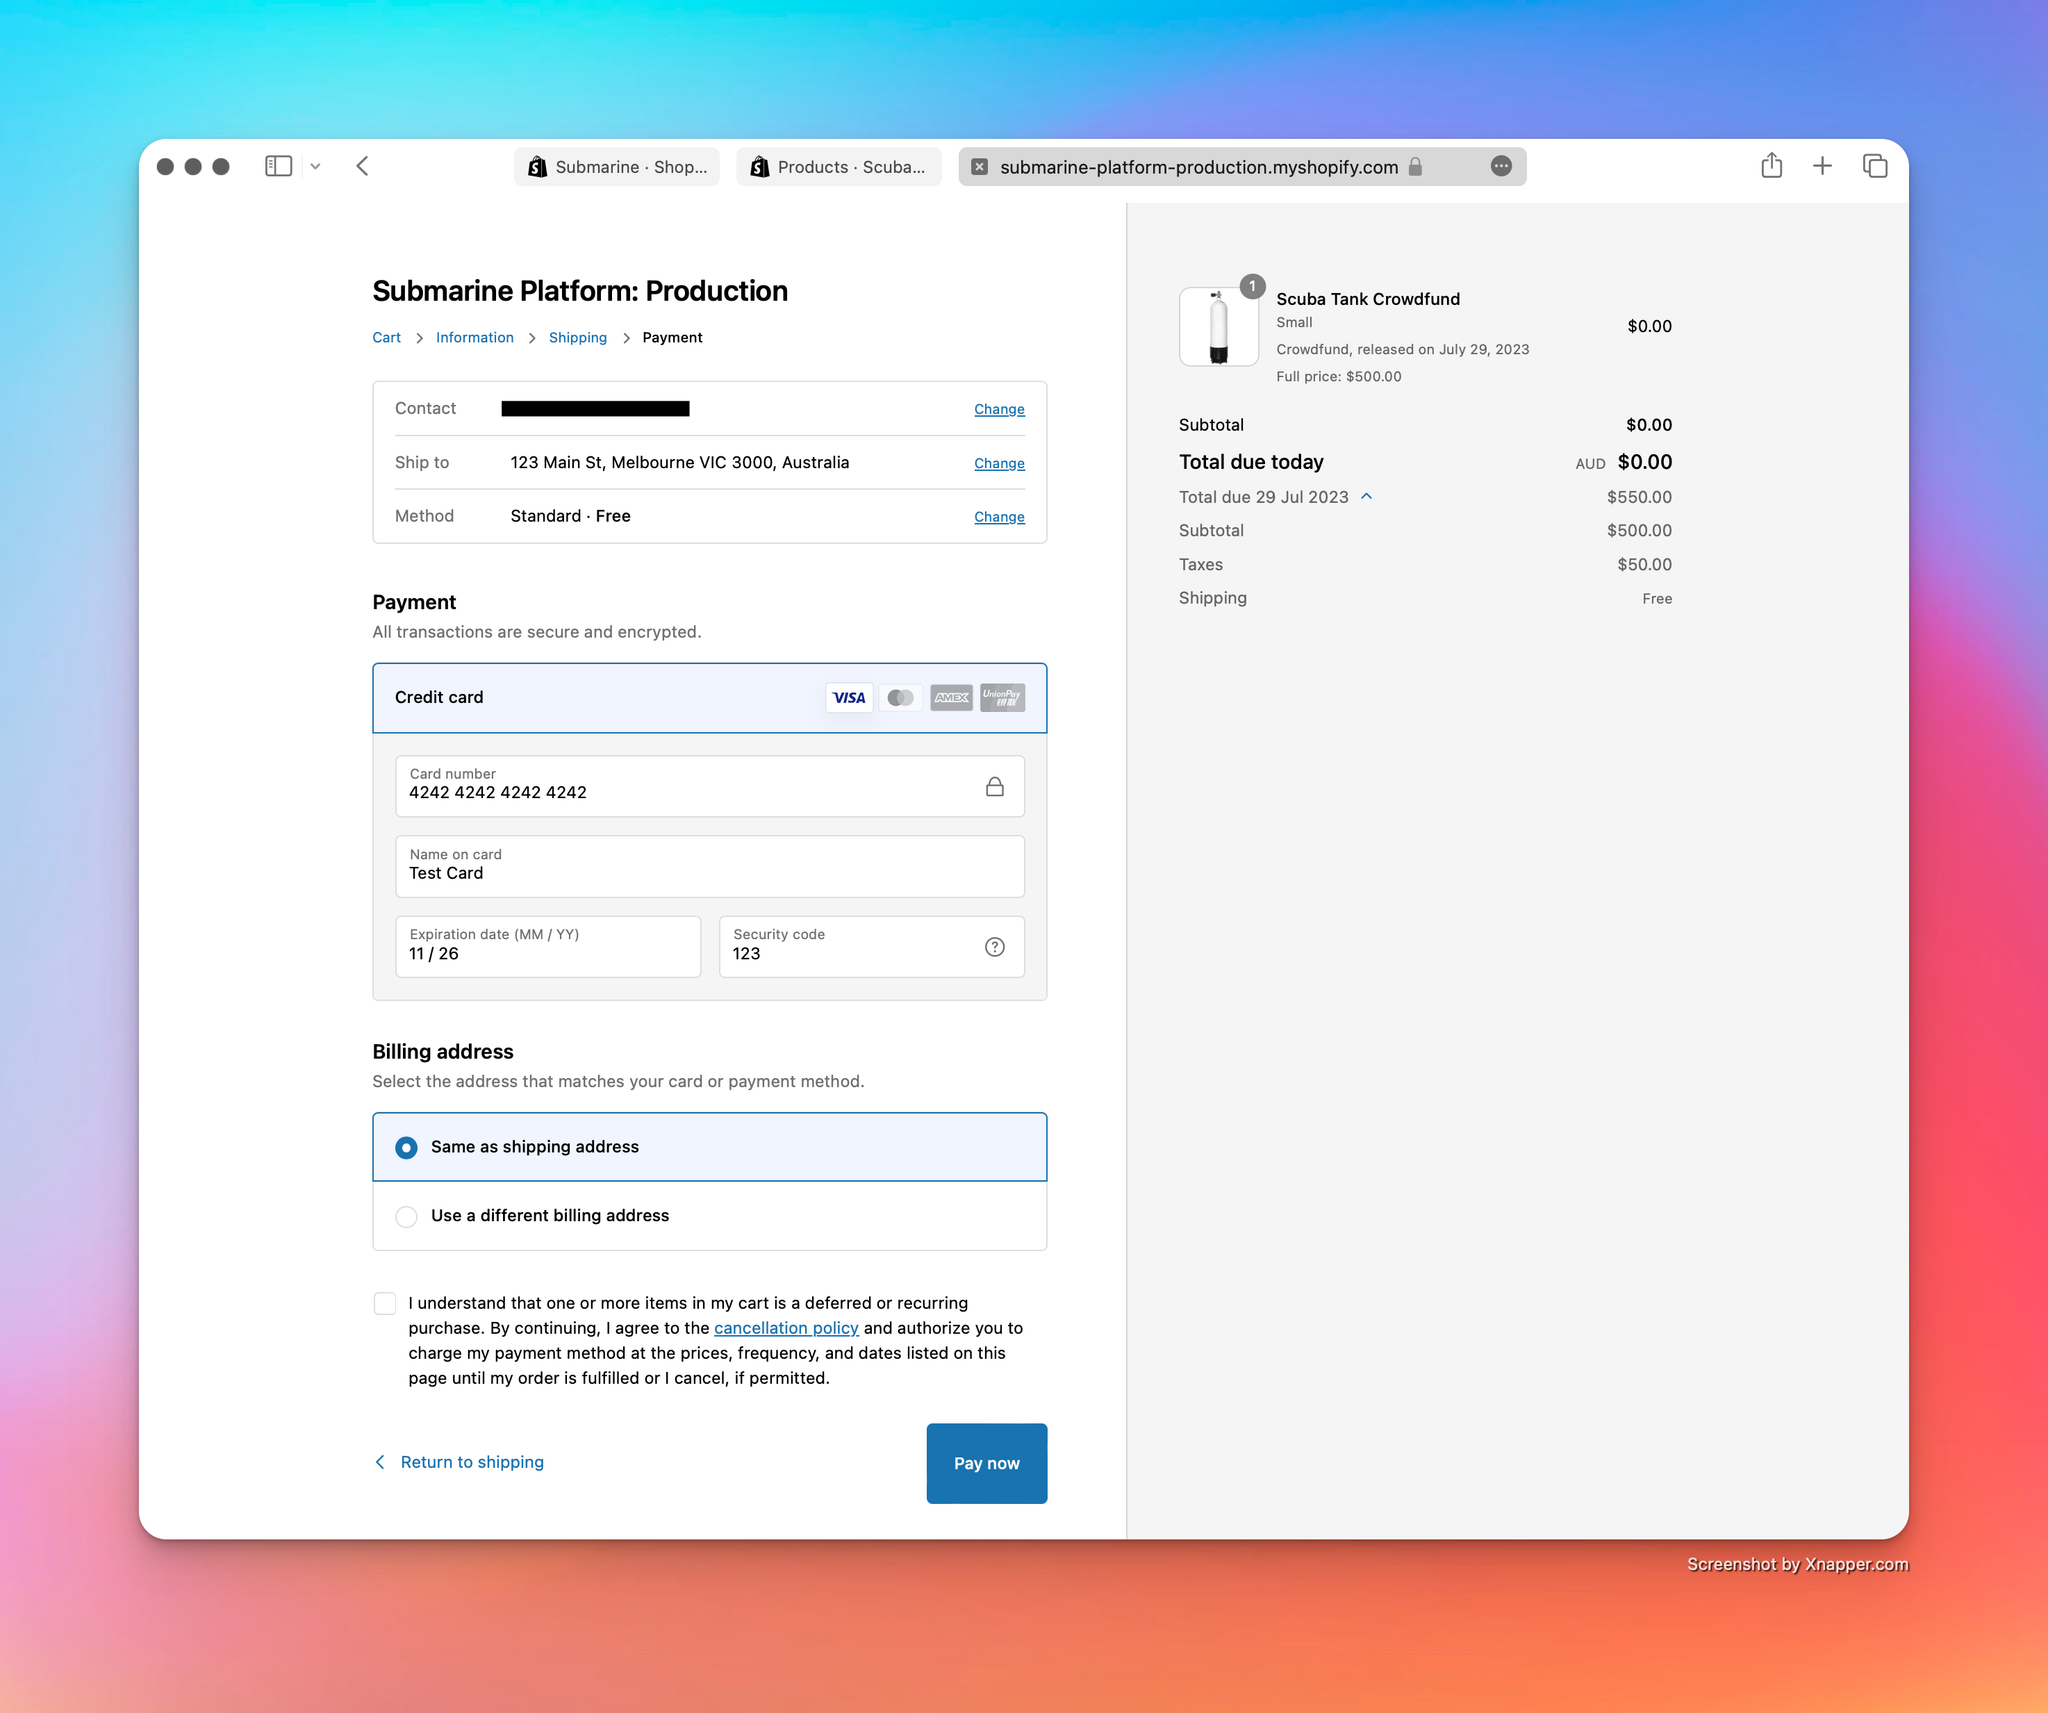
Note the additional checkbox just above the “Pay now” button. The customer cannot complete checkout until they acknowledge the deferred payment for the crowdfund item.
Also note the cart summary on the right-hand side — it indicates that nothing is due to be paid now, and informs the customer when the balance will be captured.
Please be aware the we currently do not support a mixed Presale and Crowdfunding item carts due to Shopify limitation on payment captures - You cannot have a cart with a Presale item and a Crowdfunding item. You can have a regular in stock item and a Crowdfunding item in one cart however. You can read more details on there here.
- Complete the checkout as usual. The experience should be identical to that of a regular order.
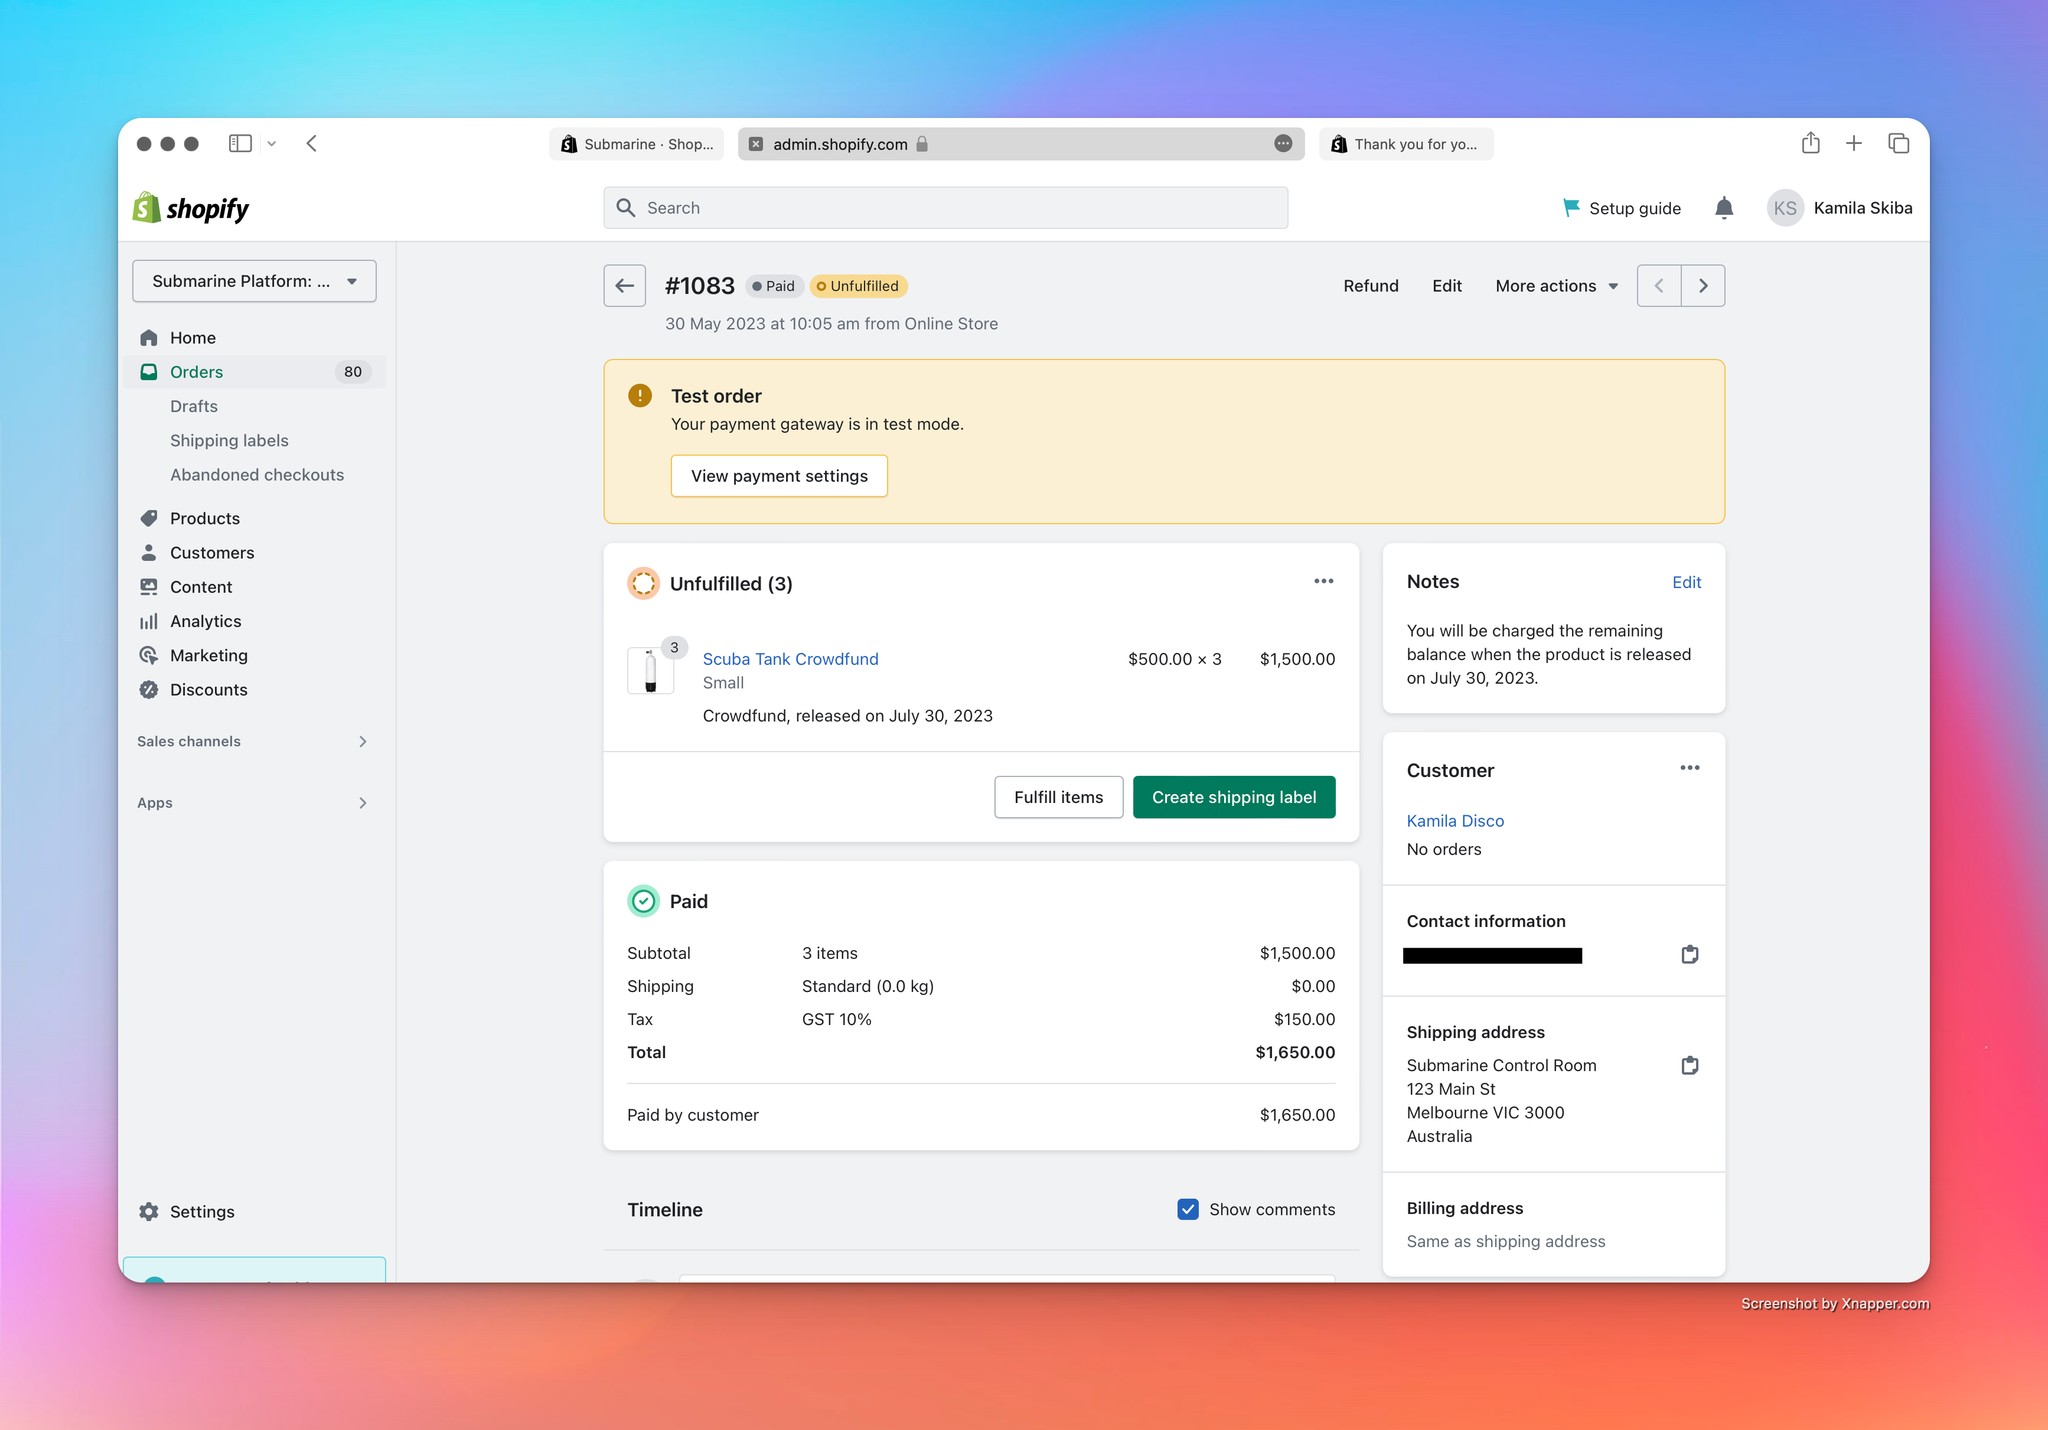
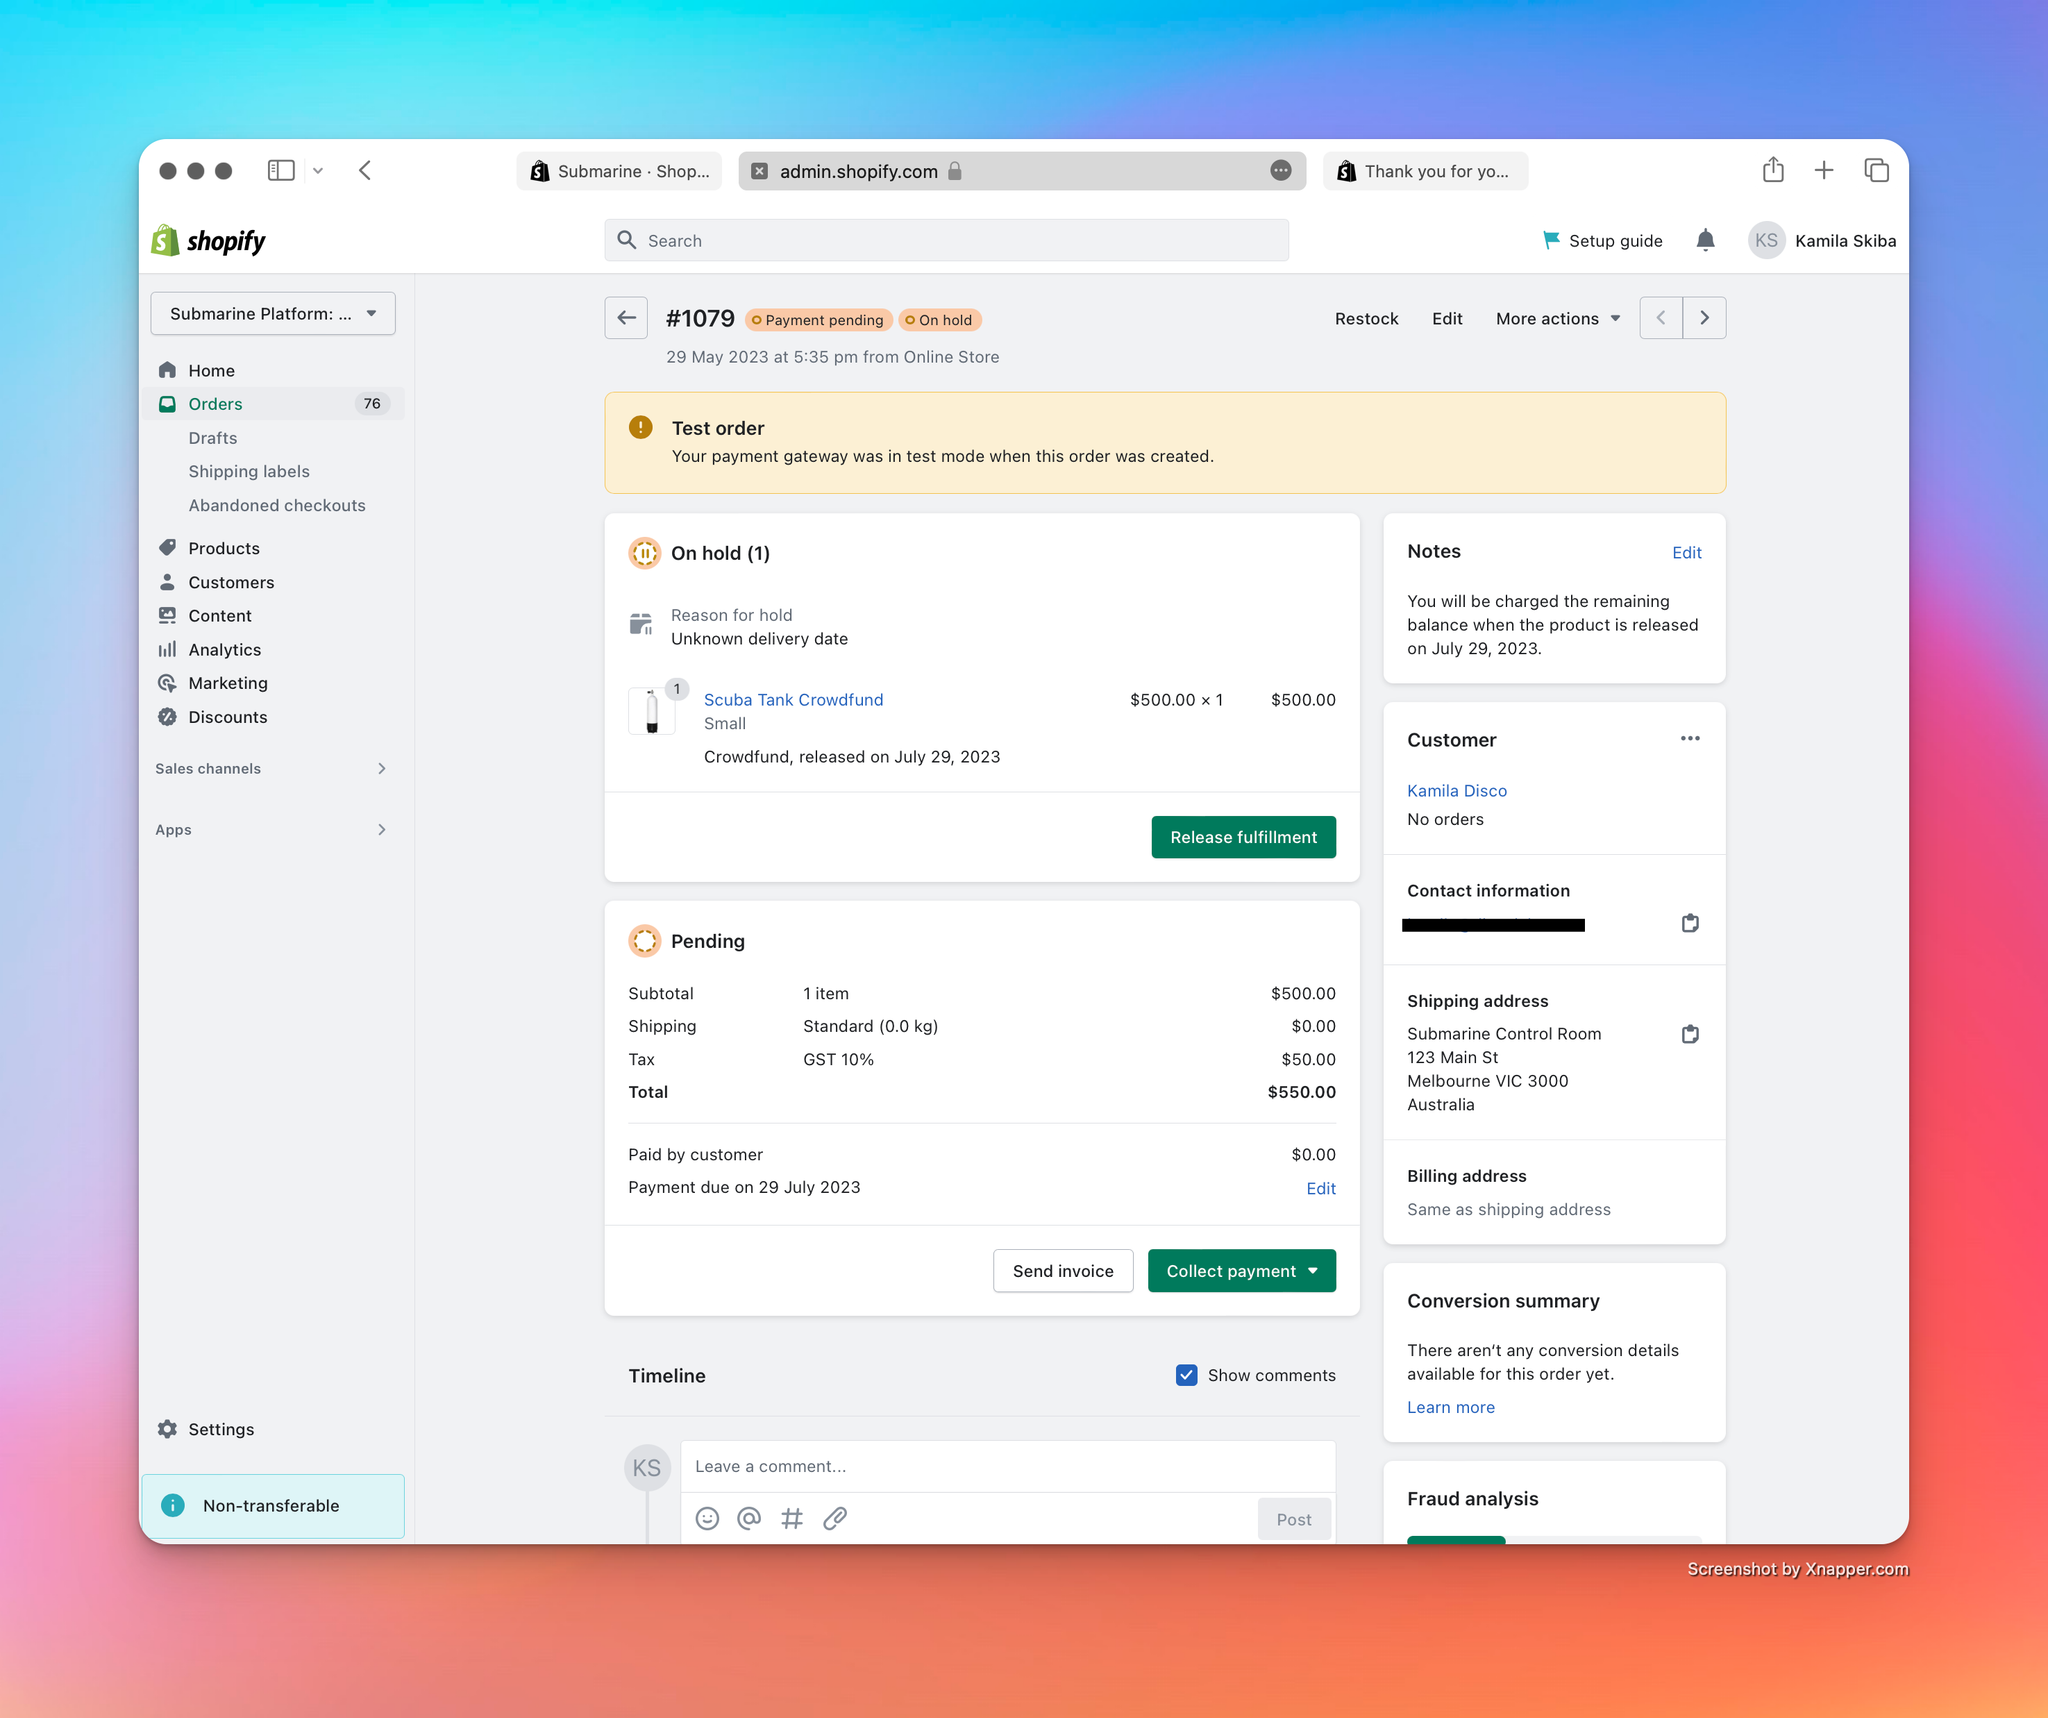
- If we navigate to the newly created order in the Shopify Admin UI, we can see some obvious differences.
- The fulfilment for the campaign item is “On hold”, with the hold reason given as “Unknown delivery date”.
- The fulfilment for the campaign item displays the selling-plan name, as configured in the Submarine UI when you created the crowdfunding campaign.
- Payment is flagged as pending, with a due date of 29 July 2023. This aligns with the end date of the crowdfunding campaign.
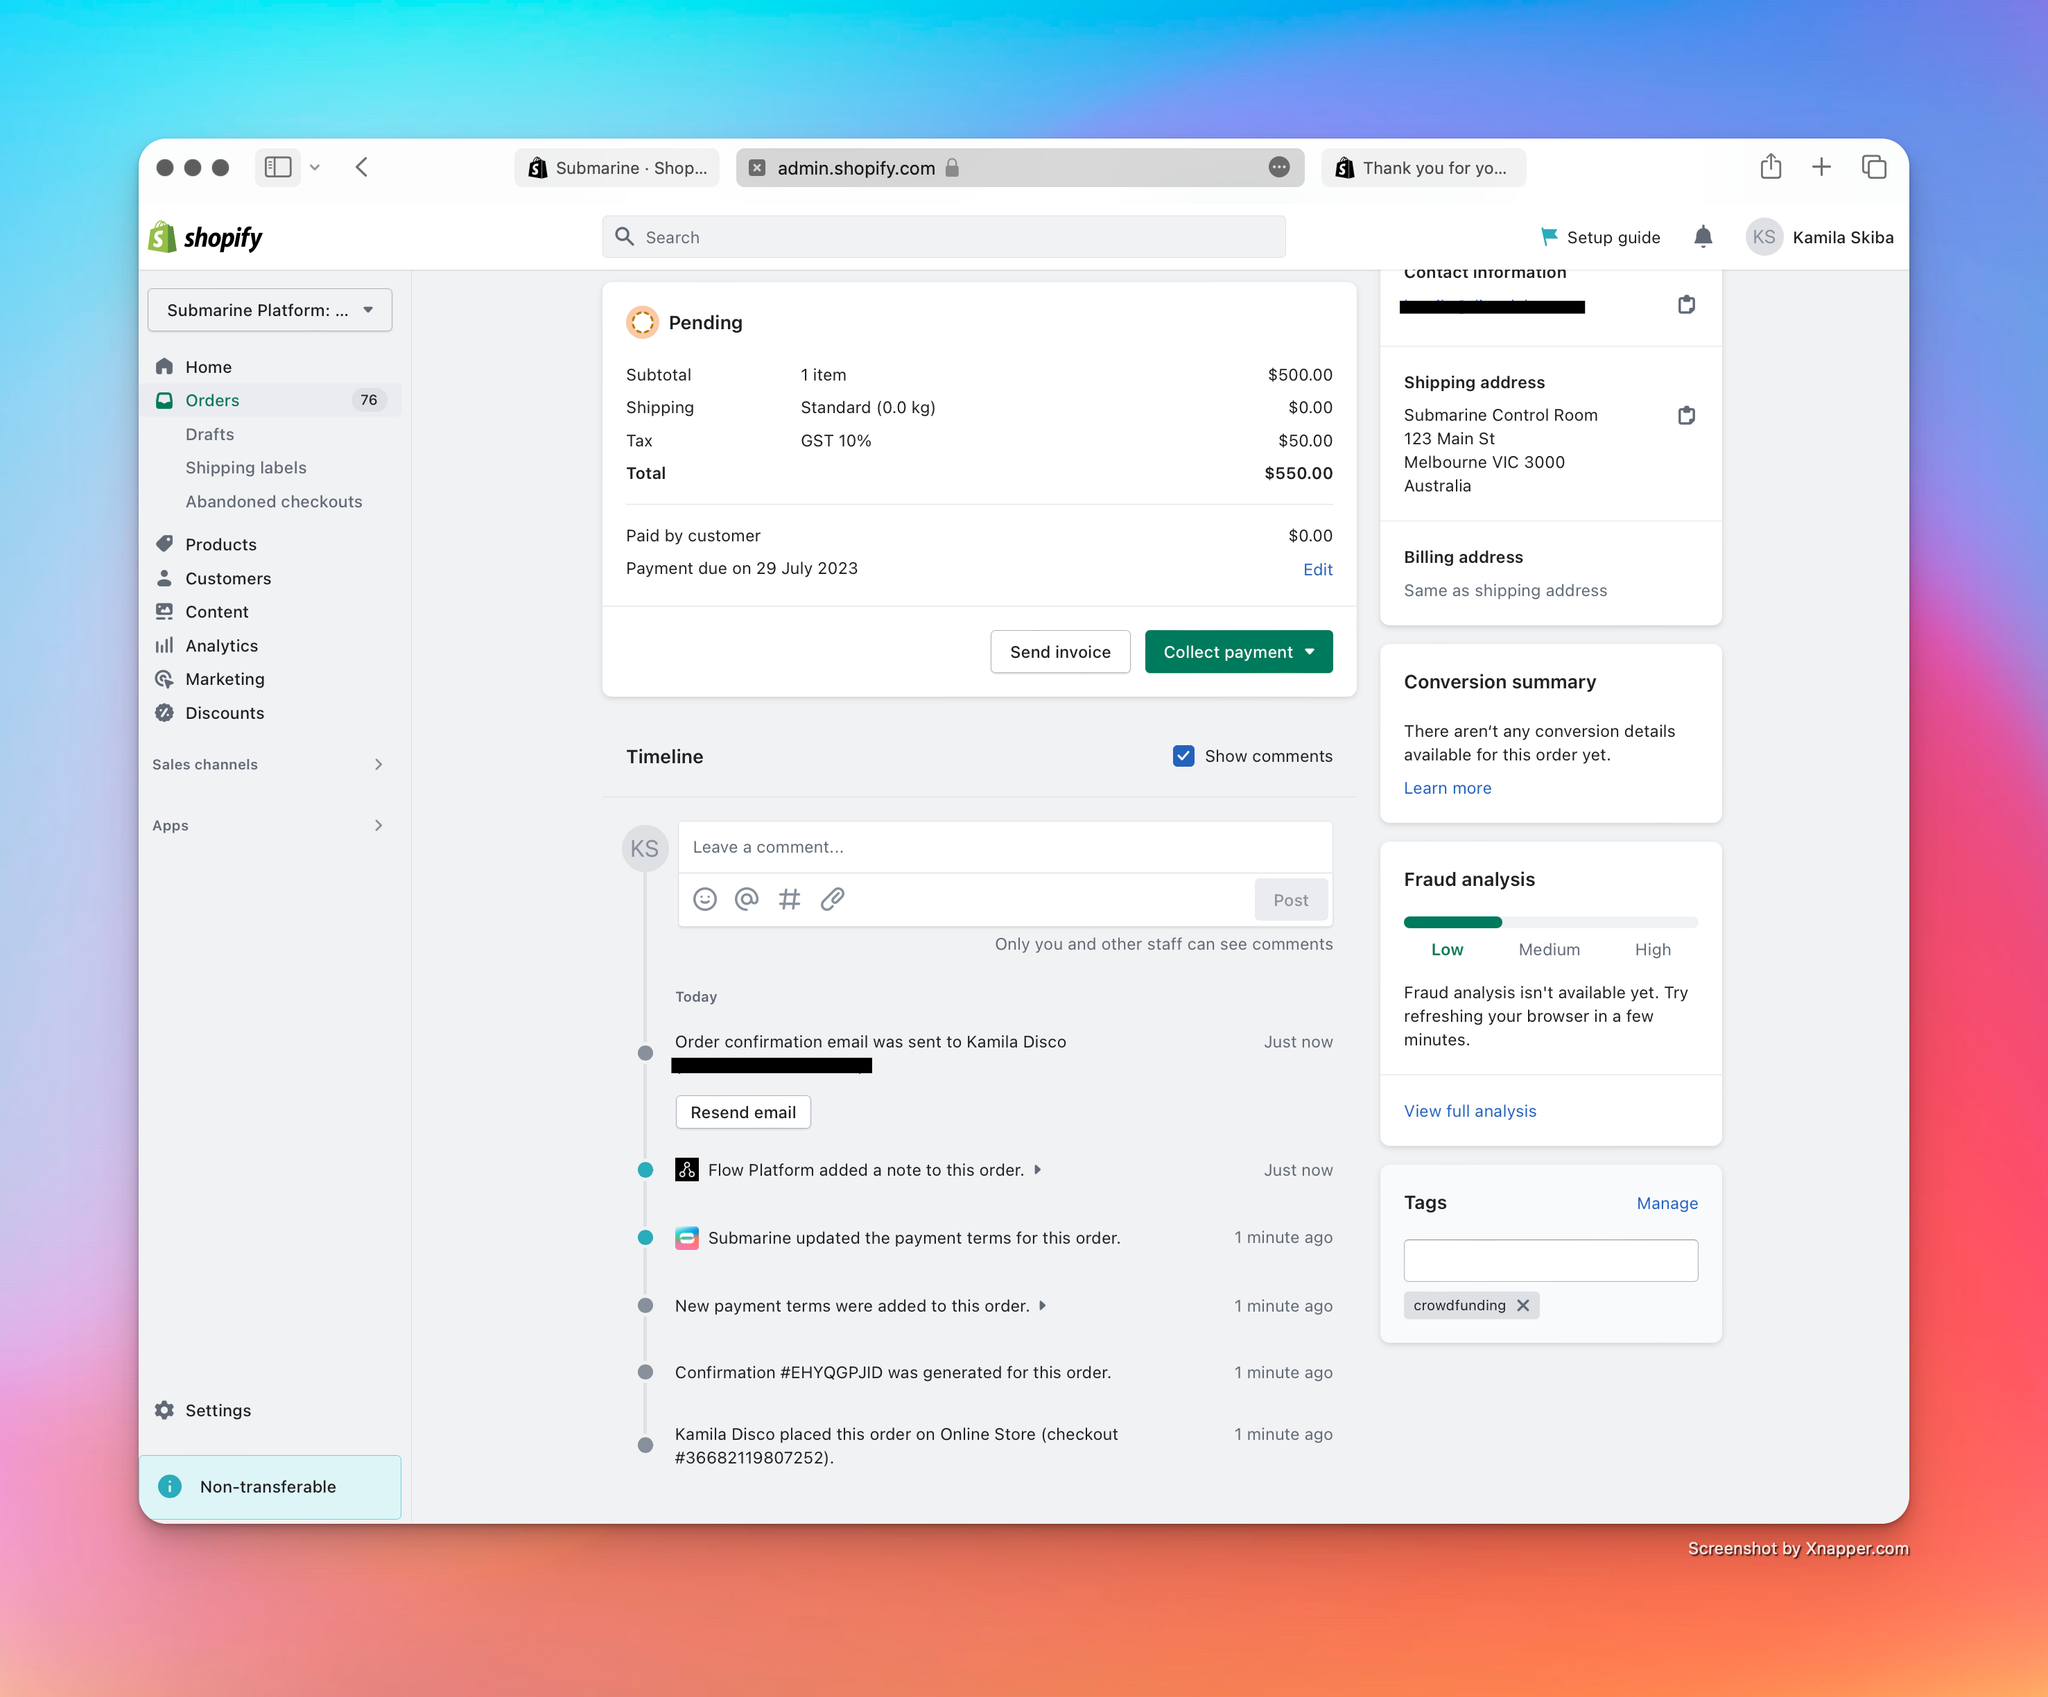
- In the timeline, you can see that Submarine updated the payment terms for the order soon after it was created. This is to handle the case when an order contains multiple campaign items. Since Shopify does not yet support partial payments against a purchase option, and instead only permits a single payment for the entire balance owing, we push the expected due date for that payment from the date at which the first crowdfund product is due (the default) to the date at which the last crowdfund product is due. This behaviour better meets the requirements of most of our merchants, but Submarine can be configured to revert to Shopify’s default behaviour. See .
- If we navigate to the crowdfunding campaign in the Submarine UI, we can see some differences there too.
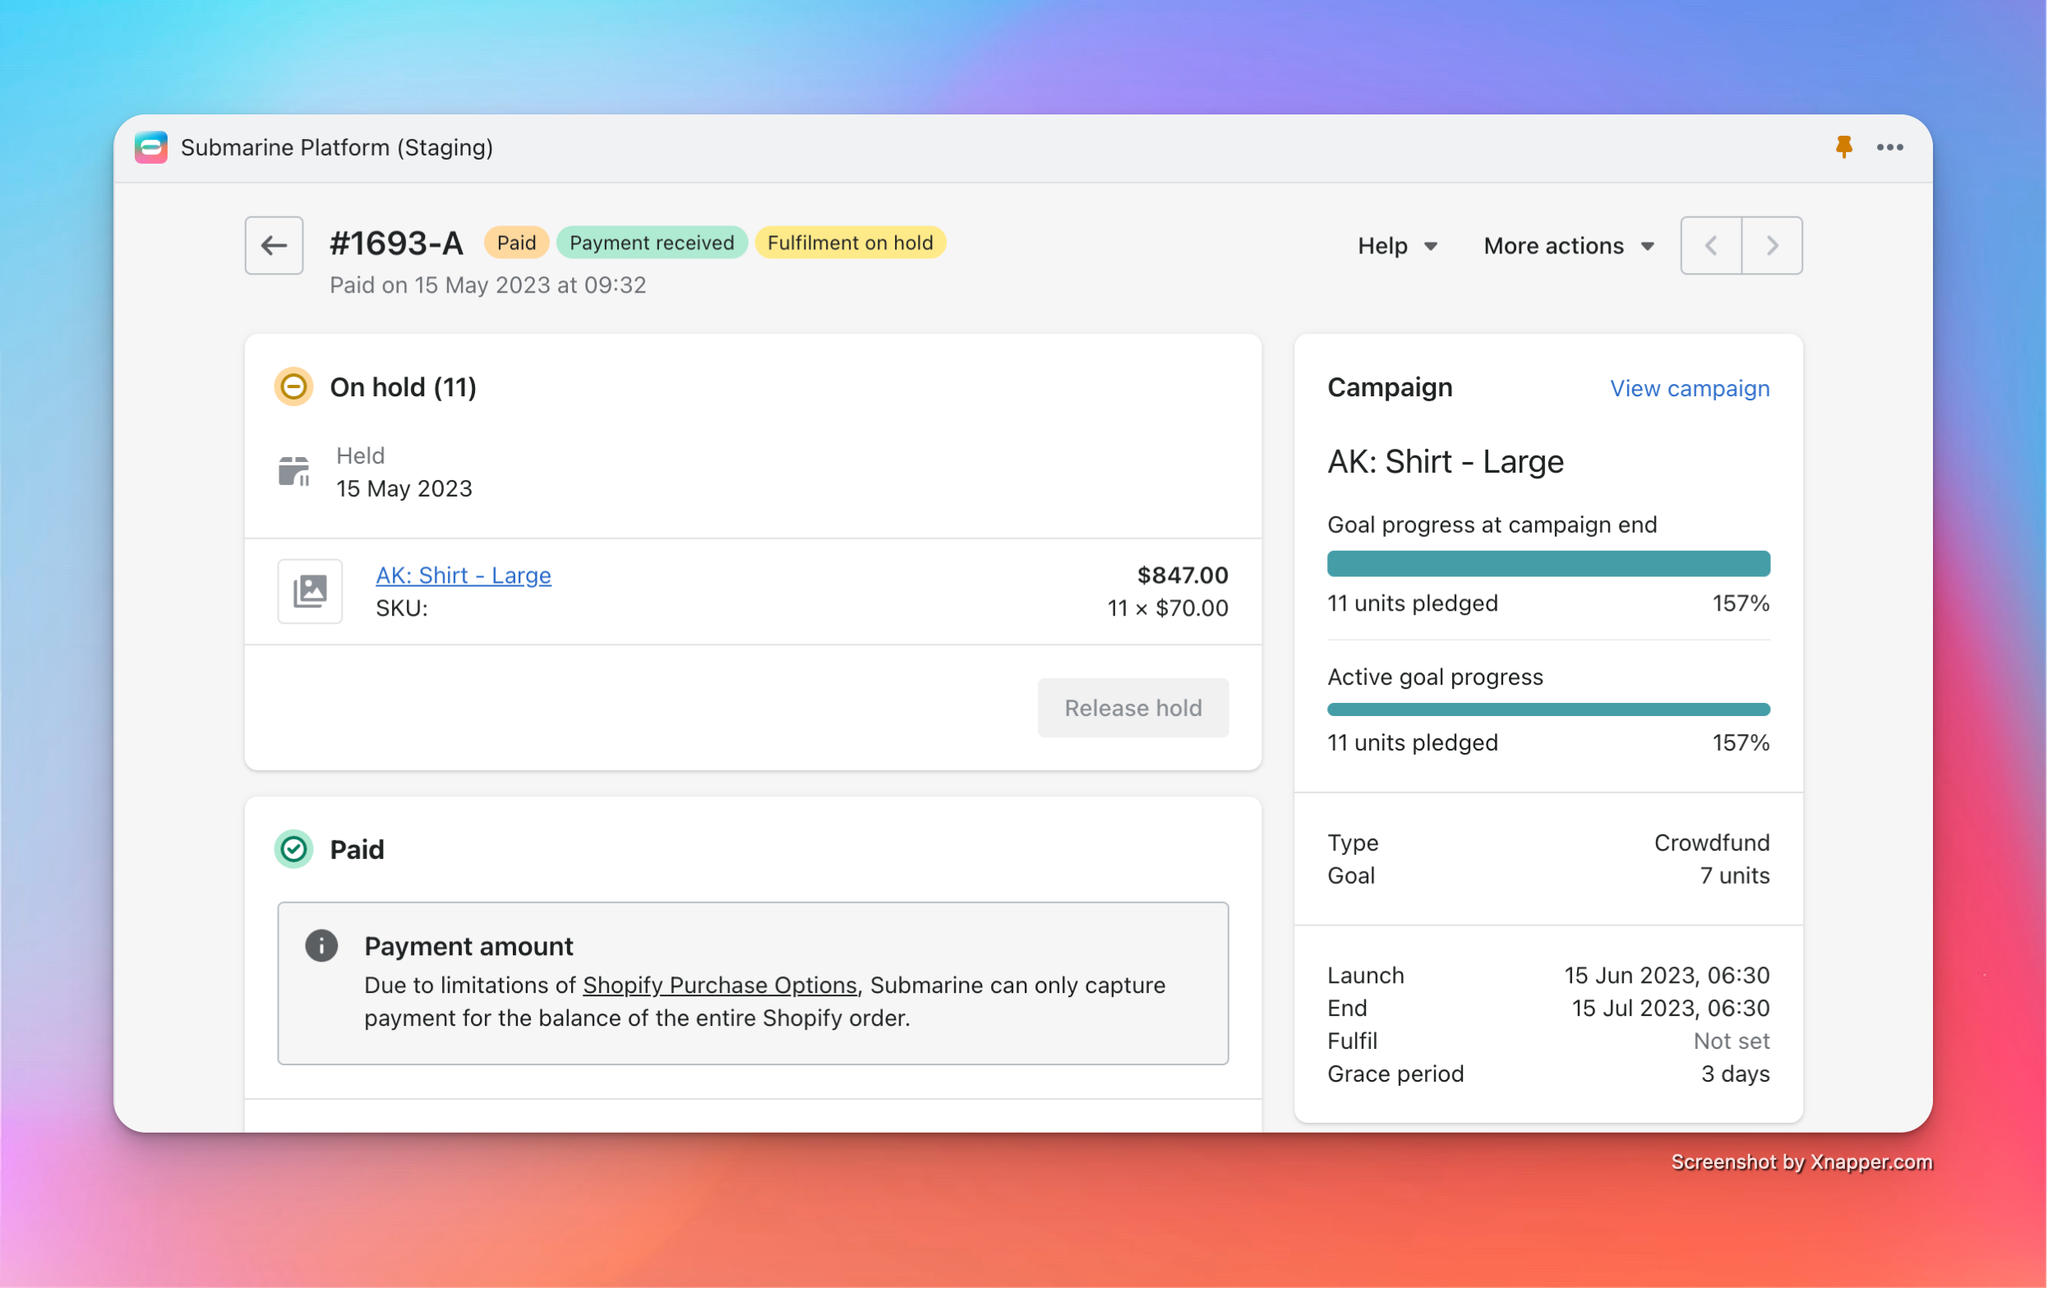
- The most obvious change is that we now have a campaign order in the list at the bottom of the page. It details the campaign item, the customer and the Shopify order, and we can easily see the three statuses: the campaign order is in a pending state, the payment is pending and the fulfilment is on hold.
- We can also see how that single order has affected the campaign’s goal progress. In the top-right corner, in the campaign summary card, the progress bar has been updated to reflect the fact that 1 out of our 50 goal has been reserved (representing 2%).

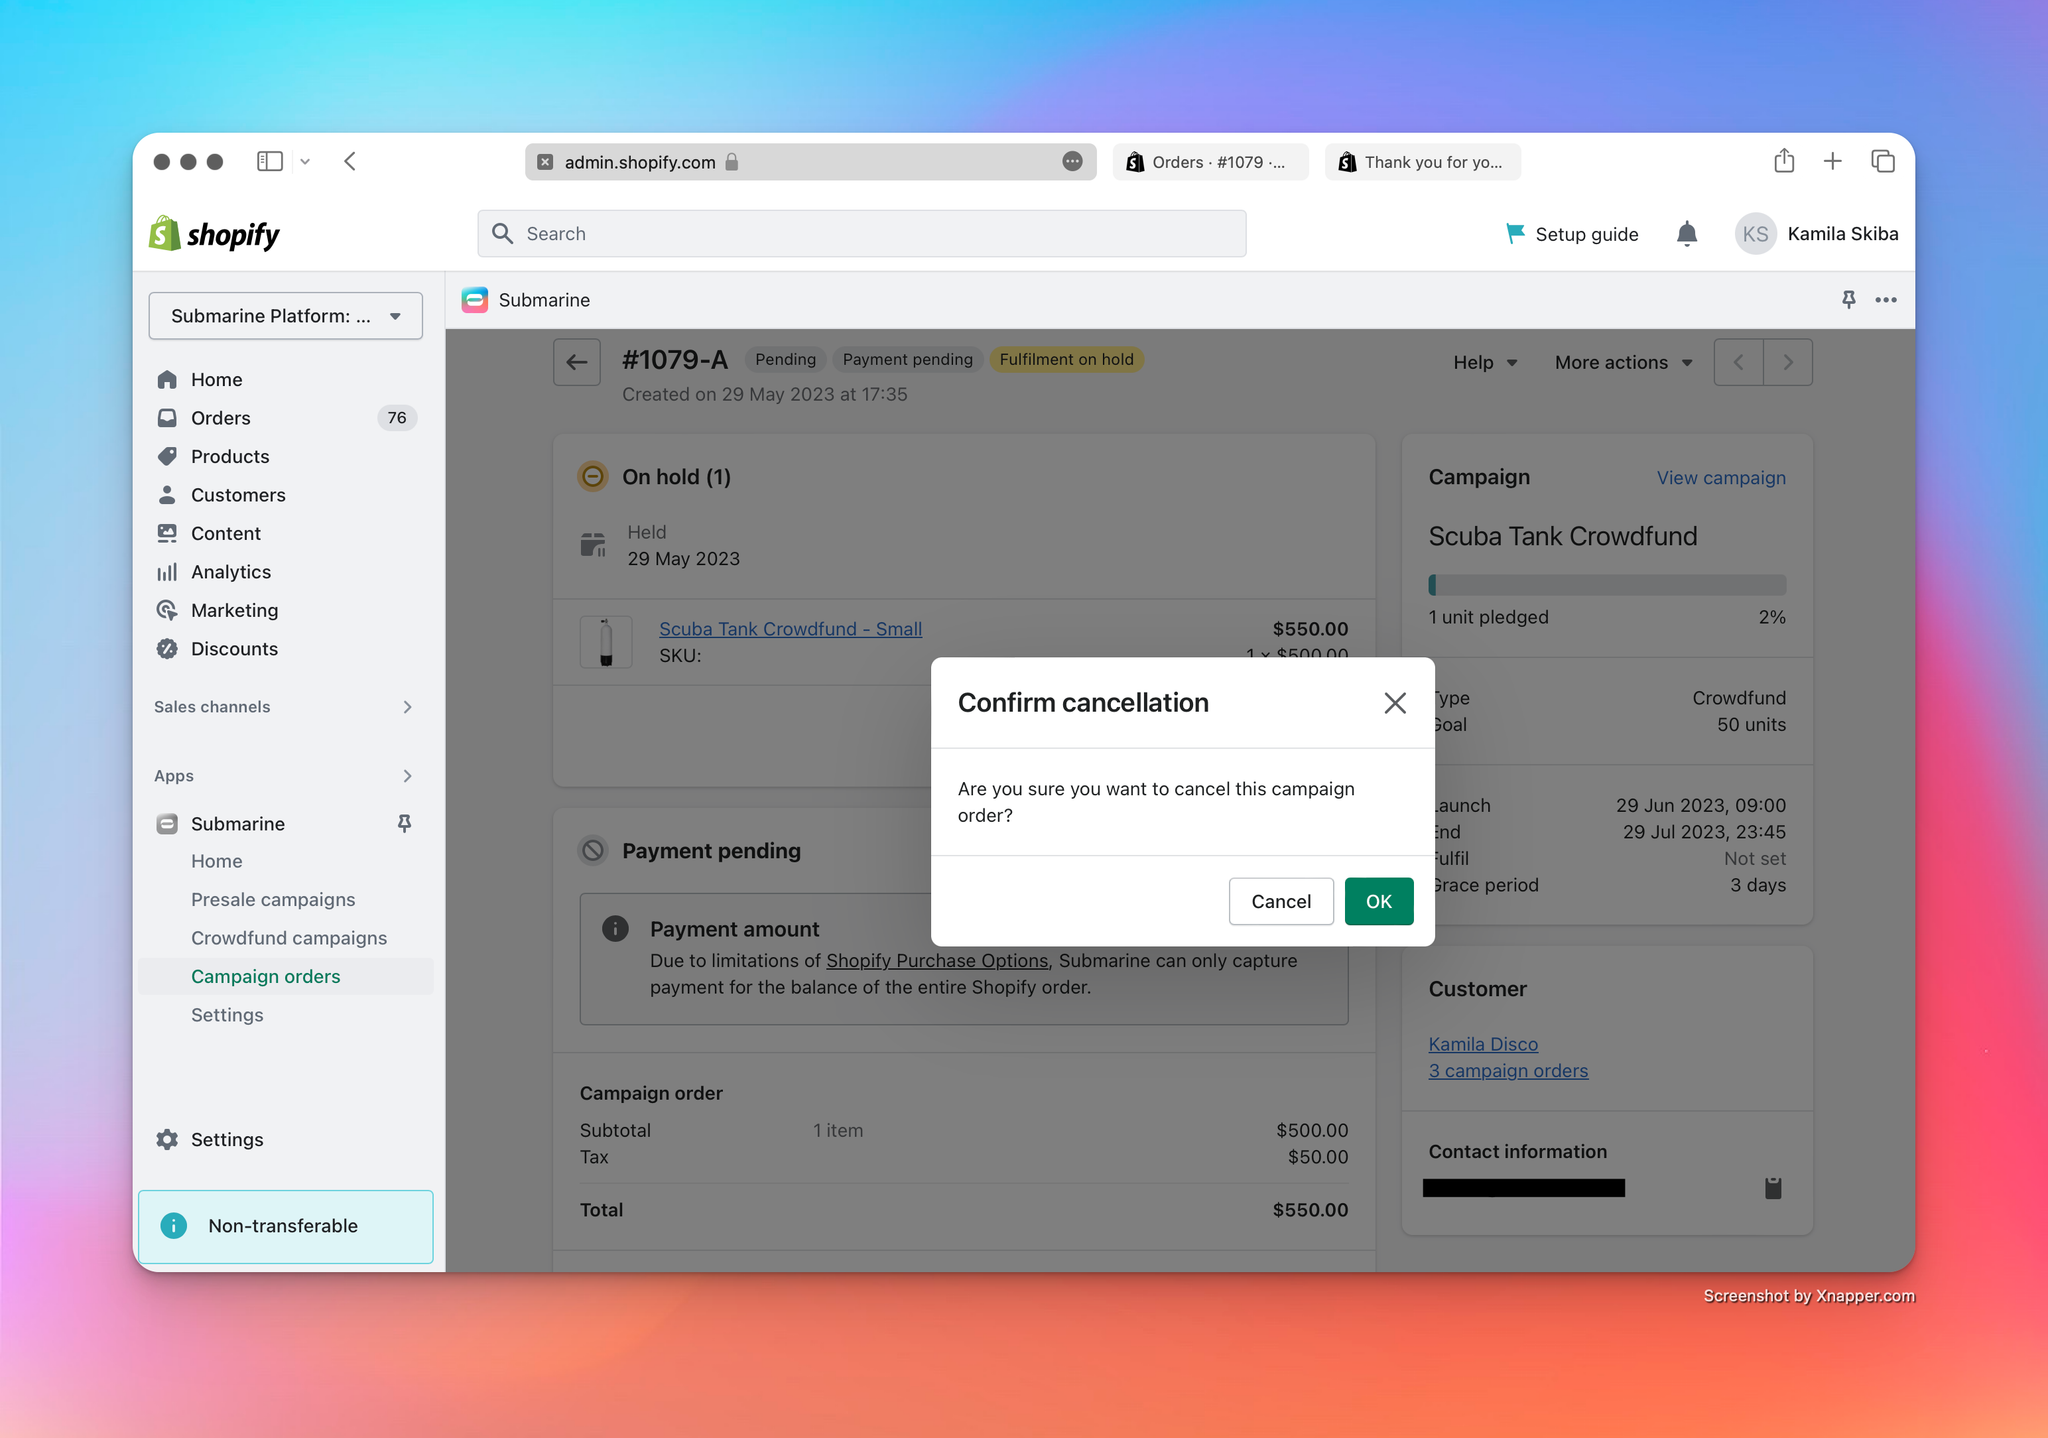
- Clicking the new campaign order, we get a more-detailed view.
- We can see the fulfilment status from Shopify mirrored here, with the fulfilment flagged as being placed on hold on 29 May.
- We can also see a breakdown of the payments — both the split between campaign order and Shopify order, an analysis of any deposits captured at checkout, and a list of any charges, refunds and adjustments that have been processed against the campaign order.
- From here, the merchant is also able to cancel the campaign order.

5. Ending your crowdfunding campaign
Goal
Manually end a crowdfunding campaign, to enable inventory application.
We’re nearing the end of a campaign’s lifecycle now. As with launch, we could wait until the campaign end date rolls around and have Submarine transition the crowdfund to the ended state automatically. Alternatively, we can accelerate that process and end the campaign manually.
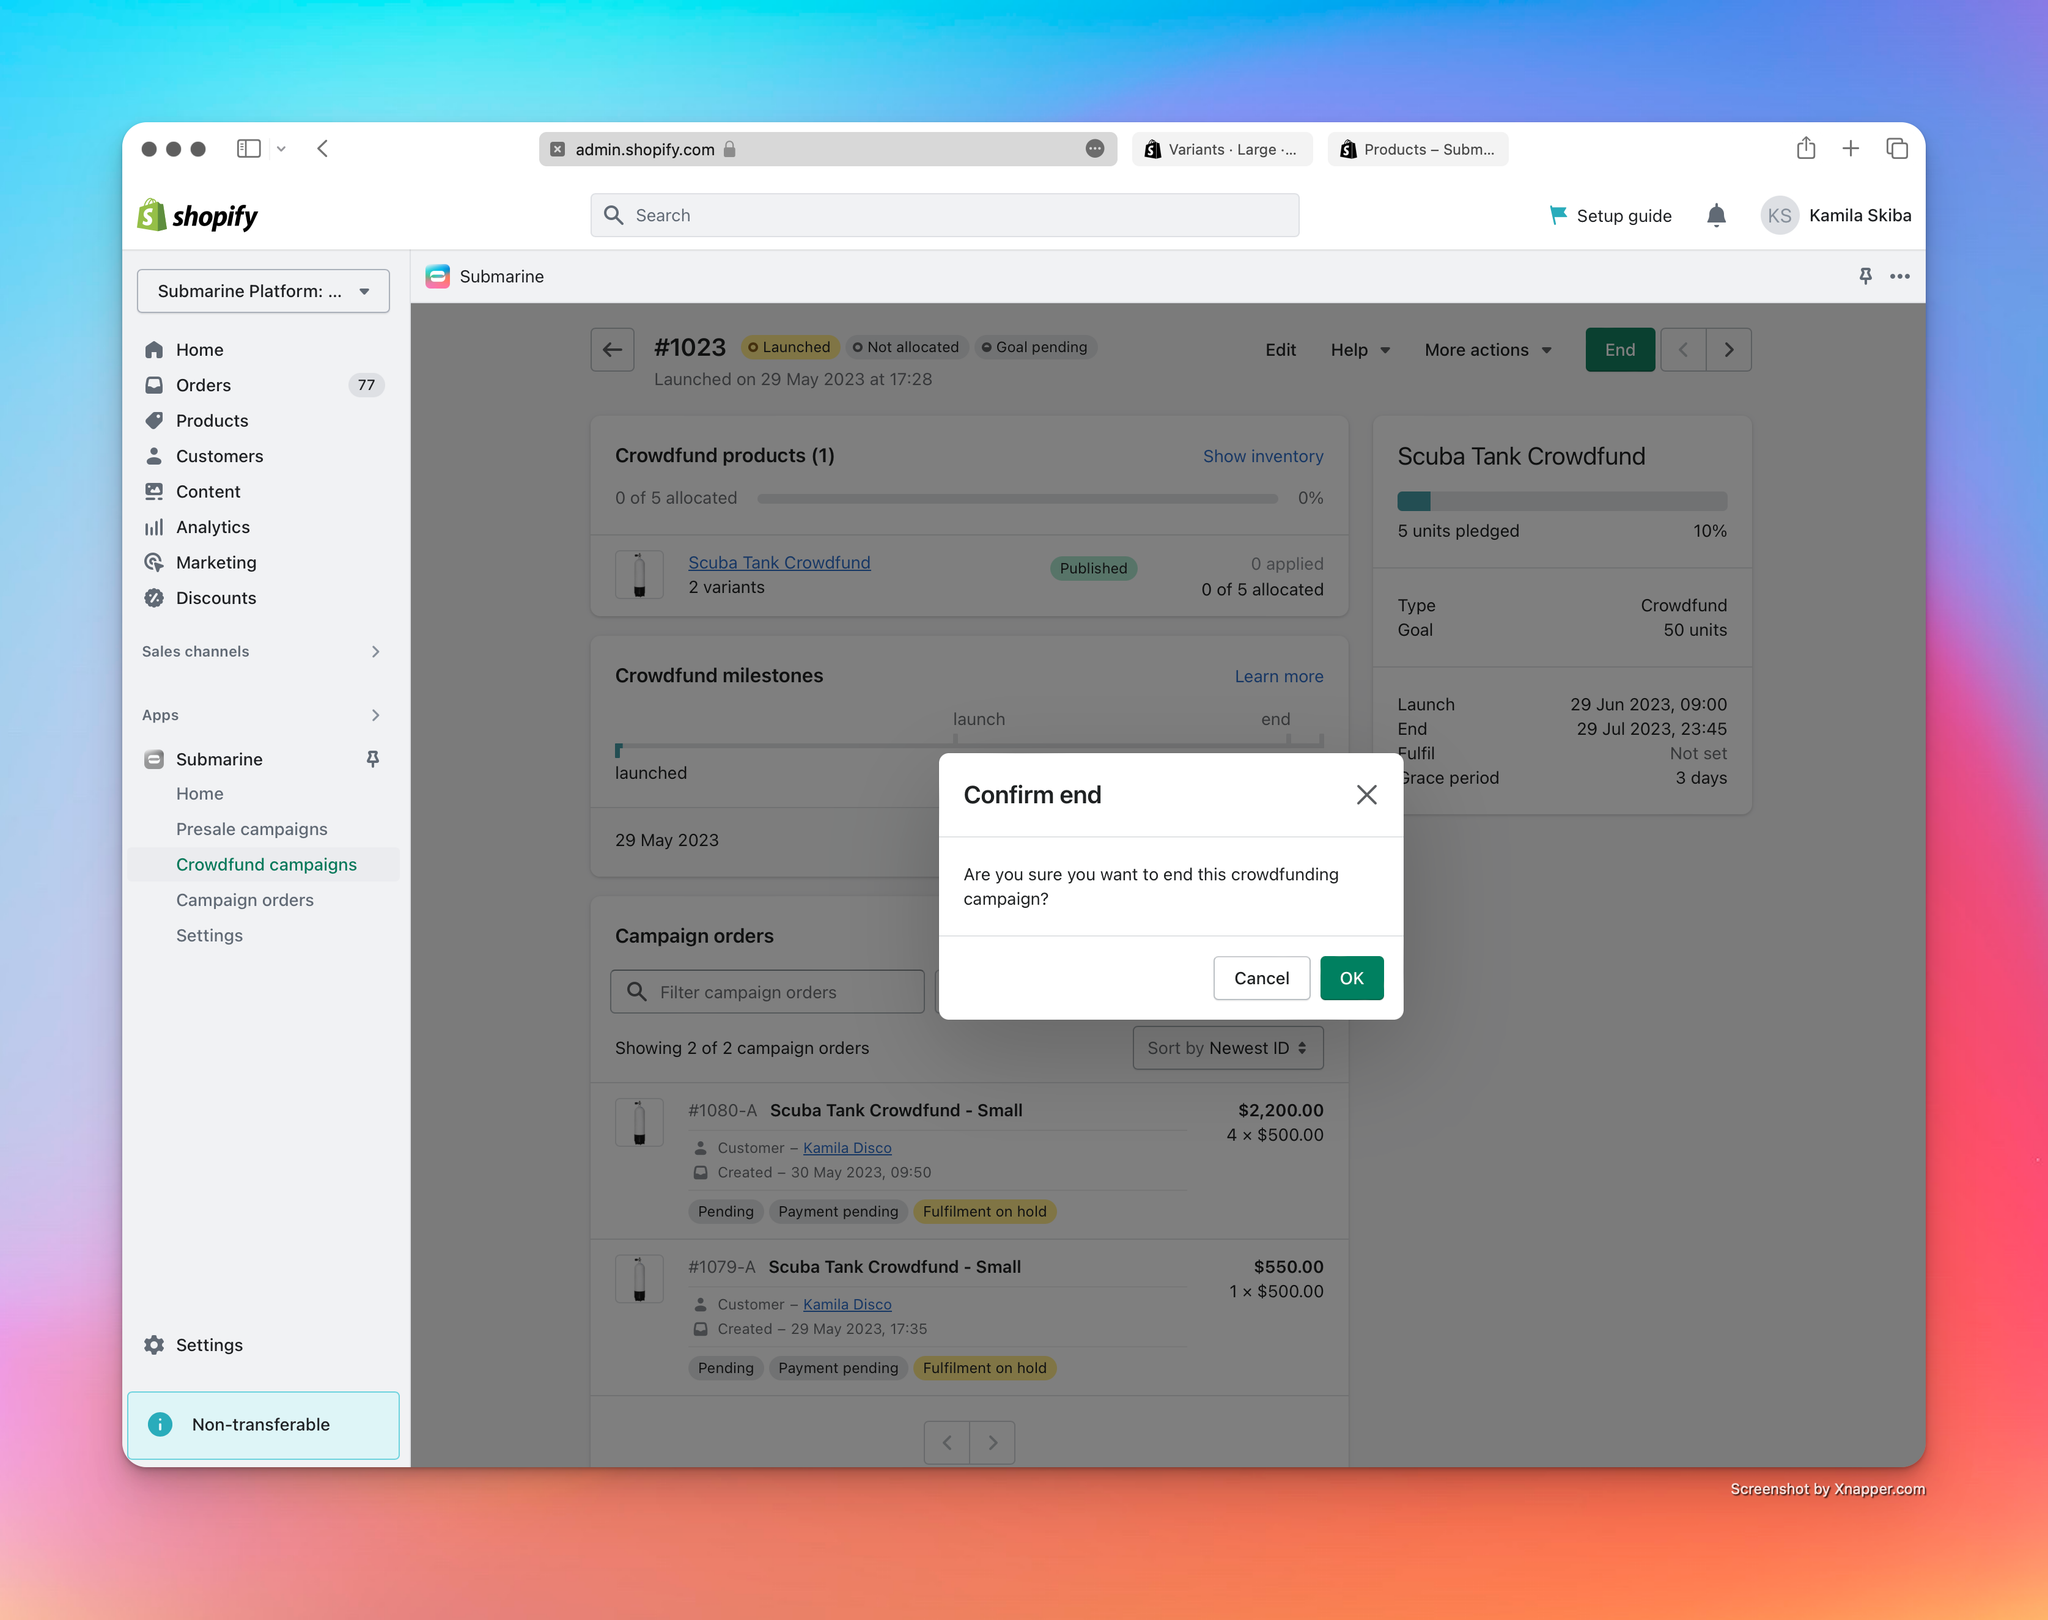
- Navigate to the crowdfunding campaign page in the Submarine UI.
A few more campaign orders have been placed since last time we saw it, but all we need is a single active one in order to end it prematurely.
- Click the “End” button in the top-right corder, and confirm the request.
- Confirm that the crowdfund is no longer available in the theme.
5.1 Ending a successfully crowdfund campaign
If your campaign has met the goal you set when you create the campaign you will see that all the Campaign orders within it will have their payments captured. The fulfilments will still remain on Hold until the inventory is allocated (See step 7)
- Confirm that the status of your campaign order status’ are: Paid, Payment Received and Fulfilment on Hold
- If the payment fails on the initial capture Submarine will wait the defined grace period before trying to capture again.
- If the capture continues to fail up until the grace period the Campaign order will be cancelled.
- You are able to attempt to manually capture the campaign order anytime between the first failed capture and the end of the grace period by using the Capture payment button in the Campaign order detail page.
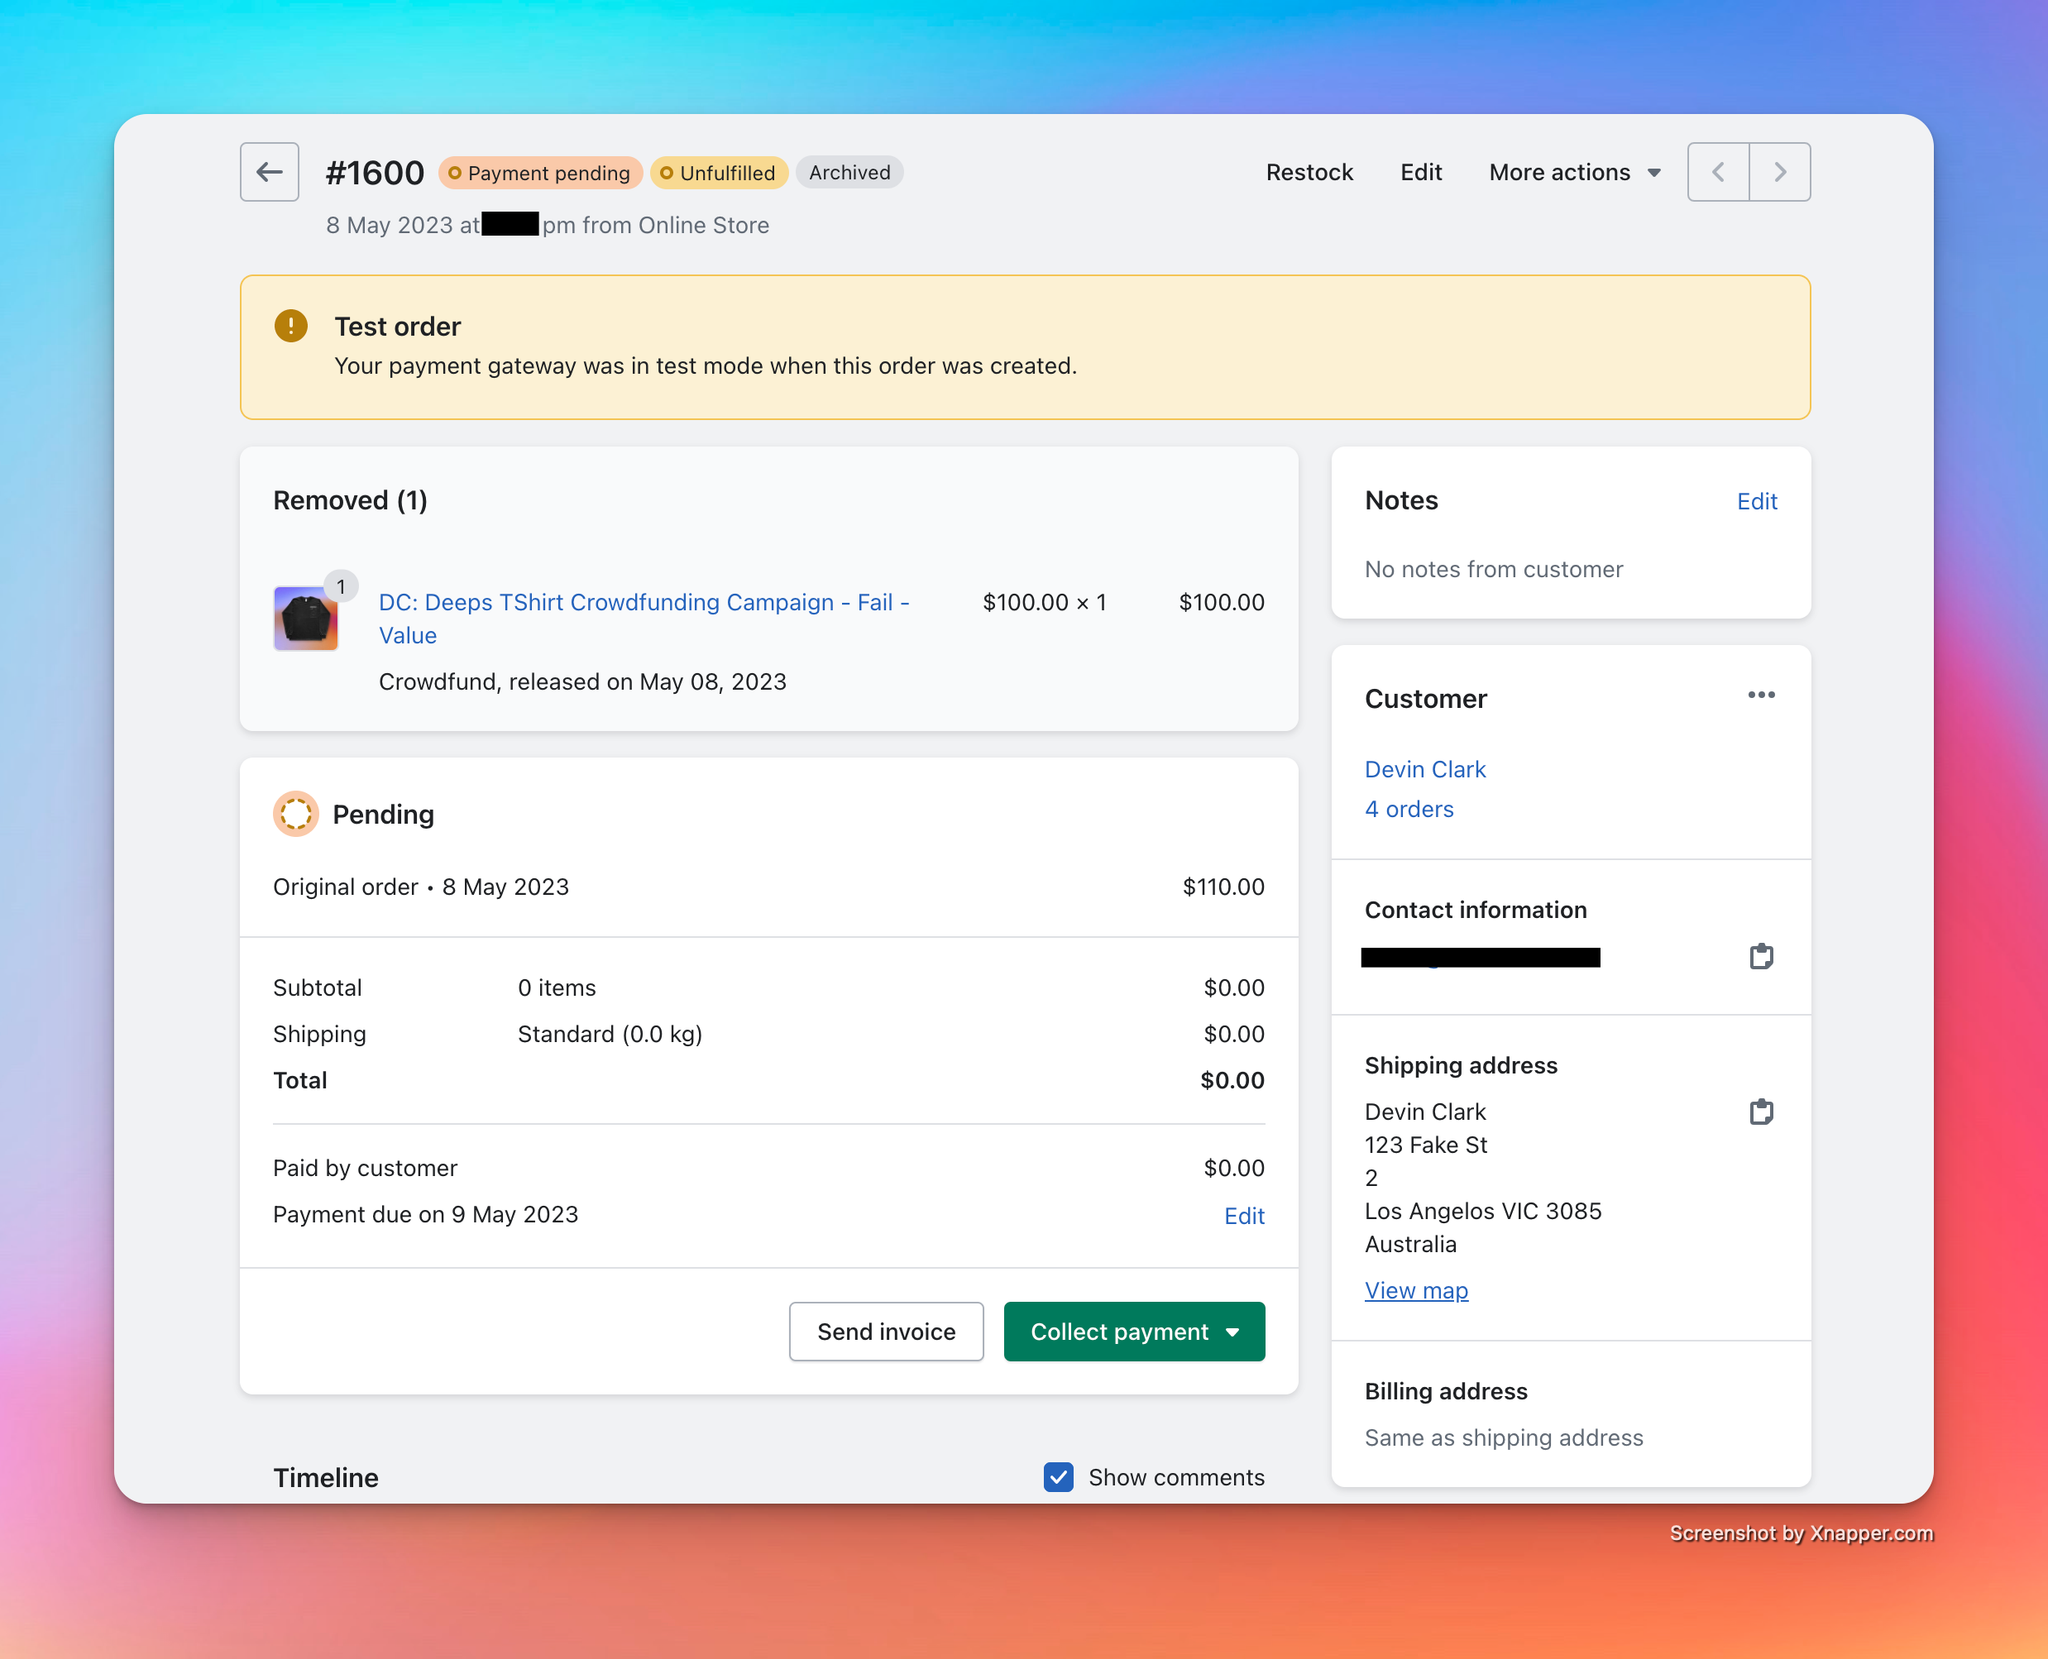
5.2 Ending a failed crowdfund campaign
If your campaign has not met the goal you set when you create the campaign you will see that all the Campaign orders within it will be cancelled.
- Confirm that the campaign order status’ are: Cancelled, Payment pending and Returned

- Confirm the line item in the Shopify order page has been removed from the order.
6. Applying inventory to your crowdfunding campaign
Goal
Apply inventory to your crowdfunding campaign, to begin take the fulfilments off hold.
Picking up from  Getting started with Crowdfunds above, we can progress to the last stage of the crowdfund lifecycle.
Getting started with Crowdfunds above, we can progress to the last stage of the crowdfund lifecycle.- With the crowdfunding campaign in an ended state and has Succeeded the goal, we are now able to apply inventory to the campaign items. Hover over each one, and you’ll be presented with an “Apply inventory” button.
- Clicking it opens up the “Apply inventory” modal.
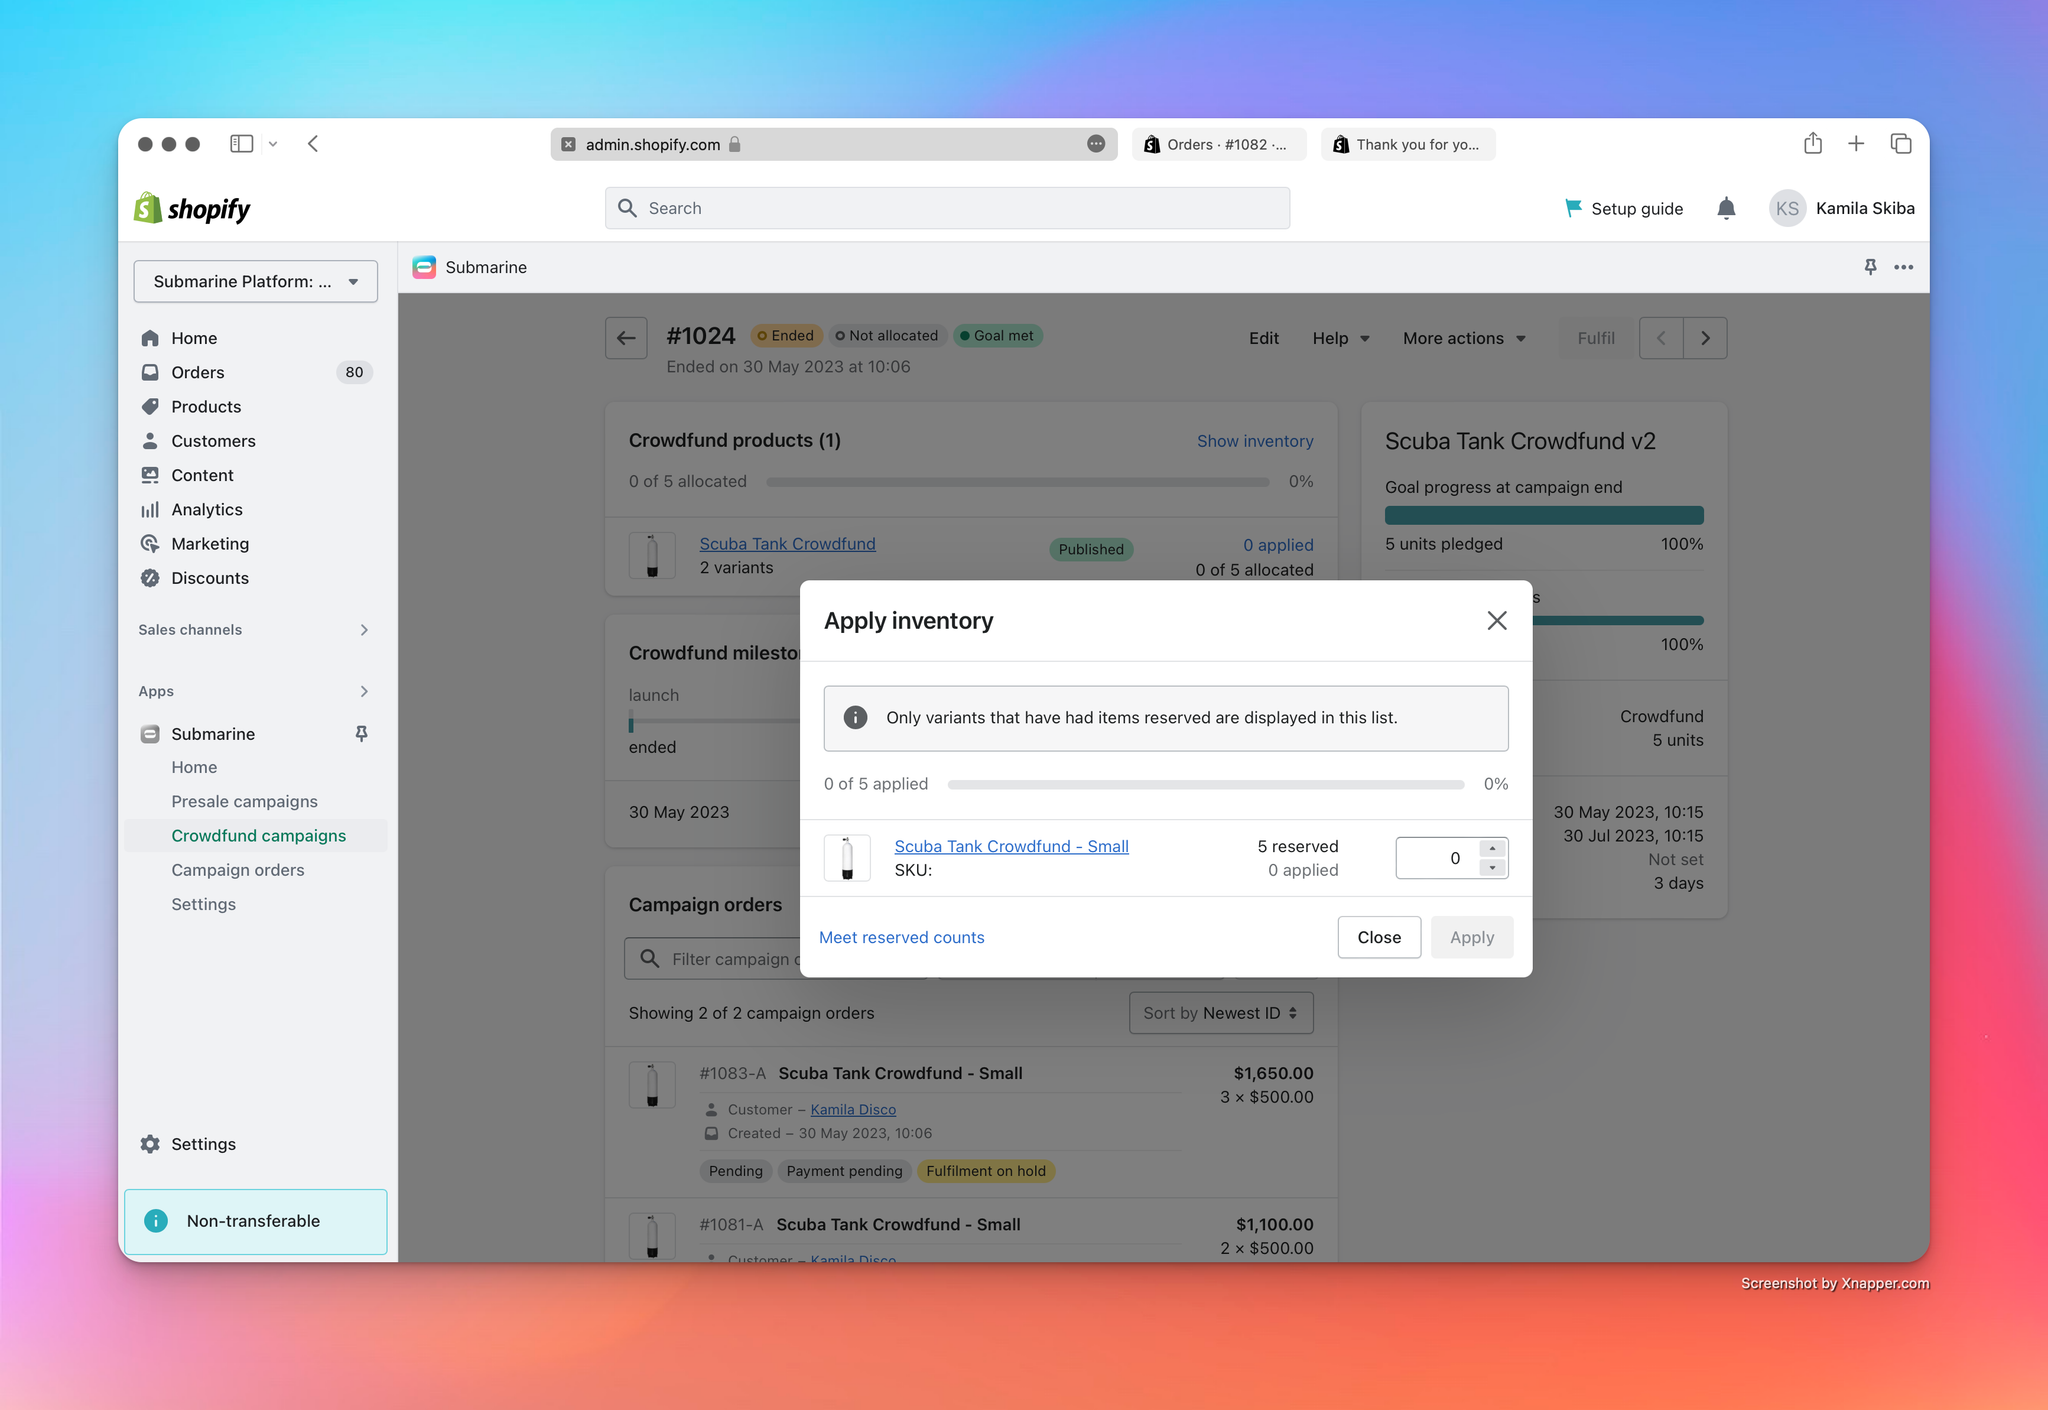
We can apply any amount of inventory to the items, but clicking “Meet reserved counts” applies just enough to cover the reserved count.
- Clicking “Apply” kicks off the allocation process.
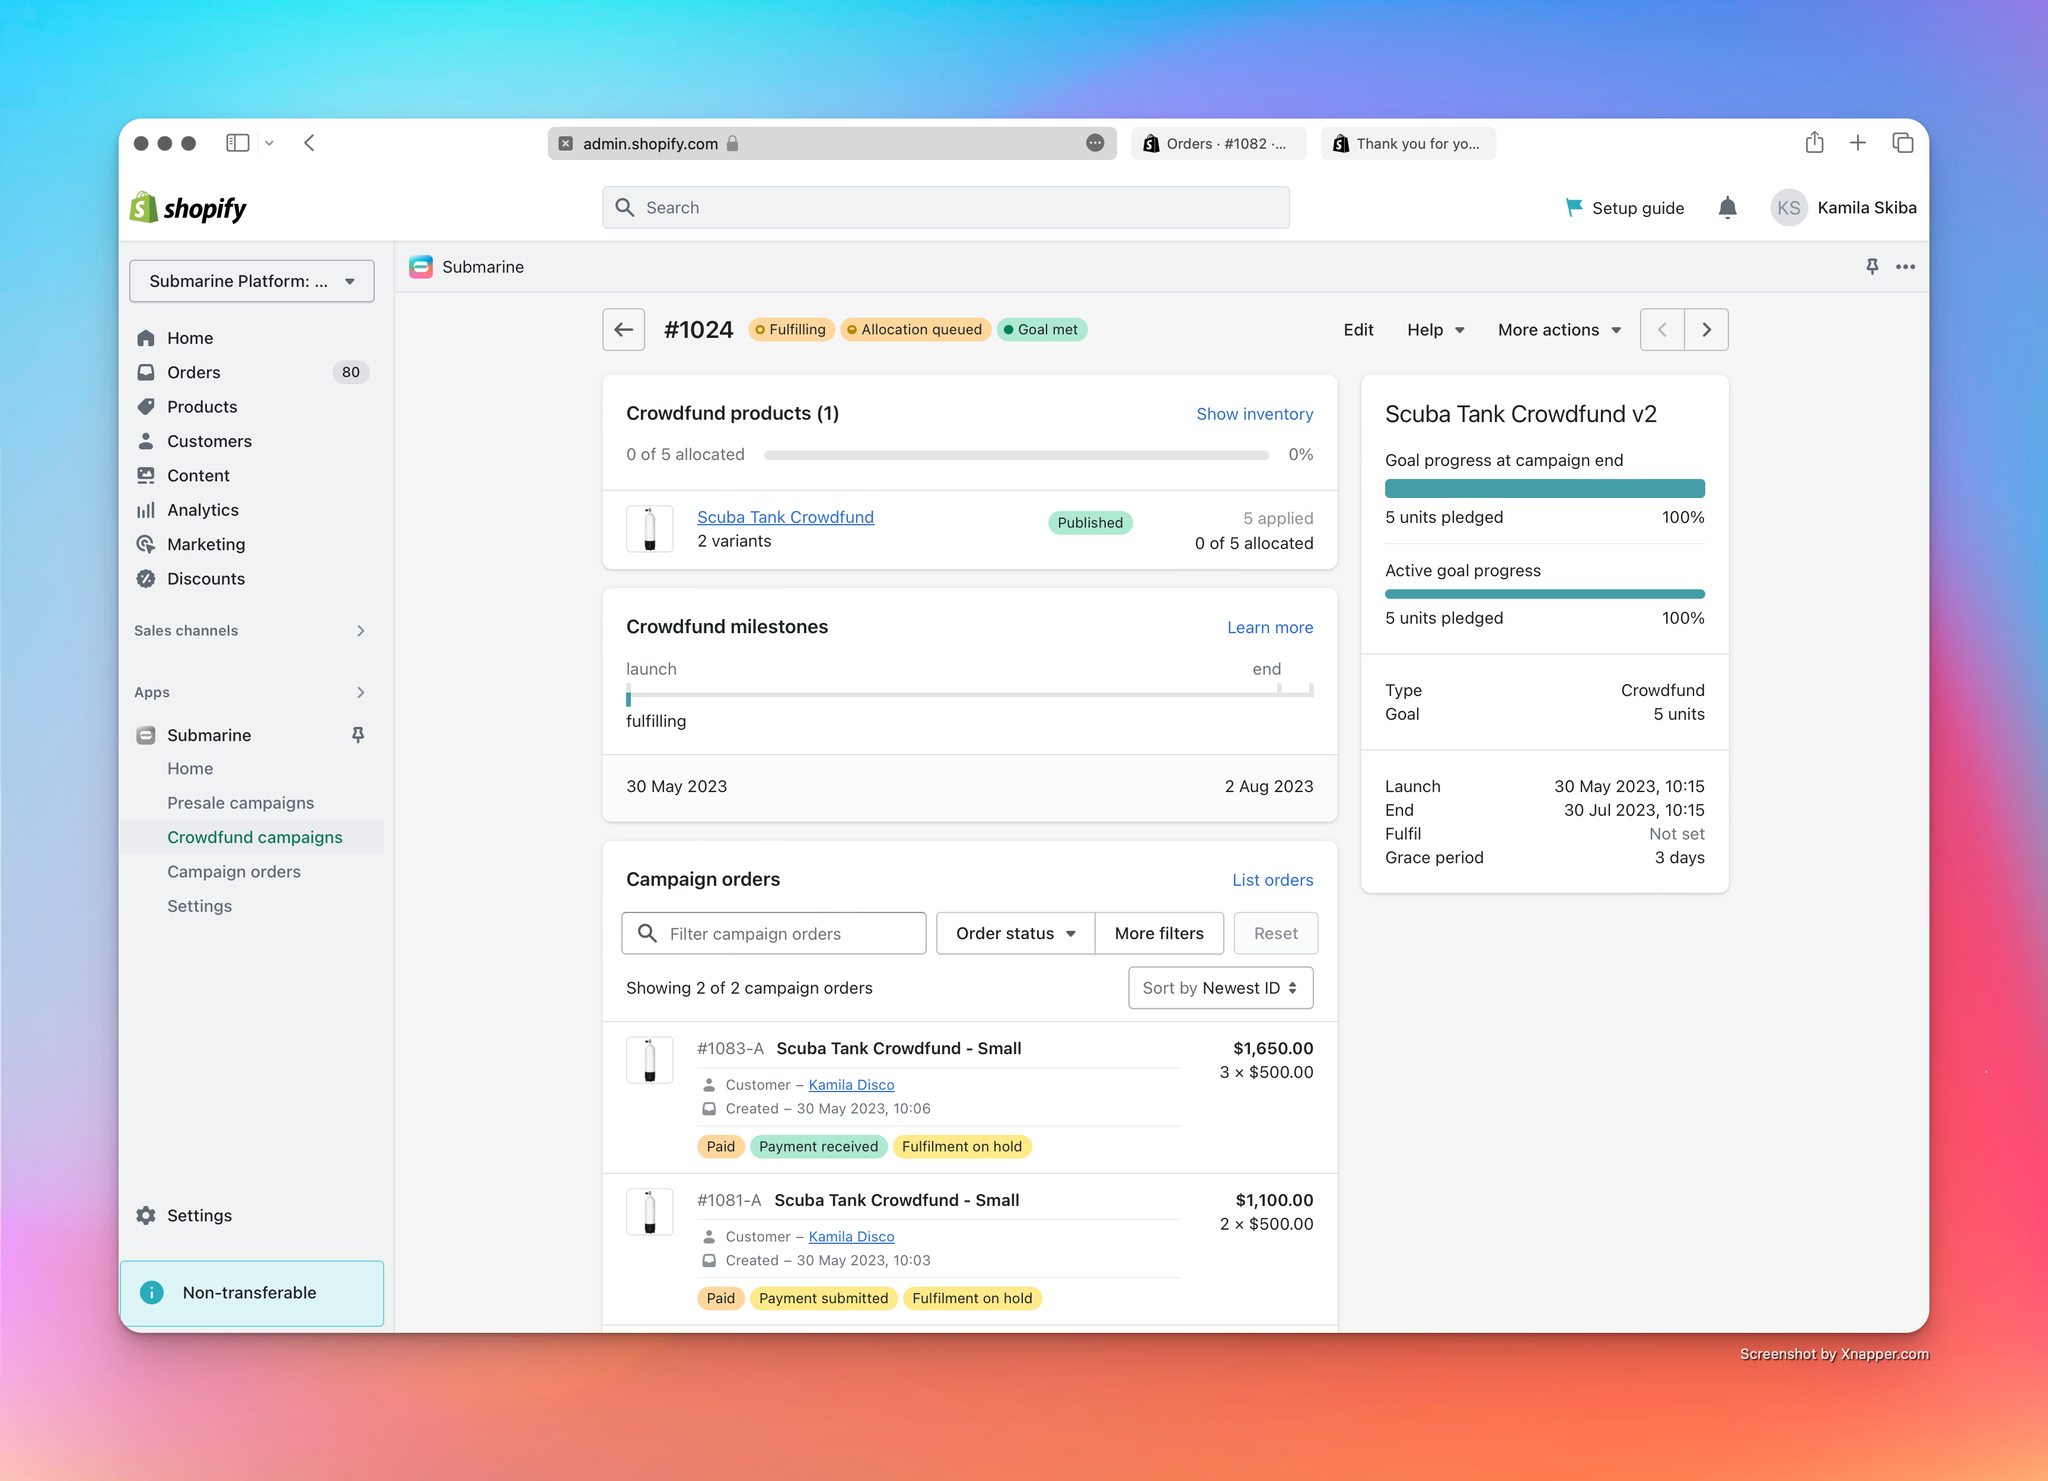
It runs in the background, so the crowdfund moves into short-lived “Fulfilling” and “Allocation queued” states.
- After a few minutes, the process has completed.
- The crowdfund statuses have transitioned to “Completed” and “Allocated”.
- The active campaign orders have all transitioned to “Completed”, “Payment received” and “Fulfilment open” states.
- The crowdfunding campaign is ready to be archived.

- Lastly, picking one of the Shopify orders as an example, once the campaign is completed we can see that it is updated to have;
- The order marked as paid.
- The hold on the fulfilment has been released, this can now be picked up by your Fulfilment workflow to ship out.